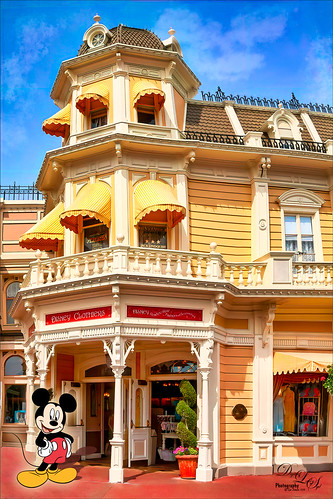
Mickey Shopping on Main Street USA

Had some fun working on this image. This image is of a shop on Main Street USA, Magic Kingdom in Orlando, Florida (click on link to see more info and other interesting buildings). I really love the color yellow so this shop always catches my attention. There was a lot of manipulation done to get rid of the people in front of parts of the image, straightening the building, and adding the Mickey Mouse cloud. Note that the top floors are not as high as the bottom floor – Disney does that on all the buildings to make them look bigger than they are. Just a few Basic panel changes done in LR before going into PS. Next the people were removed in front using the new Content Aware-Fill command and little more clean up. Next the Adaptive Wide Angle filter was used to straighten up the columns and the image was cropped (see my How to Use the Adaptive Wide Angle Filter blog). Next on a Composite layer (CTRL+ALT+SHIFT+E) , Topaz (see sidebar for website link) Studio’s AI Clear Adjustment and HSL Color Tuning Adjustment were used. Back in PS on a New Layer on top, Grut’s FX Cloud Kernel Hi brush (these Cloud Brushes are the best around) was used to paint in the Mickey Mouse cloud face. Then Grut’s Cloud Lumens Hi and Sparco HI brushes were used on other sky areas. Another composite layer was created and taken into Skylum’s Luminar 2018 (see sidebar for website link). This used their wonderful new AI Sky Enhancer which really popped the sky. (Settings: On bottom layer used Accent AI Filter Boost 67; AI Sky Enhancer Amount 38; Tone: Exposure 0, Contrast 4, Smart Tone 66, Highlights 31, Shadows -6, Whites 92, and Blacks -80; and Golden Hour Amount 17 and Sat -62. On top layer used my SJ Matt Look preset – Sun Rays which contains Matt Look (Amount 47, Fade 20, Contrast 20, Vividness -44, Toning 7, Hue 256, and Sat 46; and Sunrays – placed the sun down halfway on right side of house (X104/&55) with center off the side of the image, and the rest of the settings: Amount 30, Look 31, Number 23, Length 65, Warmth 67, Radius 63, Glow Radius 69, Glow Amount 66, Warmth 72, Penetration 78, and Randomize 8.) The last step involved adding a Mickey Mouse vector object from Shutter Stock (noted that an .eps file from Illustrator can be opened in PS – to see it first, find file in Adobe Bridge and place into your image) and created shadow for him. I love the color and how sharp the image is!…..Digital Lady Syd


Leave a Reply
You must be logged in to post a comment.