
Fog Rolling In
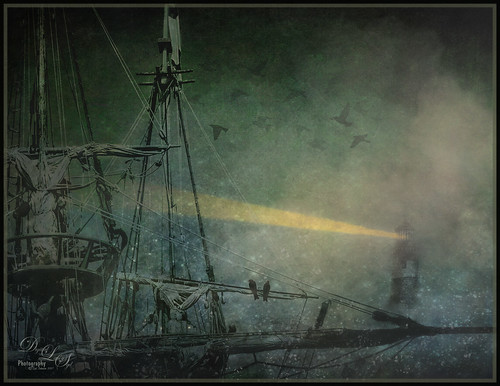
This image was created using several elements and textures – just a lot of fun to do! I have been sailing when the fog comes rolling in and I wanted that eerie feeling when it happens. The original boat element is one I took in London several years ago – it is an actual replica of the Golden Hinde – Sir Francis Drake’s galleon he sailed in 1578. In Lightroom the ship image had been converted to black and white before opening in PS. Next a New Document was created in PS and this image was loaded into it. The ship image was cropped and moved to the left side. Next Distressed Textures’s The Artist’s Palette Moody Earthtone texture was placed underneath at 25% opacity, and a Hue/Saturation Adjustment Layer was set above to make the texture less saturated and more of a blue-green tone. A Levels Adjustment Layer was clipped to the ship image (ALT+click between the layers). The lighthouse was added using some old clip-art from the Old Fashioned Nautical Illustrations book (#371). On a New Layer Obsidian Dawn’s Light Beam set Lighthouse Beam 1 was applied at 51% opacity. On another New Layer Lavender Designs Birds Nest Brush was applied – the two birds sitting on the sails. Jai Johnson’s Flybirds png2 was placed on another New Layer at 27% opacity – a layer mask was added and some of the birds were painted out. Then in the Properties Panel, the Density was set to 61% and Feather to 2.3 so the look like they are disappearing in the fog. Four Adjustment Layers were added: Hue/Sat for the yellow in the beam, Color Lookup Pastel 8 Hues set to 25% opacity, Levels to add contrast back, and another Color Lookup at 69% opacity using Blake Rudis’s preset Vintage Baby Blue. On another New Layer set to 26% opacity I used my old Cloud Text & Smoke Brush to add in more fog and haze. Using the Adobe Paper Texture Pro already supplied textures, 3 were stacked: Brush Rose set to Overlay at 67% opacity, Caspian set to Overlay 89%, and Touchtone set to Difference at 25% opacity. A Curves Adjustment Layer set to Luminosity blend mode and 61% opacity and was added to put contrast back into the image. Felt something was missing so I added 2 Lil’ Owls (see sidebar for website link) texture Cosmos 14 set to Multiply blend mode and 67% layer opacity – her star textures are some of my favorites! On a New Layer some of the spots from the texture below were painted out using my SJ Pastel 3 brush (see my How to Create My Favorite Brush blog). Topaz (see sidebar for website link) Lens Effects Fog filter was applied and set to the bottom right corner – in PS it was set to 66% layer opacity. Add a Red Channel Luminosity Curve. Then Nik Viveza 2 was opened and the final focal point was adjusted. I decided that I just did not like the way the fog looked, so with two brushes, Cloud Billoway and Cloud Heft from Gruts FX Cloud Set were both increased to a very large size and dabbed down to get the fog effect – then the layers were set to a very low layer opacity to give the dreamy fog effect. Clipping Hue/Saturation Adjustment Layers to each allowed for some color variation. In the last step I added one of my frame layer styles setting colors from the image. This turned out to be quite a project!…..Digital Lady Syd


Leave a Reply
You must be logged in to post a comment.