
Summertime!
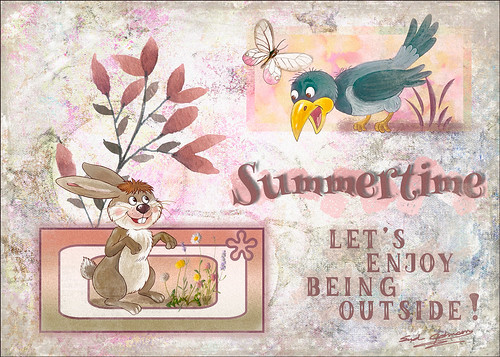
Just enjoying doing something a little different in Photoshop. I have not created a design effect in a long time. Can’t begin to thank all the people who have provided the large group of free resources that went into this image, but I will make an attempt. The first texture is one I created that is basically a bluish/gray painted effect. Then French Kiss’s (see sidebar for website link) Jubilant texture was placed on top for the colorful background effect and set to Linear Light at 76% layer opacity – a layer mask was used to remove part of the color in places that interfered with the text. Julia Mead’s Artistic Photo Overlays 8 was place on top and set to Hard Light – the Blur Tool was used to soften some of the black spots in texture. Next Lisa Glanz’s Magical Watercolor Graphics Vol 1 Sample Pink Bunch – this was duplicated twice to show up better and the top set to Multiply at 37% layer opacity. Two pink Vector blocks were created in Photoshop for both the characters to stand in. Layers styles were added to give the different edge effects. The bottom block also used a custom vector object from PS. Both the crow and hare are from the Cute Woodland Animals Bundle by Hasop. Both animals were paint to give a less graphic effect by painting over them using my SJ Pastel 3-painting Texture adder brush that I have talked about lots in my blogs. The Butterfly was from a Creative Live release called Aloha. The flowers in the hare box are called Clover 10 by Peolia. The Summertime font is Henny Penny and the other font is called LK Better Days.
Next step was to create a stamped layer (CTRL+ALT+SHIFT+E) to add noise (Tip 1 in my 10 Not So Well Known Photoshop Tips blog). Topaz (see sidebar for website link) ReStyle was opened and a preset from one of my other images was applied. What was done different is that the image was adjusted just for the animals and the Mask in ReStyle was used so that only the animals and reddish plant were affected. A frame from 2 Lil Owls Studio (see sidebar for website link) was created using a bonus texture and removing the white area – then saving as a PNG file. At the end a Blue Channel Luminosity Curves Adjustment Layer was applied. It is fun to try out different elements in a document just to see what you can get……Digital Lady Syd


Leave a Reply
You must be logged in to post a comment.