
Sunset at Viera Wetlands
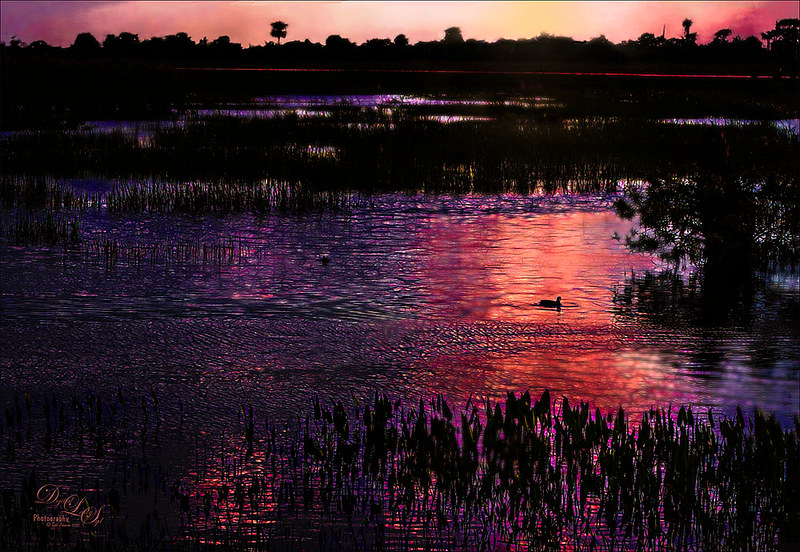
This image was not near as interesting in its Raw version. Had to add some filters and was pleasantly surprised at what a pretty sunset effect could be achieved. In Lightroom Seim’s (see sidebar for website link) PowerWorkflow Super HDR X preset was applied. Once opened in Photoshop Topaz (see sidebar for website link) Clarity’s Color and Contrast Boost II was applied. I like to use Clarity when dealing with nature scenes – sometimes it gives better results than Detail. On a duplicated layer, Topaz Glow filter was added – used my SJ Mysterious II Water preset and set the layer to Hard Light blend mode – this is how I got all the beautiful colors in the image. (Here are the preset settings if you are interested: Primary Glow: Glow Type Dark, Glow Strength 0.30, Effect Sharpness 0.63, Electrify 0.14, Simplify Details 0.17, Edge Color 0.28, Detail Strength -0.06, Detail Size 0.20, Brightness -0.56, Contrast 0.44, Saturation 0.00, Line Rotation 0.00, and Glow Spread 0.00; Secondary Glow: Glow Type Light, Glow Strength 0.00, Effect Sharpness 0.22, Electrify 0.03, Simplify Details 0.00, Brightness 0.45, and Contrast 0.64; Color Overall – all set to 0; Red RedSat 0.34; Orange Sat 0.33; Yellow Sat 0.03 and Lightness -0.29; Blue Sat 0.42 and Lightness -0.43; and Magenta Sat 0.75 and Lightness -0.35.) A clean up layer was created and layer to add some yellow sun glow. On a stamped version (CTRL+ALT+SHIFT+E) placed on top, Photoshop’s Iris Blur filter was centered around the duck with the blur set to only 2 pixels. A black layer mask was added so just a few areas that I wanted softened could be back with a white brush. That is basically how this image was post-processed, and the Glow filter made it into something quite nice!…..Digital Lady Syd


Leave a Reply
You must be logged in to post a comment.