
Using Topaz Glow to Add Color

Thought I would do a quick before and after on an image that Topaz (see sidebar for website link) Glow was applied to. Below is the original as I first processed it as an HDR image with a very wide angle lines.
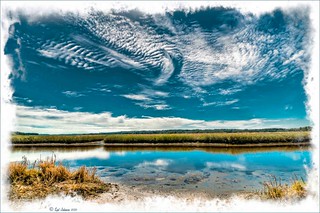
I like both renditions – they are just very different. You can see what mainly the color sliders can do to an image in Glow. Essentially that is all I did with this image. I did do a little painting on a New Layer on top just to make it look like I wanted it to look – used my Chalk 60 brush (with Angle set to 19%). (Here are the Glow settings if you would like them – TG-SJ Secondary Webbing preset are Primary Glow: Glow Type Light, Glow Strength 0.00, Effect Sharpness 0.00, Detail Strength 0.87, Detail Size 0.20, Brightness 0.03, Contrast 0.47, and Saturation 0.96; Secondary Glow: Glow Type Light, Glow Strength 0.56, Effect Sharpness 0.46, Electrify 0.00, Simplify Details 0.02, Brightness -0.13, Contrast 0.24, Line Rotation Rotation 0.00, and Glow Spread 0.26; Color: Yellow Saturation 0.20 and Yellow Lightness 0.34; and Finishing Touches: Effect Coverage 1.00, Coverage Transition 1.00, and the rest 0.00. Note you need to change this to Soft Light before the settings make any sense. Then here are the settings used to change it to the above: Added Orange Sat 0.78; Green Sat 0.40 and Lightness -0.41; and Blue Hue 0.18, Sat -0.27, and Lightness 0.26; and changed Yellow Sat 1.00 and Lightness 0.88. In Photoshop the layer was set to Overlay blend mode.) I find this transformation rather amazing!…..Digital Lady Syd


Pingback: HOW TO GET THE SOFT GLOW IN TOPAZ GLOW | Digital Lady Syd's Fun Photoshop Blog