
Just Playing!
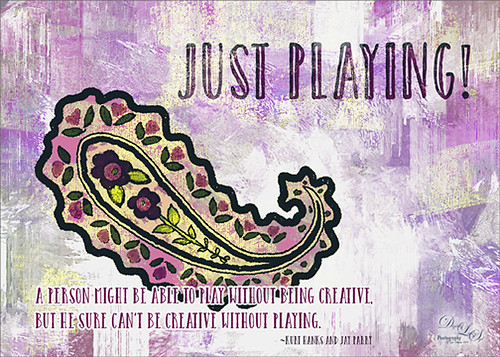
Just having some fun here. Did a wonderful tutorial by the great brush guru Obsidian Dawn called Multiple Colors (and Removing Transparency) with Photoshop Brushes Tutorial that explained how to colorize the brushes that she offers for free, I might add. I just sort of took the tutorial to a different level and ended up with this colorful final image. She included some very interesting info on selecting and adding the paint to the brushes so I would recommend checking it out if you like to use different types of brushes. I used Brush 19 in her Paisley Sketches Brush set. Since this required using several layers for the colors, they were put in a Group. Two textures, both by one of my very favorite texture sites, Painted Textures were used to finish up. Under the group the May Garden texture was applied and in the layer style, the Blend If This Layer black tab was split (ALT+click and drag on tab) and set to 189/196 and the split white tab set to 198/216. This gave the layer a lighter feel. A Hue/Saturation Adjustment Layer was added to give the texture more purple and pink colors. Added the Winter Storm texture set to Lighter Color blend mode and once again the layer style was opened and the Blend If Underlying Layer black tab was split and set to 84/139. Three Text layers were applied using the Catalina fonts that were bought in a Design Cuts package I bought recently. Love this font! The layer style for the longer lines of text once again used the Blend If Underlying Layers black tab split and set to 37/85. Also an Outer Glow was applied by setting the Opacity to Blend Mode Normal, Opacity 100%, White color swatch, Spread 67% and Size 10 px. This way the letters stood out but you could still see the design a little bit behind the lettering. For the larger top lettering, the layer style was opened and Blend If Underlying Layer white tab split and set to 242/255 and an Inner Shadow set to Normal Blend Mode using a sampled color from the green in the paisley brush, Opacity 100%, Distance 21 px., and Size 18 px. Just experimented to get the right look. But you can see some of the beautiful texture coming through the lettering by using the Blend If sliders. The last step was to add a Curves Adjustment Layer to pop the contrast and color. This was so much fun!…..Digital Lady Syd
Digital Lady Syd Related Blogs:
How to Use Those Handy Blend-If Sliders!
How to Get Blend If Slider Settings to Apply to a Layer


Leave a Reply
You must be logged in to post a comment.