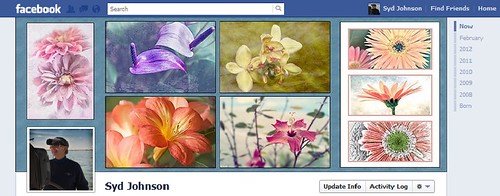
Free Timeline Cover Template for Seven of Your Images

It has come to my attention that Facebook is changing everyone over to using the Timeline feature for their profile page. Therefore I have created this free template you can use in the top portion of your profile page to show off your favorite images. The openings are set for a 4″ X 6″ size image. The resolution of the template is 72 ppi so you do not have to use a very high resolution of your image since they will be seen on low resolution monitors or phone/Ipad devices. This template can also be used as a blog header.

Steps to Add Photos for Photoshop/Elements Users: Download template here (scroll to bottom of page for download button) and open in Photoshop. Highlight each layer that says “PLACE IMAGE # HERE” and go to File -> Place. Navigate to your image and Place. You can now adjust the image to the opening since the image comes in as a Smart Object. If you Rasterize the layer (right click to choose Rasterize in Photoshop or Simplify in Elements) the layer to make file smaller, you can still adjust position of image later using a Free Transform (CTRL+T). Hold SHIFT key to constrain size of image. When finished, save your Photoshop Template file as a PSD file so you can update with different photos easily. Then do a File -> Save As and save the file as a jpg to be uploaded to Facebook using the steps below. It is easy to change the look of the template.
- The template is set to White but if you want the Facebook Blue color, just click the turned off top Facebook Blue layer eyeball and it will match Facebook.
- If you want to change the template color, pattern and stroke type, just double-click on the White Template layer to open up the Layer Style Blending Options for this layer. (For Elements Users, go to Layer -> Layer Style where you can adjust the Stroke and the Inner Glow – there is no Pattern Overlay style.) For the flower template example, Pattern Overlay was selected and Color Paper Pattern Blue Crepe from Photoshop’s canned patterns was chosen. (To load new patterns, click on the down arrow by the default pattern, and then open up the fly-out menu to load new pattern groups.)
- To just change the template color, go to Inner Glow Blending Option and change Blend Mode to Normal. Select the color you want and adjust the Size slider to fill the template – voila! New color!
- Select Stroke in Layer Styles to change the size and color of the stroke surrounding each image. The first example used Black set to Inside at a size of 2 pixels and White was used on the Facebook Blue example.
- To add a regular texture to the template, highlight the Template Layer and Place the texture (just like the images). Adjust to fit and then clip the texture layer to the Template Layer by going to Layer -> Create Clipping Mask so the openings for the images appear.
Steps to Load Cover to Profile Page: Go to Profile Page and hover cursor over the top area to the right of your image. The words “Change Cover” appear. Click on the words and select “Upload a Photo…” and navigate to the template image just created. The template will appear as the cover on the top without your image. Click Save Changes and your image will appear.
I hope you like using this template. Enjoy!…Digital Lady Syd


Leave a Reply
You must be logged in to post a comment.