
Pololu Valley
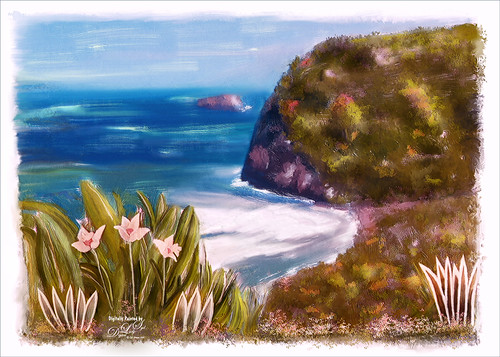
This image was taken a while back on the Big Island in Hawaii of Pololu Valley – I think this shot has been taken a zillion times! Absolutely beautiful place! Thought I would share some of what I am doing with my painting. Still using the Jack Davis Painting Action, this image was painted using all his provided layers and several New Layers with some of my own painting prowess added. I love Henri Rousseau‘s paintings, so I tried to copy some of his painting style in the foreground areas. It was a lot of fun, but took a long time since I am not too good at freehand painting. I figure this is the way you learn how to do it. Several adjustment layers were added on top to try and give an even feel to the image and it was topped off with some of Jack Davis’s gesso textures. If you are interested in painting in Photoshop, check out my More Jack Davis Painting! Fun Photoshop blog for additional info. Lots of fun learning!…..Digital Lady Syd
Riding the London Eye
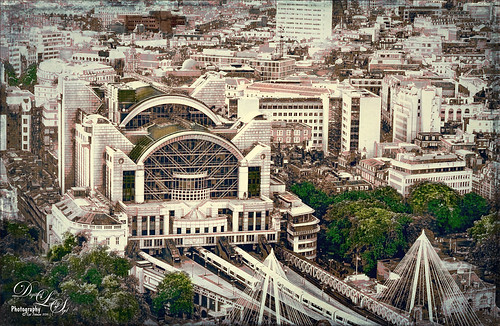
This image of a train station was taken from the London Eye. Topaz (see sidebar for website link) DeNoise 6 was used to get rid of the noise in the shadow areas. The now free Nik Silver Efex Pro 2 was used to convert image to a black and white. On a stamped layer above, Lucis Pro 6.0.0 (no longer available) was set to Enhance Detail 105 and Smooth Detail 95. This layer was set to a Difference blend mode, and the Blend If Underlying Layer white tab slider was used to bring back some of the white in the image. A Red to Gray Gradient Map Adjustment Layer was placed above at 47% layer opacity. On another stamped layer Topaz ReStyle was used to get the a good color balance. Last step was to add Topaz Texture Effects to get the vignette in the image. It was fun to see what stacking these filters would do!…..Digital Lady Syd
St. Trinity Church in Mir, Belarus
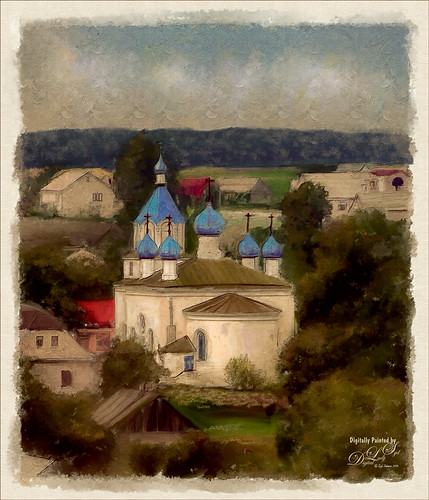
This is an image of the St. Trinity Church as taken from a window at Mir Castle in Belarus. The spire color is fabulous! This image was also painted using Jack Davis’s painting action as discussed in my More Jack Davis Painting! Fun Photoshop Blog last weekend. Very similar steps as the other two images in my original blog. This time I kept the sketch layer turned on and set to Multiply blend mode at 90% layer opacity. Topaz (see sidebar for website link) ReStyle’s Winter Hazel & Wood Bark preset was used to get the vintage effect. I am really starting to enjoy painting using this action…..Digital Lady Syd
The Rosebud
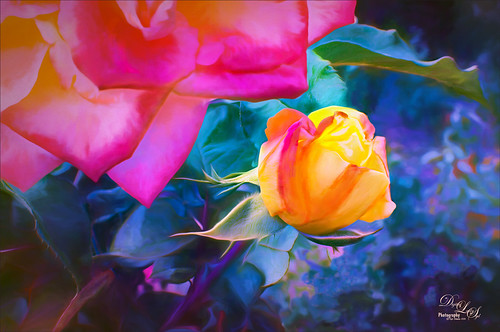
The image was taken at the Harry P. Leu Botanical Gardens in Orlando, Florida in the rose section. This is a beautiful place to photograph flowers – in this case the image was shot at F/22 with my Nikon 60 mm Macro Lens with a Bower 0.5 x High Resolution Digital Lens added to the lens. I know, odd settings but I was experimenting and loved the result. The key to getting this image effect was getting a very clear detailed shot. In Lightroom just basic changes were made and a little sharpening was applied to the bud with an Adjustment Brush set to Clarity 77 and Sharpen 83. Then in Photoshop Lucis Pro (no longer available) was set to Split Channel with Enhance sliders set to R157/G233/B59 and Green Smooth slider set to 25. On a stamped layer (CTRL+ALT+SHIFT+E) was placed above and Topaz (see sidebar for website link) Impression 2’s Georgia Okeefe II preset was applied. In a white layer mask some of the edges were painted out to keep them sharper. Next on another stamped layer Topaz Lens Effects Selective Vignette set to Olive Green preset with effect centered on the bud. Back in PS the layer opacity was set to 74%. Hope to be able to reproduce this result again!…..Digital Lady Syd
The Red Bromeliad
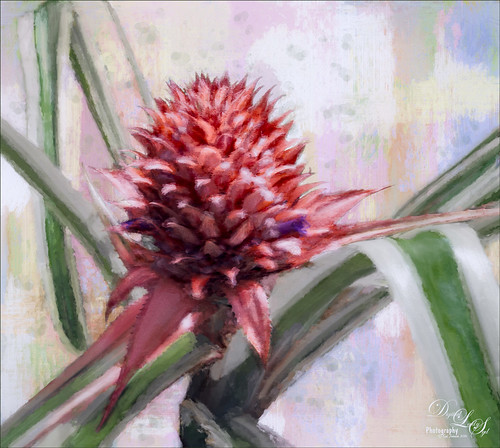
This is a red Bromeliad taken at the Harry P. Leu Gardens in Orlando, Florida. In Lightroom just basic adjustments were done on the RAW file. In Photoshop, the plant was selected using the Quick Selection Tool and then the Select and Mask Panel was used to clean up the selection. This is a wonderful addition to the latest version of CC. One of my Corel Painter textures was placed behind the the selection. Topaz (see sidebar for website link) Impression 2 was opened one of my Impressionistic textures was applied. A Brightness/Contrast and Curves Adjustment Layers were placed on top and the layer mask converted to black by CTRL+I inside the mask. Then just areas I wanted brightened or more contrast added into were painted back. On a New Layer above, a lot of painting using a regular brush to smooth out rough edges from the plug-in was used. Nik Viveza 2 was used to set the focal point in the flower and the last step was to add Topaz ReStyle to get a nice pleasing color palette. Love the final effect!…..Digital Lady Syd
Blowing in the Wind!
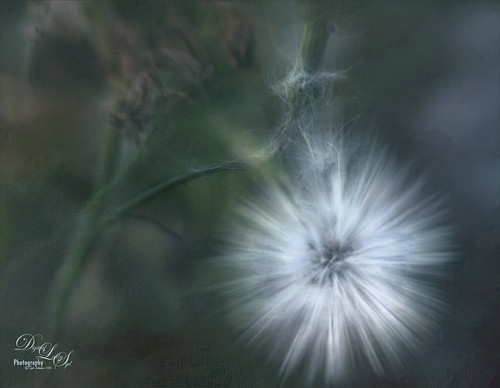
Had some fun with this little dandelion – it was taken using my Lensbaby Composer at F/4 using a Macro +4 Lens. In Lightroom just the regular basic adjustments. In Photoshop Nik Viveza 2 was used to lighten up the white strands in the flower. Then Lucis Pro 6.0.9 was applied using the Split Channels. Next Nik Color Efex Pro 4 was opened and 4 filters were added: Detail Extractor, Glamour Glow, Reflector Efex, and Darken/Lighten Center. Can you tell I was having a lot of fun with this one? Next Topaz (see sidebar for website link) Lens Effects was opened and the Motion filter Type Zoom was centered on the flower to straighten out the strands. In a black layer mask, just the strands were painted back. A Levels Adjustment Layer was used to lighten up the overall image. Next Topaz Texture Effects was used to apply one of my painted textures set to Blend mode Subtract in the plug-in. Back in PS, Melissa Gallo’s Trees in May texture was added and set to Linear Dodge blend mode and 40% layer opacity. That was it! It is so much fun just to play around with an image and I am sure this little dandelion did not care!…..Digital Lady Syd
Orchids Showing Off
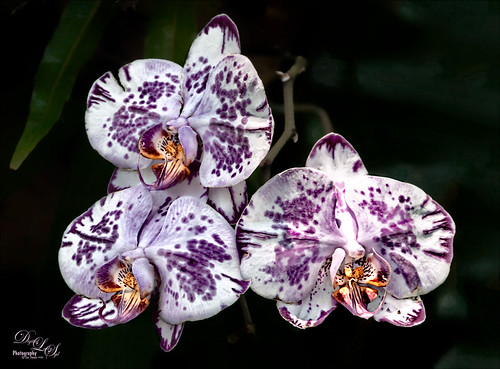
These little beauties were showing off at the Harry P. Leu Gardens in Orlando, Florida. Not much was done to them – just your basic adjustments in Lightroom. In Photoshop, Lucis Pro 6 (no longer available) was run twice – once to smooth the background by setting the Smooth Detail to 19, and once to sharpen the foreground adjusting the Detail settings in each channel (Red 109/Green 103/Blue 101) where the color dialed back to the original amount by setting the Assign Original Image Color at 20/80. Two Curves Adjustment Layers were used to darken certain areas and lighten in others to blend away some shadows. The now free Nik Viveza 2 was used to draw the focus to the center of the flowers. That was it. I really love these flowers!…..Digital Lady Syd
Firebush Plant Spinning Out of Control!
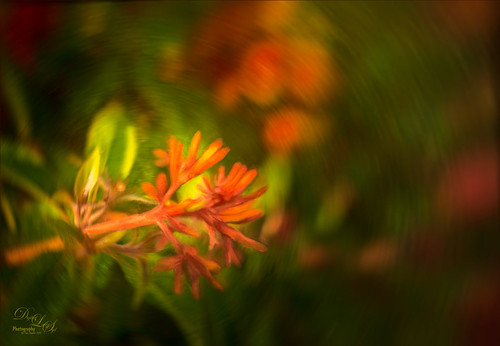
This bright orange-red Firebush Plant has taken over my front yard – I bought it a little over a year ago in the damaged good area for 75 cents. Wow! This image was taken with my older Lensbaby Composer at F/4 with a Macro +10 Lens attached. In Photoshop the image was duplicated and JixiPix Spectrel Art was applied using the Darken Detail preset – the layer was set to Screen blend mode at 48% layer opacity. On a New Layer Grut Brushes MI Swish Mini Mixer Brush was used to paint the plant and red floral areas. Jai Johnson‘s Soulful Sea Breeze texture was placed above and set to Color Dodge blend mode at 64% layer opacity. Then Melissa Gallo’s Mountain Range Texture (not sure her textures are available anymore) was applied above and set to Color Dodge at 34% layer opacity. A Hue/Saturation Adjustment Layer was clipped to this layer (CTRL+ALT between the layers) and the Saturation was set to 0 so no color comes through, just the painterly texture. On a stamped layer above (CTRL+ALT+SHIFT+E) Topaz (see sidebar for website link) Lens Effects Motion Blur filter centered on the flower. On another stamped layer, the now free Nik Viveza 2 was used to further emphasize the focal point. Have a great day!…..Digital Lady Syd
A Palace on Wheels
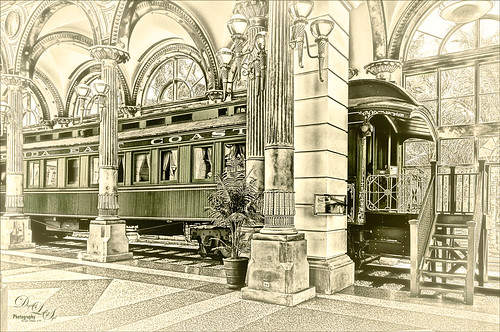
This image is of Henry Flagler’s Railcar No. 91 (see A History of Railcar for No. 91 for an interesting history lesson) or the so-called “Palace on Wheels” from the Guilded Age (CC 1912). It is available to walk through while visiting at the Flagler Museum in Palm Beach, Florida. This image was created using the exact same steps as in my recent Fun Photoshop Blog called How to Get a Great Illustrative Effect with Lucis Pro 6.0.9. First duplicated the background layer and opened up the free Nik Silver Efex Pro 2 using High Structure (Harsh) preset with a few changes for this image. This layer was duplicated and Lucis Pro was applied (Smooth 13/Enhance 97 and Mix with Original Image 81/19) and then duplicate this layer and open up Lucis Pro again with these settings (Split Channels Enhance Detail Red 159, Green 171, and Blue 177 with Smooth at 15). On top a Hue/Saturation Adjustment Layer was added and green color created (Hue 109, Saturation 11, and Lightness -41 with Colorize checked). The layer mask was turned black by CTRL+I in mask and a soft low opacity brush was used to paint back the green in the railcar and set to 44% layer opacity. Another Hue/Saturation Adjustment Layer was added (Hue 187, Saturation 8, and Lightness -7 with Colorize checked). The layer mask from below was copied (ALT+drag) and then invert the layer mask (CTRL+I in the mask). A stamped layer was created on top (CTRL+ALT+SHIFT+E) and Topaz (see sidebar for website link) Glow 2 Auto Shine preset was applied. A Gradient Map was added on the image using a cream to yellow gradient set to Color blend mode at 47% layer opacity. Last step involved another stamped layer and the also free Nik Viveza 2 was applied to adjust where the focal point is. That is it!…..Digital Lady Syd


