
Two Rough-Housing Grizzlies
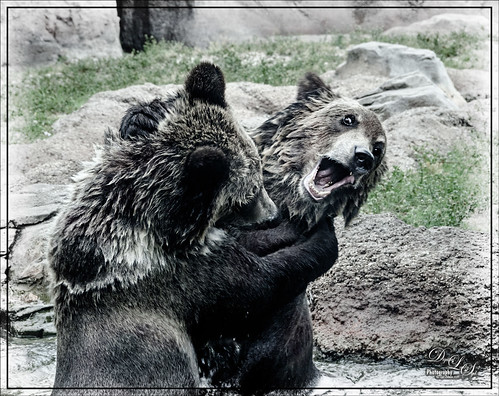
This image of what appears to be two Grizzlies going at each other in the Alaskan wilderness, but is actually just two bears playing in the water on a hot afternoon at the West Palm Beach Zoo, according to the Zookeepers. Definitely pretty exciting to watch though! In Lightroom Kim Klassen’s free Lightroom Sampler Dark 1 preset was applied and the eyes and teeth were sharpened with an Adjustment Brush. Opened image in Photoshop and Lucis Pro 6.0.9 was used to get that classic Lucis look (settings: Enhance Details Red Channel 161/Green 183/Blue 129 and Assign Original Image Color 0/100). (See my Digital Lady Syd Reviews Lucis Pro 6.0.9 (Now Affordable!) blog.) Did a little dodging and burning on eyes and teeth. Used a Black and White Adjustment Layer to fine-tune the focal point. Added the border using Smart Photo Editor‘s Brighten Border by Tony. (See my Digital Lady Syd Reviews Smart Photo Editor Photoshop Plug-In blog.) Then decided it had a little too much cyan in the fur so used a Color Balance Adjustment Layer to add a little dab of red to the Midtones and Shadows. Enjoyed how this image turned out – rather natural looking and just like I remember it. These bears were not making any loud noises, really just having fun!……Digital Lady Syd
The Sculpture Called Reaching
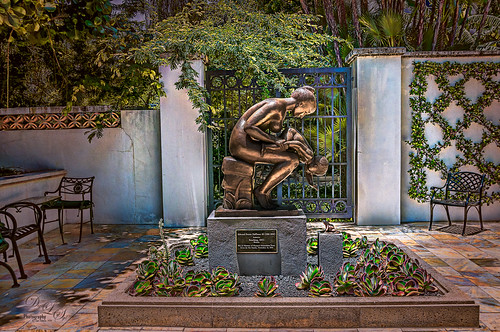
This bronze sculpture called Reaching was created by Edward Fenno Hoffmann, III, in 1963 and is very striking. The image was taken at the Society of the Four Arts’s Philip Hulitar Sculpture Garden in West Palm Beach, Florida. It used Technique 1 on the Lucis Pro 6.0.9 website where both their Single Channel mode (47% layer opacity) and Split Channel mode (73% layer opacity) are applied on separate layers. (Settings for the Single Channel mode layer were: Enhance Detail of 55, Smooth Detail of 10 , and Mix with Original Image of 10% processed and 90% original. Settings for the Split Channel mode layer were: same Enhance Detail and Smooth Detail settings as Single Channel mode but no Mix with Original Image.) This image shows how little an amount is needed to get that classic Lucis look we all love. The vignette is from Topaz (see sidebar for website link) Lens Effects – Add Vignette Selective filter set to Medium (Strength -0.46 and Opacity 39.60). Not much else was done to get this lovely effect on the beautiful sculpture. For more information on the Lucis Pro 6.0.9 plug-in, check out my Digital Lady Syd Reviews Lucis Pro 6.0.9 (Now Affordable!) blog……Digital Lady Syd
A Pub at the Borough Market
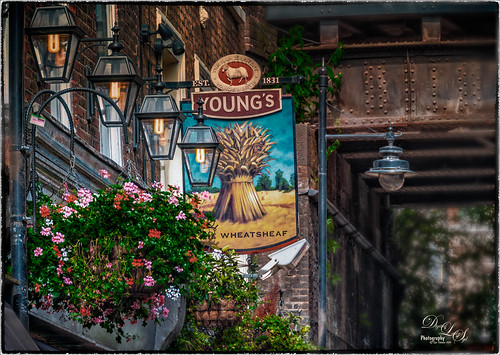
Found this old picture from the Borough Market in London, England, taken several years ago. It just looked so good when Nik Color Efex Pro 4 was used. I had created a preset years ago that used these filters: Tonal Contrast, Brilliance/Warmth, Vignette: Lens, Contrast Color Range, Remove Color Cast, Graduated Filters, and Image Borders. A Gaussian Blur effect set to 16.8 Radius was added to blur the lower right area. Check out the Nik plug-ins as they are now free from google and try them out……Digital Lady Syd
Coming At You!
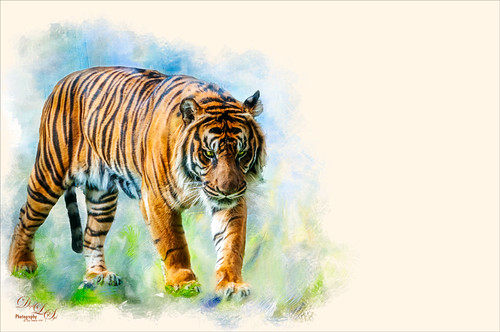
Below is an image of a Malayan Tiger taken at the Jacksonville Zoo earlier this year. JixiPix’s free Spectrel Art preset 10 was applied to the whole image. (See my How To Use the Free Spectrel Art Plug-in blog.) Next the tiger was selected using Topaz (see sidebar for website link) ReMask 5, then a white layer was placed underneath the tiger. One of my Corel Painter textures was added on top of the white layer and a layer mask was added. By painting with a soft black brush, just the parts of the painted texture wanted were left in the image. Lot of fun here!…..Digital Lady Syd
Sunrays At the Beach
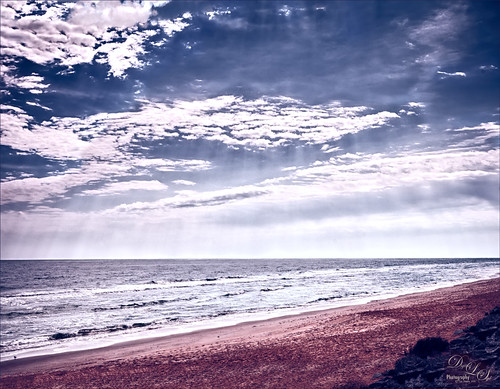
This is an HDR image of Flagler Beach, Florida, taken with 3 bracketed images. The images were taken into the now free HDR Efex Pro 2 plug-in from Photoshop (see my How to Use Google (Nik) HDR Efex Pro 2 blog for instructions on how to do this). The Bright preset was used with some minor changes. Nik Silver Efex Pro 2 (also part of the free Nik Collection) was then used to give a different feel to the image – High Contrast (Harsh) preset was used and the layer was set to Luminosity blend mode at 78% layer opacity. On a stamped layer, Topaz (see sidebar for website link) ReStyle was used to give the beautiful color palette – used my favorite Cream and Plum preset and just adjusted the Color Temperature and Tones a little. That was it. This is really how I see this beach on a beautiful day!…..Digital Lady Syd
Feeling Peachy

Just felt like playing with one of my beautiful peach colored hibiscus blooms that are growing on my back porch. In Lightroom’s Basic Panel, just pressed Auto and reduced the Exposure slider a little (usually the Auto button tends to over-expose the image), added some Clarity, and used the Adjustment Brush to paint in some of the flower focal point details using the Clarity and Sharpness sliders. In Photoshop, Topaz Impression’s Watercolor IV preset was applied with no changes to the image. A layer mask was added and using Grut’s Natural Media Knit Pin brush, small lines were painted to bring the original color from underneath – looks like a light outline in places. Really liked this effect and it is easy to do. On a New Layer above, Grut’s Charcoal Dale Haze brush set to 35 pixels was used to blend away areas that were drawing attention from the focal point, mainly the bud and some of the edges had bright colors in them. Check out Grut.com brushes – each week he offers a free brush to try out and that is how I got the two used here. Nik Viveza 2 (now free) was used to add a slight vignette on the outside edges and to add a little more detail to the focal point. These flowers are so beautiful!…..Digital Lady Syd
Swimming in Circles
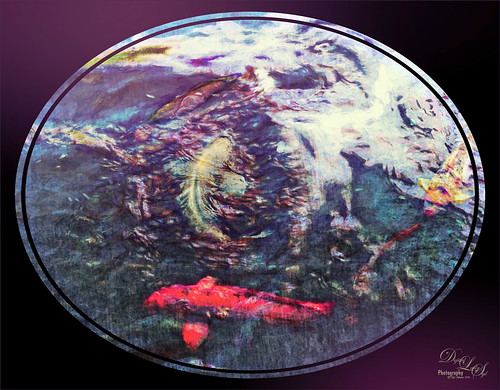
Lots of fun playing with this image of some Hawaiian fancy fish (koi) that was not that great – wanted to see what I could do with it since it had an abstract feel to begin with. In Lightroom, used the Basic Auto button, then backed off the Highlights to -12. Painted with the Adjustment Brush set to Clarity (60), Dehaze (45), and Sharpness (71) on the fish to bring them out just a little. Got to watch the Dehaze brush setting as it can overcook the results if too much is used. Topaz (see sidebar for website link) Glow Graphic Sketch II preset was applied and the layer was set to Overlay blend mode at 77%. On a duplicate layer (CTRL+J) applied Topaz Impression’s Cezanne I preset with changes to the Orange Hue and Saturation sliders. Created a New Layer and set to Overlay – used a black brush set to 12% brush opacity and burned in parts of the image where areas are blending too much together. On a stamped layer (CTRL+ALT+SHIFT+E) used Topaz Texture Effects’s Burning Effect preset. Changed the border to create the pretty oval effect. Finally applied Nik Viveza 2 (now free) to draw attention to the two middle fish. I thought it turned out to be an interesting effect…..Digital Lady Syd
Quietly Standing Out
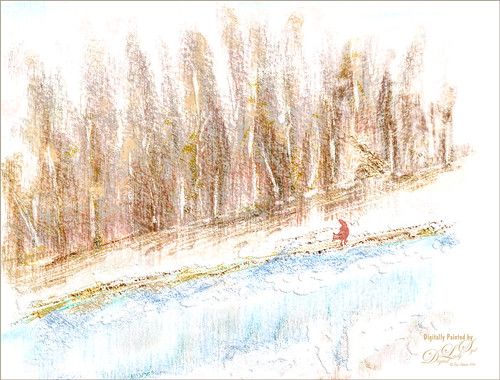
Sometimes it just feels good to paint! Totally enjoyed trying out and practicing with Melissa Gallo’s Painting Spring brushes and paper (still have a lot to learn but enjoying it immensely). Once the basic background was painted, it was brought into Photoshop to finish up. The impasto effect was created using Kyle Webster’s Impasto Kit – Super Light Gesso 2 layer style with the Natural Media Knit Pin brush from Grut.com to paint in the snowy effect. Topaz (see sidebar for website link) Lens Effects’s Polarization filter using the Bottom Half 2 Stops preset was applied. The Fox was created on its own layer using a free brush from Fox-russdepress.com and adjusting it to match my image. Topaz Texture Effects’s 1 Color Burst II was added without the vignette effect. Last step was to add Nik Viveza 2 (now free) to really showcase the fox. That was it! Loved painting this image!…..Digital Lady Syd


