
A Face in the Crowd
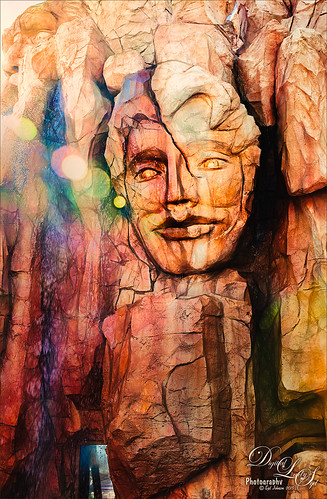
This image was taken at The Lost Continent area of Universal Studios in Orlando, Florida. It is a rather interesting engraving in the mountain. The bokeh was actually on the image I took. Not a lot was done to time, just Topaz (see sidebar for website link) Glow (my SJ Inter Web Variation preset) set to Soft Light blend mode at 50% layer opacity and Nik Viveza 2 were used to emphasize the lines and the lighting in the image. On a New Layer set to Overlay, several of the face lines were painted over to darken so you could see them more clearly. It turned out rather painterly looking!…..Digital Lady Syd
Horses Checking Me Out
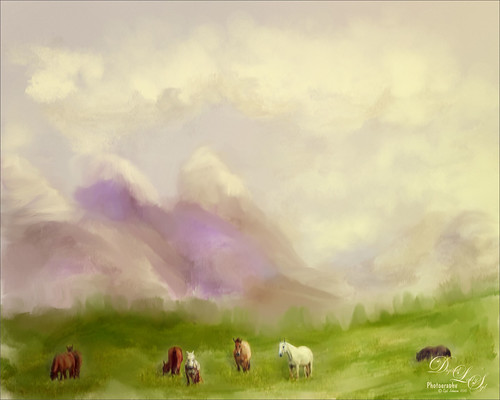
Created this image using a texture I painted in Corel Painter and a horse image from Belarus. This is basically just painting the horses into the texture by using a black layer mask on the horse image above. Then used Topaz (see sidebar for website link) Lens Effects Toy Camera filter Awesomeness I preset as a start, then applied the Reflector filter to lighten up the whole image. On a stamped layer Topaz Restyle was used and just the bottom colors were changed to darker tones. Then mainly just some clean up – love the the results……Digital Lady Syd
A Somber Effect for a Somber Image
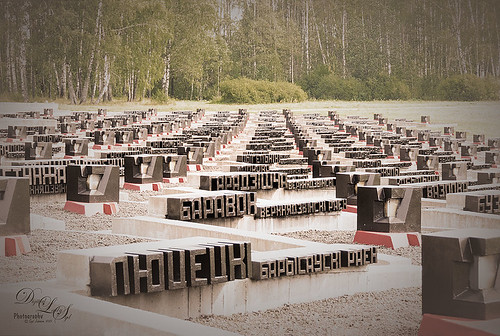
I thought this post-processing technique suited the somber image taken a few years ago portraying the Khatyn Memorial Complex in Belarus – a reminder of the devastation caused by the Nazi of the 5,295 settlements destroyed during WW2. The names in stone represent the settlements that were devastated. One of the most moving places I have ever seen.
This is a cinematic effect applied following Colin Smith’s technique in his Photoshop Secrets: Photographic Effects videos that are for CS5, but work fine in newer versions of PS. This effect looks good on architectural photos and landscapes. Mainly uses 3 adjustment layers and a gray layer that adds grain. Really liked this treatment for serious places…..Digital Lady Syd
Seashells on the Beach
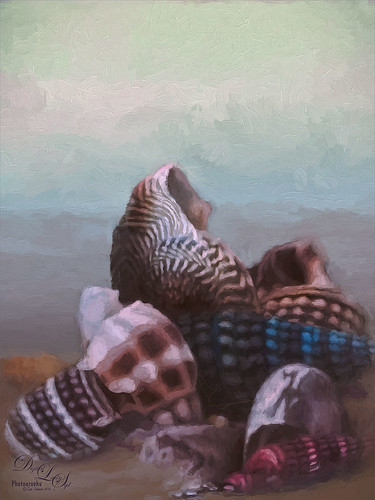
These shells were actually inside the base of a lamp – just did a close up phone image. By adding one of my Corel Painter textures and painting back in the shells in a layer mask, the busy original background could be replaced. Now for a change up – Topaz (see sidebar for website link) Impression’s Oil Painting 1 preset was applied. Next on a New Layer, some image clean up and painting was done. Last step was applying on a stamped layer (CTRL+SHIFT+ALT+E) Topaz Restyle’s Soft Sienna Veil preset with a few adjustments in the color sliders. This was the final result and I loved the colors in it whole image……Digital Lady Syd
The East Clouds in a Sunset
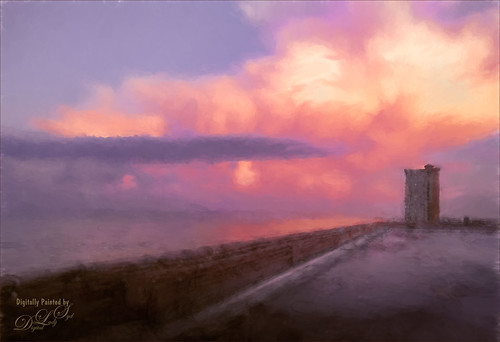
Just a quick phone pix I took from the penthouse at the La Playa Resort in Daytona Beach, Florida. This was taken facing east over the Atlantic Ocean while the sun was setting on the west behind the Intracoastal Waterway. Not much done here – just Topaz (see sidebar for website link) Impression applied using the Watercolor IV preset with a little color adjustment, some Mixer brush clean up, and a Selective Color Adjustment Layer to reduce the overwhelming blue effect in the image. Loved how the sunset plays off the ocean clouds!…..Digital Lady Syd
My Magical Front Yard
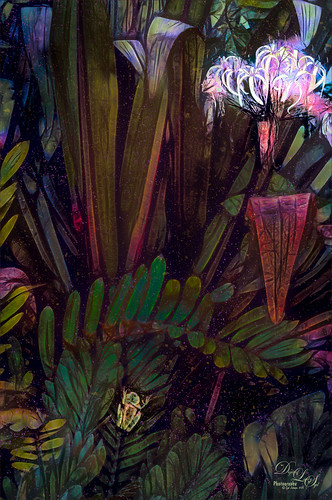
My front yard is a little crazy looking but it is a happy place, at least for the tree frog! This was just a lot of fun to do. Used Topaz (see sidebar for website link) Glow and my SJ Inter Web Variation preset set to Exclusion blend mode at 100% layer opacity. On a stamped layer (CTRL+ALT+SHIFT+E) Nik Viveza 2 was used to brighten the Tree Frog and the flower. Some painting clean up was done on a separate layer. On another stamped layer, Topaz ReStyle’s Rustic and Orange preset was applied. Another stamped layer set to Smart Object, Photoshop’s Camera Raw Radial Filter was used three times to lighten exactly where I wanted. Last step was to add some splatters more so in the dark areas to add a little more magical feel. Hope you enjoyed it!…..Digital Lady Syd
Topaz Glow Inter Web Variation preset settings: Primary Glow Type Dark, Glow Strength 1.00, Effect Sharpness 0.12, Electify 1.00, Simplify Details 0.06, Edge Color 0, Detail Strength 1.00, Detail Size 0.42, Brightness 0.16, Contrast 0.18, Saturation 0.08, Line Rotation 0, and Glow Spread 0; Secondary Glow Glow Type Light, Glow Strength 0, Effect Sharpness 0.54, Electrify 0.11, Simplify Details 0, Brightness 0, and Contrast 0; Color Overall Saturation to 0.62, Red Sat to 0.44, Yellow Sat to 1.00 Yellow Lightness -0.36, Green Sat 1.00 and Lightness -0.51, Aqua Lightness -0.36, Purple Sat 1.00, and Magenta Sat 1.00 and Lightness 0.50.
Abstract Wetlands

Felt like doing something a little different with a rather ordinary image. This was another shot from the Ritch Grissom Memorial Wetlands in Brevard County, Florida (also known as the Viera Wetlands). This image was first Merged to HDR in Adobe Camera Raw 9.0 – thought I would put it through its paces and it worked really well. I have a lot of HDR programs, but it is so nice to have all the ACR tools available to clean up the result.
Once the HDR file was created in ACR, the image was opened as a Smart Object in Photoshop CC2015 to add a few filter effects. Topaz (see sidebar for website link) Glow was using my Inter Web Variation preset set to Hard Light blend mode. (Here are the settings: Primary Glow Type Dark, Glow Strength 1.00, Effect Sharpness 0.12, Electify 1.00, Simplify Details 0.06, Edge Color 0, Detail Strength 1.00, Detail Size 0.42, Brightness 0.16, Contrast 0.18, Saturation 0.08, Line Rotation 0, and Glow Spread 0; Secondary Glow Glow Type Light, Glow Strength 0, Effect Sharpness 0.54, Electrify 0.11, Simplify Details 0, Brightness 0, and Contrast 0; Color Overall Saturation to 0.62, Red Sat to 0.44, Yellow Sat to 1.00 Yellow Lightness -0.36, Green Sat 1.00 and Lightness -0.51, Aqua Lightness -0.36, Purple Sat 1.00, and Magenta Sat 1.00 and Lightness 0.50. Set to Screen blend mode at 66% Strength; and no Finishing Touches.) On a stamped layer (CTRL+ALT+SHIFT+E), Topaz Impression’s Turner Storms II was added. It was turned into a Smart Object and Photoshop’s Camera Raw filter was opened – used Photoshop Cafe’s PS Cafe-euro model preset with some Basic adjustments and color changes. I really liked the fantasy feel I was getting. Some clean up on a New Layer was done. On another New Layer Kyle’s Real Watercolor Spatter Mixed brush was used on the foreground, a gradient overlay layer style added, and then a Guassian Blur filter set to 2.0 radius was applied to this layer. The last step was using Nik Viveza 2 to draw attention to the focal point. I really liked the results of this image….Digital Lady Syd
A Tricolored Heron That Fell in a Painting!
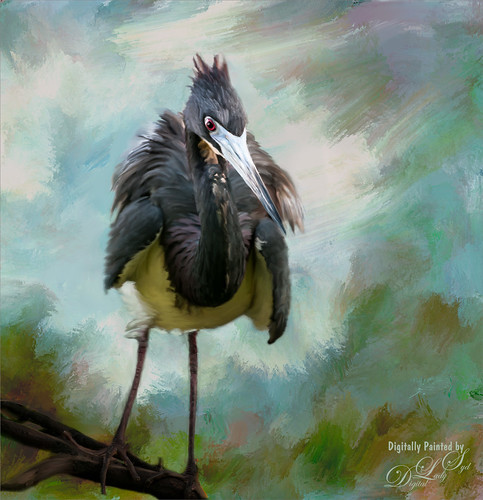
I seem to have an endless supply of these bird images from the St. Augustine Alligator Farm Rookery. It is such an incredible place to get bird images in the Spring. This is just another example of one of the magnificent birds hanging out looking for a mate. This time I actually used a layer mask to separate most of the bird from the tree limbs behind him. Since I was going to paint him, it did not have to be perfect. The bird was painted using Fay Sirkis’s (from KelbyOne) Precious Diamond Blender brush (her Mixer brushes are wonderful), then changing to it to add color when needed. This is my favorite brush for painting birds and has been used on most of my bird paintings. The texture is made up of two textures I created in Corel Painter 2015. Both textures used Quick Fix Color Brushes from Karen Sperling’s Artistry Quick Fix Video (#4 in this case) Series (check them out-and inexpensive way to learn Painter and she provides some of the best Painter brushes!), and the second also used a blender I created, and the other used Karen’s . They were placed underneath the bird and on a New Layer on top, the edges of the bird were blended into the texture. An Exposure Adjustment Layer (see my How To Do a Quick Eye Sharpening in Photoshop blog) was used to sharpen the eye. On a stamped layer on top, PS Camera Raw’s Radial Filter was used to add focus to the face and beak – painted out with the brush parts of body not to be emphasized. A Selective Color Adjustment Layer’s White Color was selected to make the white color behind the bird stand out just a little more – set Black slider to -37. That was it. I was pleased how the texture fits with the bird……Digital Lady Syd
Soaring Spoonbill

Still enjoying the bird images I took at the St. Augustine Alligator Farm Rookery this Spring. The original image was captured with a totally light blue sky behind this Roseate Spoonbill. This made it easy to add a texture underneath the image (my painted texture created in Corel Painter called Seashore) and changing the blend mode of the bird layer to Multiply. Topaz (see sidebar for settings) Clarity and DeNoise 5 were applied to cleanup the the bird layer. On a stamped layer (CTRL+ALT+SHIFT+E), Topaz Glow’s Room Glow Blake Rudis preset was applied (check out Integrating Topaz Glow into Your Workflow for info on this). Next on a New Layer Fay Sirkis’s (from KelbyOne) Precious Oil Diamond Mixer was used to clean up the feathers and beak a little. Topaz Impression Watercolor II preset with no spill was applied. Nik Viveza 2 was used to bring out the color of the bird just perfectly and a Curves Adjustment Layer was used as a last step for overall contrast. I love my bird pix!…..Digital Lady Syd


