
Here’s Looking At You
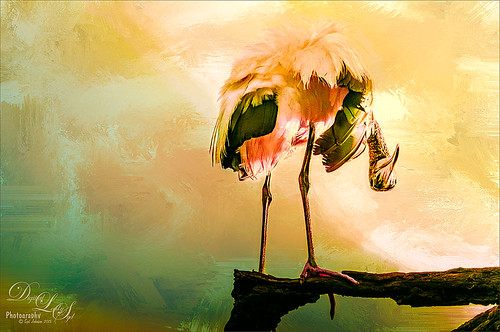
I really love these big gentle birds. This wood stork was giving everybody some serious eyeball at the St. Augustine Alligator Park recently. In Lightroom just did the Basic Slider adjustments and applied Dave Delnea’s Backlit Vertical Right and Custom Tone 002 presets. In Photoshop Topaz (see sidebar for website link) Detail 3 was applied next for overall sharpening. Topaz Glow was applied on a stamped layer. A Selective Color Adjustment Layer was added where just the Yellows were changed. Nik Viveza 2 was opened on a stamped layer and a control point was placed on the head to add more detail. Painted Textures Sunrise Canvas texture was set to Linear Burn at 50%. In the Layer Style the Blend If white tab was set and split to 190/212. Some clean up layers were added throughout to sharpen up various areas. I really liked the artsy look this bird ended up having!…..Digital Lady Syd
Singing Spoonbill Duet Takes Rookery by Storm!

Recently our Photo Club took a trip to the St. Augustine Alligator Farm’s Rookery to check out the birds. What a riot, as usual. I had never gone quite this early so the birds were doing a lot of mating and nest building, but not a lot of babies yet. It was total craziness and the Roseate Spoonbills were in all their splendor. I had never had a chance to see this many at one time and they were practically tame! They would get so close you could hardly focus your camera. Needless to say, it was a great time. These two birds were either doing mating clacking song, or totally entertaining the photographers. I was less than 5 feet from them and they were there all morning.
This image was mainly just sharpened up a bit and the basic tonal correction was done in Lightroom. In Photoshop Topaz (see sidebar for website link) Clarity using John Barclay basic settings preset (Micro Contrast 0.36, Low Contrast 0.20, Medium Contrast -0.11, and High Contrast -0.23) was applied. On a stamped layer (CTRL+ALT+SHIFT+E) Topaz Glow was applied using my SJ Mysterious II Water preset (Primary Glow: Glow Type Dark, Glow Strength 0.30, Effect Sharpness 0.63, Electrify 0.14, Simplify Details 0.17, Edge Color 0.28, Detail Strength -0.06, Detail Size 0.20, Brightness -0.56, Contrast 0.44, Saturation 0.00, Line Rotation 0.00, and Glow Spread 0.00; Secondary Glow: Glow Type Light, Glow Strength 0.00, Effect Sharpness 0.22, Electrify 0.03, Simplify Details 0.00, Brightness 0.45, and Contrast 0.64; Color Overall – all set to 0; Red RedSat 0.34; Orange Sat 0.33; Yellow Sat 0.03 and Lightness -0.29; Blue Sat 0.42 and Lightness -0.43; and Magenta Sat 0.75 and Lightness -0.35) set to Strength 64% and Overlay blend mode in the plug-in. A clean up layer was placed on top to clone out a few distracting bush edges and that was it. This was a really fun image to take!…..Digital Lady Syd
Springtime Wishes from Betsy
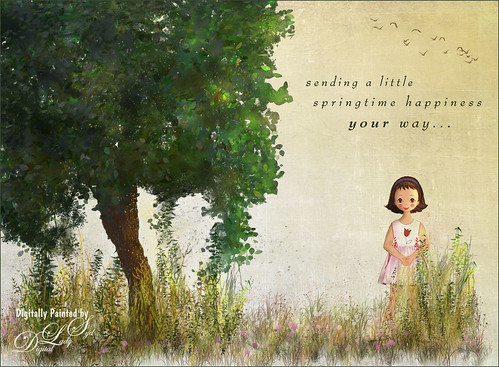
Was organizing the wonderful Photoshop Foliage Brushes from Aaron Blaise I recently purchased. I came up with this tree while checking out the different brushes and looked who popped up in the image! Why that is Betsy McCall of paper doll fame from 1958. She just looked like she belonged in this image. Basically just followed Aaron’s workflow and used his brushes to created the tree, reeds and flowers. Also added Frostbo Set 2 Grass (brush 010) for the front smaller grass. Used Kim Klassen’s December Collection Unexpected texture set to Multiply blend mode and 51% layer opacity. Used Bird Brushes II bylpdragonfly-brush bb114s2220.jpg and the was expression was included in a Design Cuts package (ldavi-sendingalittlehappinessyourway-wordarttitle1). Downloaded Betsy from the Betsy McCall website called Download and Print Vintage Betsy McCall Paper Dolls. Selected one of her dresses to pretty up the image. I am enjoying using these brushes so much!…..Digital Lady Syd
Very Busy Snowy Egrets
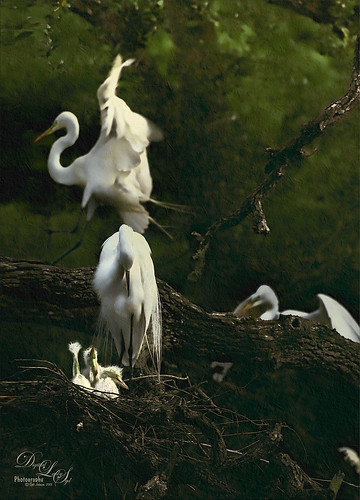
This is one of the shots I got at the St. Augustine Alligator Farm rookery. This is such a fun place to visit this time of year – the birds are totally distracted and let you take really great photos. The above is of the beautiful Snowy Egrets – at this time only a few baby birds were seen, most were nest building and mating.
Here is a quick run-down of what was done to this image: In Lightroom Seim’s (see sidebar for website link) Super HDR X preset and Dave Delnea’s Develop Preset Forestwalks Look 03 were used before bringing photo into Photoshop. A little clean up and then a stamped layer was created (CTRL+ALT+SHIFT+E) on top. Topaz (see sidebar for website link) Clarity was used to do an overall sharpening – this time I wanted a little more of an artsy look so my SJ Artsy with Highlights preset was used. (Settings: Clarity Dynamics Micro Contrast -0.86, Low Contrast -0.86, Medium Contrast 0.63, and High Contrast 0.94; Tone Level Black Level -0.19, Midtones -0.36, and White Level 0.19; HSL Filter Hue – no changes; Sat Orange 0.06, Yellow 0.63, Green 0.13, Blue 0.25 0.25, and Overall -0.45; and Lum Orange 0.36, Yellow -0.34, Green -0.42, Blue 0.61, Purple 0.11, Magenta 0.75, and Overall -0.27 – all other colors were 0.00.) A layer mask was added and the birds were faces and beaks were painted out to maintain the sharpness since this preset smooths out colors. Nik Viveza 2 was used to draw focus to the babies and help remove a bit of yellow in the bird feathers. A Levels Adjustment layer was added to add back some contrast into the image. On another stamped layer, John Derry’s Varnish-Matte-Light layer style was used to apply a little painterly feel to the whole image. That was it. I love working on these bird images!…..Digital Lady Syd
Looking Through You!
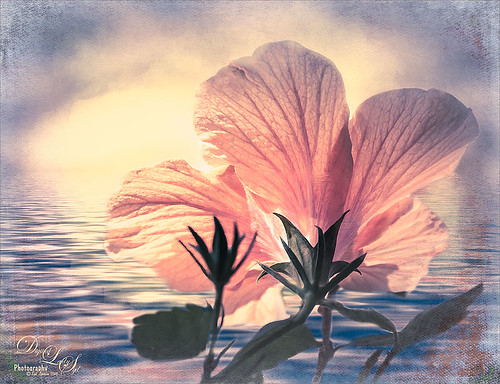
Took this image recently when the sun was shining so beautifully through the peach Hibiscus bloom. These are the most beautiful flowers but they only last a day. What a shame! This image was put together very simply. In Lightroom Trey Radcliff’s Sunday Alone preset was applied. Then in Photoshop, the Shake Reduction filter was applied – did not make much of a difference in this case. On a duplicate layer, Flaming Pear’s Flood preset was next used so that it covered up about 3/4 of the bloom. (Here are the settings used: Horizon 45, Offset 0, Perspective 57, Altitude 50, Waviness 78, Color dark blue #0b1b4e, Complexity 47, Brilliance 65, Blur 54, Size 0, Height 31, Undulation 40, and Glue Normal.) A layer mask was added and the bloom and leaves were painted back. On a New Layer above, Kyle’s Real Watercolor Big Rough Small Grain was painted onto the image to get a pretty soft sun glow. Used the same layer mask but this time painted back around the top of the blossom. On another New Layer, used a Pastel Brush set to 35 pixels, Multiply brush mode, 53% brush opacity, Pressure Sensitivity for Opacity icon on, and 100% Flow. By sampling in the blossom, I tried to smooth some of the shadow transition lines. Next 2 Lil” Owls (see sidebar for website link) Color Bokeh-Grunge Set 5 was placed on top in a layer mask, the center was cleared of the hazy feel to focus on the flower. The last step was a Curves Adjustment Layer. I really like the colors in this one…..Digital Lady Syd
A Wintry Scene
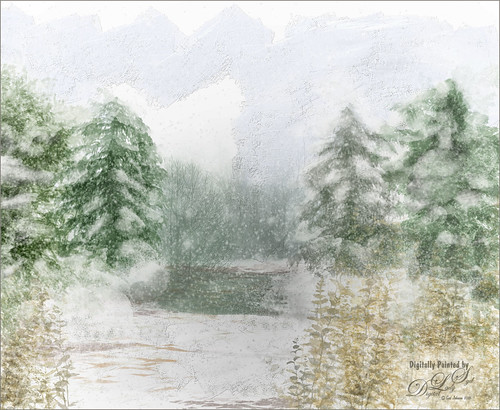
This is just a another image I created using mainly Aaron Blaise’s Foliage and Water brushes in Photoshop. In Painter some of the snow effects were created using Gel’s 2009 Holiday brushes and Fay Sirkis’ blender brushes. The Impasto sky was created using on one of Melissa Gallo’s brushes. In Photoshop three snow layers were added and Shadowhouse Creations Assorted Brush set tree brush 4 for background effect. As you can see, this is made up of a lot of different brushes and a little of my own painting. Not sure why I went wintry today, but it was a lot of fun to do…..Digital Lady Syd.
A Little Watercolor Fun
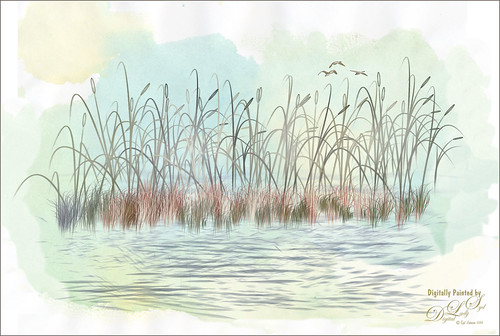
Just totally having some fun with this one. Used the brushes from my How to Create A Magical Feel in Photoshop blog – really enjoying both Aaron Blaise‘s brushes and Frostbo’s Brush Grass Set 2 brushes. The birds brush was from Obsidian Dawn and the background water is Sad Monkey Designs Watercolor 22. Just played around and ended up with a pretty little watercolor……Digital Lady Syd
Trying out Very Wet Watercolor Brushes in Painter

This is just a short quick blog to explain the above image. I did a Bob Ross type image using Skip Allen‘s wonderful Working with Very Wet Watercolor Variant Videos as a guide. I had never used watercolor brushes that run like traditional paints – they actually make your computer really “chug-a-long,” but Skip explains how to get around those hurdles. The above pretty much followed his videos, except I switched over to Photoshop to add the textures. I am much more comfortable using PS for this part of the process. The textures used were Frenchkiss Collections (see sidebar for website link) Artiste Autumn Fauve set to Hard Light at 65% layer opacity for the adding in the nice yellow and brown tones, and Painted Textures Olive Canvas (from one of Melissa’s workshops) set to Hard Light at 100% layer opacity which is basically a pretty soft plain greenish texture. A Curves Adjustment Layer was used to add some contrast back into the image. On a New Layer, Kyle’s Real Watercolor Big Rough Textured mod brush was used to darken down the left side of the mountain a little more. It was set to Soft Light blend mode. Just wanted you to see that you can add in a few more strokes in Photoshop to fill out areas that did not stroke correctly in Painter. That was it. Apparently people add chops to this, but I do not know how to do this yet. I would recommend you check out Skip’s tutorials and free brushes if you get a chance…..Digital Lady Syd
Beautiful Maize
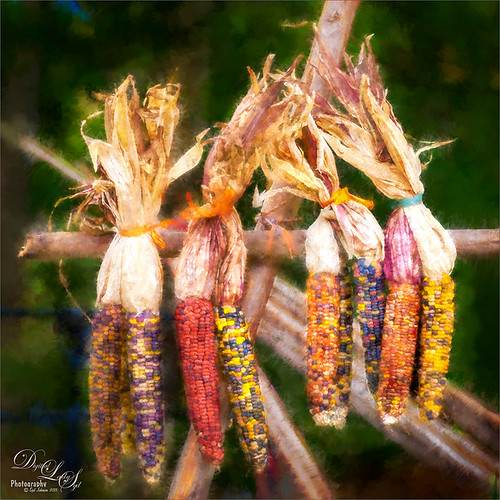
Loved this hanging batch of colorful corn or maize taken at the recent Native American Festival in Ormond Beach, Florida. In Lightroom Seim’s (see sidebar for website link) Workflow DreamScape preset was applied. Next Topaz (see sidebar for website link) Detail 3 was applied using just my basic Little Medium Large Detail preset (Medium Details 0.38, Large Details 0.16, and Contrast 0.30) where a black layer mask was added and just the corn was painted back. The background needed to remain soft. On several layers above a lot of clean up was done as the background was full of distractions. On a stamped layer (CTRL+ALT+SHIFT+E), my Topaz Impression Abstraction preset was applied (Stroke Type 12, Brush Size 1.00, Paint Opacity 0.38, Stroke Rotation 0, Stroke Color Variation 0, Stroke Width 0.85, Stroke Length -0.50, Spill 0.72, Smudge 0, and Coverage 1.00; Color Overall Hue 0.14, Sat 0.23, and Lightness 0.06; Red Lightness 0.14, Yellow Sat -0.11, and Green Lightness -0.36; Lighting Brightness 0.13, Contrast -0.23, and Vignette 0, Light direction X 0.34 and Y 0.05; and Texture Strength 0.19, Size -0.43, and Canvas I, Background type white solid and Background White). This layer was duplicated and taken back into Impression where the Ethereal Background by Blake Rudis preset was applied. A white layer mask was added and just the corn was painted out where I did not want the blurred effect to occur. This layer was set to Linear Burn at 53% layer opacity. On a new Stamped Layer, Nik Viveza 2 was applied to further enhance the focal point. It is so much fun to use the different filters to get different effects…..Digital Lady Syd
Digital Lady Syd Related Blogs:
How to Get the Most Out of Your “Not-So-Great” Images – contains link for Topaz Impression’s Ethereal Background by Blake Rudis


