
Sailing!
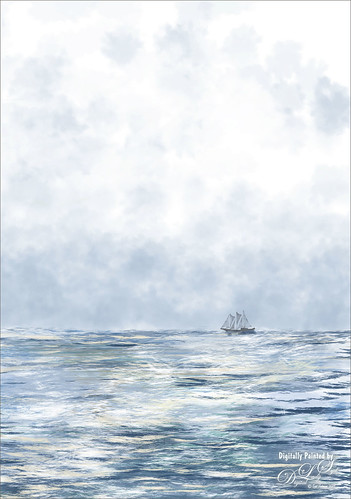
Totally love these new inexpensive Photoshop brushes I purchased from Aaron Blaise’s (a former Disney artist) website. This image used both his Water Brush Set and his Cloud Brush Set. (Check out his videos as he gives lots of just great digital painting tips throughout his demos.) This image was composed of one Cloud layer using his SB 46-12 brush (a major cool cloud brush) and three Water layers using three brushes: his SB 44-13, a really nice larger waves brush, SB 45-13, smaller sized waves for more distant effects, and SB 50-40, a very flat thin wave effect that could be used for horizons or fill in color waves. The sailboat is from Vector Art Box – set to a 40% layer opacity to give a slightly dimmed look. The layer was set to Multiply at 100% layer opacity, then duplicated and set to 21% layer opacity just to make the boat show just right. Last step was a Curves Adjustment Layer to add a little contrast to the image. Done! This was so easy to create and it is so much fun to use these brushes……Digital Lady Syd
Digital Lady Syd Related Blogs:
Just Some Photoshop Fun This Week!
How to Create a Watercolor/Ink Image in Photoshop
What the Worm Saw
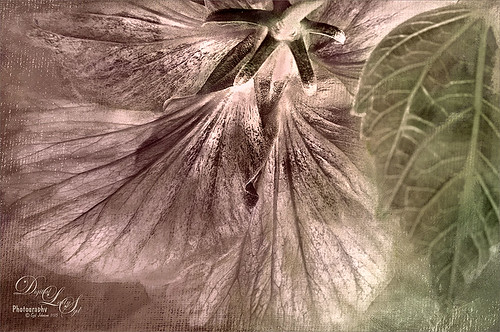
This was a macro image I took for a Photo Club Theme called What the Worm Saw. I did not submit it (got a little over creative actually and tried something not so great). This is the underside of a Red Hibiscus bloom and I just liked the result. Used Topaz (see sidebar for website link) Clarity to sharpen it overall. Used Nik Silver Efex Pro 2 to turn it to black and white. Next a Color Balance Adjustment Layer was used to add a little green in the Midtones. Painted Textures Trees in May texture was added next with a layer mask and the bloom and leaf were painted back in the mask. A Nik Viveza 2 filter was added to emphasize the focal point of the image. To get the pinkish tone on the flower, a light pink gradient layer was placed on top. The last step was a Curves Adjustment Layer to get back a little contrast. Something a little different for me…..Digital Lady Syd
A Little Cherry Tree

Have not painted in a while so decided to give it a go. I wanted to paint a Cherry Tree since I lived in the Washington, DC area for many years and miss seeing them this time of year. The original image was created in Corel Painter 2015 on just the Canvas and using 9 different brushes on a Plaster Paper. This image was brought into Photoshop where a Clean Up layer was created. Three other layers using some of Aaron Blaise Foliage Brushes were added to soften some of the sharp edges mainly around the water and on the plants. A Motion Blur set to 4 was used to soften the graphic look os his brushes. Nik Viveza 2 was used to reinforce the focal area in the tree and a Level Adjustment Layer was added to make sure the contrast was correct. That was it! It was a lot of fun to get back to painting, but I still like to go between the programs……Digital Lady Syd
A Tuscan Blossom
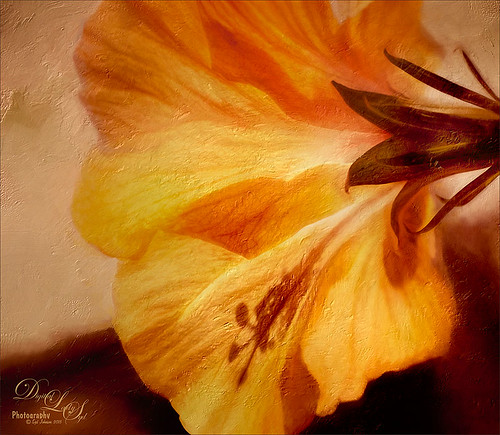
Just loved how this little Yellow Wing Hibiscus blossom image turned out. Did very little to the original image other than apply 2 Lil’ Owls (see sidebar for website link) Spring Whispers 4 preset and sharpening of the shadow stamen. On a duplicate layer of the background, Topaz (see sidebar for website link) Clarity was applied using John Barclay’s Basic Settings preset (see My Glowing Porch Flowers blog for settings). Next went into OnOne’s (see sidebar for website link) Perfect Effects 9 and applied the PE4 Vintage preset. I believe that OnOne gave it away with an earlier version, probably Perfect Effects 4. Next Topaz Impression was opened and the new preset created from Blake Rudis’s blog called Ethereal Background was applied next (see Blake Rudis video called Atmospheric Backgrounds with Topaz Impression). A New Layer and some clean up was done, especially a little Mixer Brush painting on some of the edges to smooth. Painted Textures Creamsicle texture was applied (not sure this texture is still available) set to Linear Burn blend mode at 73% opacity. A Hue/Sat Adjustment Layer was clipped to the layer and the Saturation set to -56 so there was not a lot of color added to the image, just texture. A Curves Adjustment Layer was added to add back some contrast and the last step was Nik Viveza with a control point on the focal point, or for me the stamen shadow. It was fun to experiment with my arsenal of filters!…..Digital Lady Syd
A Reflecting Wood Stork
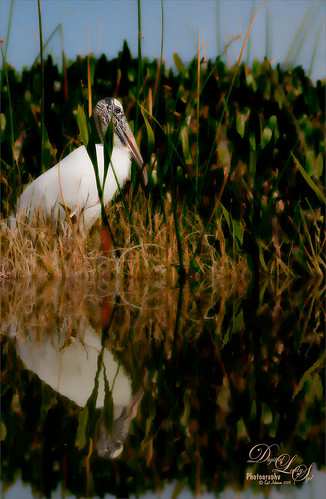
I guess this is what birds do when they are reflecting on their lives. Hum… Anyway, just the different iteration of an image I posted in my Fun Photoshop Blog recently (see How to Get the Most Out of Your “Not-So-Great” Images blog). I wanted to show how interesting it can be to change up an image just by running the same filter effect twice on the it. I used the same settings from my linked blog for the Flaming Pear Flood filter and Topaz (see sidebar for website link) Detail 3 using the same Soft Leaves preset. But this time the same Detail filter was applied twice using the same preset to get this sort of dreamy, natural effect. It gave the image a totally different feel. So this is just another example of how to change the ordinary to extra-ordinary!…..Digital Lady Syd
Hiding Out with a Red-Winged Blackbird

This beautiful bird was hiding in the brush at the Ritch Grissom Memorial Wetlands in Brevard County, Florida. I had not seen one in a long time. Not that much post-processing on this one. In Lightroom applied Seim’s (see sidebar for website link) Classic Holga preset. Opened in Photoshop and Topaz (see sidebar for website link) Detail 3 was used to give the photo a little more depth of field feel and the bird was painted out in a layer mask. The Sharpen Tool was used on the bird. Added Topaz Glow set to Soft Light. Nik Viveza 2 was used on the bird and Photoshop’s Camera Raw Radial filter was used to get the pretty vignette. Pretty standard workflow here……Digital Lady Syd
Sunset at Viera Wetlands
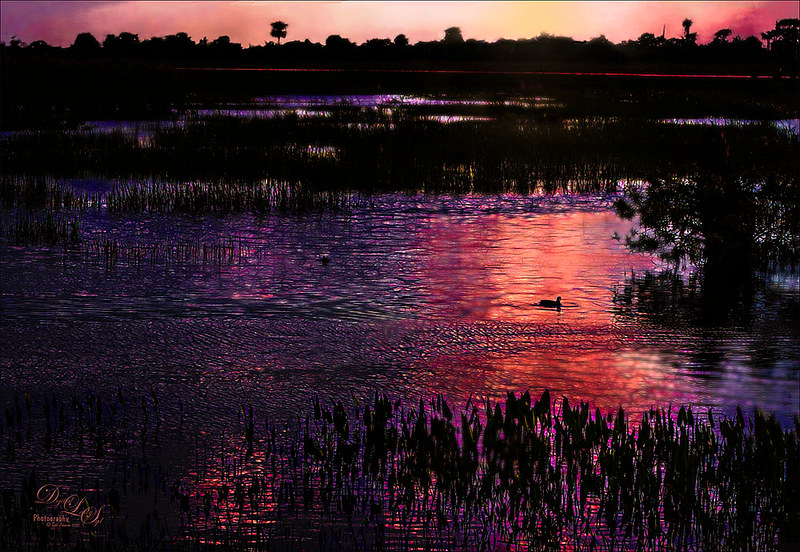
This image was not near as interesting in its Raw version. Had to add some filters and was pleasantly surprised at what a pretty sunset effect could be achieved. In Lightroom Seim’s (see sidebar for website link) PowerWorkflow Super HDR X preset was applied. Once opened in Photoshop Topaz (see sidebar for website link) Clarity’s Color and Contrast Boost II was applied. I like to use Clarity when dealing with nature scenes – sometimes it gives better results than Detail. On a duplicated layer, Topaz Glow filter was added – used my SJ Mysterious II Water preset and set the layer to Hard Light blend mode – this is how I got all the beautiful colors in the image. (Here are the preset settings if you are interested: Primary Glow: Glow Type Dark, Glow Strength 0.30, Effect Sharpness 0.63, Electrify 0.14, Simplify Details 0.17, Edge Color 0.28, Detail Strength -0.06, Detail Size 0.20, Brightness -0.56, Contrast 0.44, Saturation 0.00, Line Rotation 0.00, and Glow Spread 0.00; Secondary Glow: Glow Type Light, Glow Strength 0.00, Effect Sharpness 0.22, Electrify 0.03, Simplify Details 0.00, Brightness 0.45, and Contrast 0.64; Color Overall – all set to 0; Red RedSat 0.34; Orange Sat 0.33; Yellow Sat 0.03 and Lightness -0.29; Blue Sat 0.42 and Lightness -0.43; and Magenta Sat 0.75 and Lightness -0.35.) A clean up layer was created and layer to add some yellow sun glow. On a stamped version (CTRL+ALT+SHIFT+E) placed on top, Photoshop’s Iris Blur filter was centered around the duck with the blur set to only 2 pixels. A black layer mask was added so just a few areas that I wanted softened could be back with a white brush. That is basically how this image was post-processed, and the Glow filter made it into something quite nice!…..Digital Lady Syd
Viera Wetlands

Decided I wanted a different look for this image. I was upset that I did not bring my wide-angle lens when I went to the Ritch Grissom Memorial Wetlands in Viera, Brevard County, Florida. The sky is actually what I saw – it was not replaced. Nik Color Efex 4 helped give the image this effect by using two of my favorite filters in the plug-in: for the diffused effect the Monday Morning filter was applied, and for the slight Nostalgic feel the Film Efex Vintage filter. The real trick to this image was to use Topaz (see sidebar for website link) Lens Efex and the Fish Eye Adjustments with the Distortion set to 0.26. Totally loved the result even without ever using my wide angle lens!…..Digital Lady Syd
Wetlands Getting Ready for Spring

Just another quick snap I took while at the Ritch Grissom Memorial Wetlands in Viera, Brevard County, Florida recently. It really did feel like Spring is on its way which I am really glad to see. I took this image because I thought the water looked interesting where it intersects the reeds. It turned out to be a lot of fun since I got to paint a sky in using Fay Sirkis’s Photoshop brushes to make it. (These brushes can be downloaded from KelbyOne if you are a member – just go to her Four Seasons webinars.) Used a couple Cloud Highlighter brushes and a Cloud blender. Created several layers and put them in a group which was set to Multiply blend mode at 35% group layer opacity. Also used Topaz (see sidebar for website link) Glow and my SJ Inter Web Variation preset (see Image 4 Information for settings at my How to Get the Soft Glow In Topaz Glow blog). This layer was set to Overlay Blend Mode at 61% layer opacity. Since it almost wiped out my sky, I copied my painted sky group on top to add it back in again with the same layer settings. Nik Viveza 2 was used to even out the image and add a focal point in the center of the image. Obsidian Dawn’s Flying Birds Grouping 1 was added just because the image needed them – the layer was set to Multiply at 77% opacity. On a New Layer above lightly painted in white to get a water bird look to the birds. Next 2 Lil’ Owls Studio (see sidebar for website link) Color Bokeh Grunge Set 1 was added and set to Color Dodge blend mode at 72% layer opacity. The last step was a Curves Adjustment Layer to bring back the contrast. Totally fun to do!…..Digital Lady Syd


