
Painted Apples
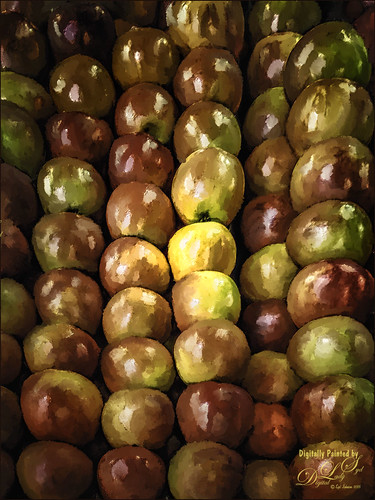
Not sure what inspired me to paint these apples from image taken at the local grocery store, but I did. The image was first opened in Lightroom where the basic image was adjusted, then in Photoshop. After some clean up, a stamped layer was created on top (CTRL+ALT+SHIFT+E) where Topaz (see sidebar for website link) Clarity was applied using the Landscape III preset. Next on a duplicate layer, Nik Color Efex Pro 4 was used (used Cross Processing Method L05 at Strength 27%; Darken/Lighten Center set to Shape 1, Center Luminosity 73%, Border Luminosity -46%, and Center Size 24%; Low Key Glow 0%, Standard Low Key 6%, Dynamics Low Key 0%, Sat 56%, Whites 3%, and Contrast 72%; and Detail Extractor 22%, Contrast 14%, Sat 25%, Shadow under ow, and Highlights under hl). On a New Layer above, used a Blender Mixer brush using property bar settings of Wet 100%, Load 1%, Mix 100%, and Flow 100% and set to Sample All Layers – turn off Load Brush After Each Stroke so it will just be a blender and mix the colors underneath. I am not sure which brush I used, but any brush you like should be a nice blender with the above settings. On a new Stamped Layer, Nik Viveza 2 was used to add focus to the center area. Last step was a Curves Adjustment Layer. I also painted this in Corel Painter and got a much more abstract look. Will probably show that version in a later post. Anyway, love the Photoshop Mixer Brush effect on these apples!…..Digital Lady Syd
A Particle Brush Flower
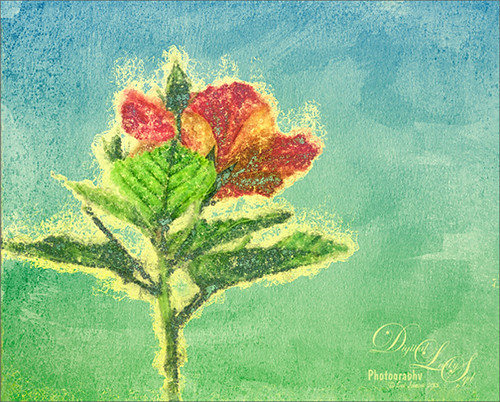
This beautiful Chinese Hibiscus bloom was painted in Corel Painter using one of their new particle brushes and following the short video called Painter 2015 Particle Brush Painting Featuring Karen Bonaker. The image started with auto-painting using the Oils category Particle Spring Oil Mop brush variant. So much fun. Then brought it back into Photoshop to apply the textures, although it could have been done the same way the video showed in Painter. The flower was selected by going to Select -> Color Range and choosing white. Then added a layer mask to the painted canvas layer so the flower is white and the background is black in the mask. Since I wanted the edging to be yellow around the flower, the Layer Style was opened and the B Channel was unchecked. Also the Blend If This Layer black tab was split (ALT+drag to split tab) and set to 133/158. Two textures from French Kiss (see sidebar for website link) were placed underneath: Colorwash Juin set to Normal at 100% Layer Opacity and Solstice Well Spring set to Multiply at 100% layer opacity. The Layer Style was opened up for the last texture and the Blend If This Layer white tab was split and set to 221/255 and Underlying White tab split to 195/226. The original Flower layer was placed on top with a black layer mask applied. Just the leaf veins in the front leaf and a few other details were lightly painted back in with white in the mask. A Curves Adjustment Layer was added to bring back some contrast. Last step was using Nik Viveza 2 to really add some focus to the center leaf. I really love how the particle brush created this rather interesting effect around the flower……Digital Lady Syd
Digital Lady Syd Related Blogs:
Corel Painter’s Auto-Painting Results – Not Bad!
Doors, Doors, Doors!
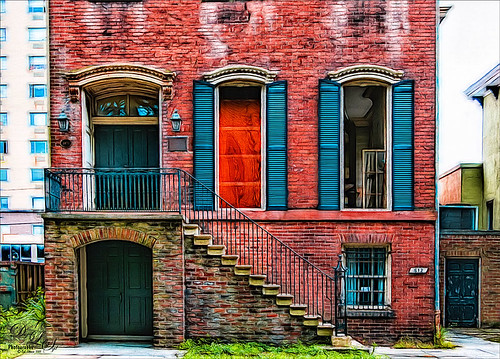
Did this photo a while ago of an old home in Savannah, Georgia, that was being renovated. The original image was not that pretty as the building had to be taken into Photoshop’s Lens Correction where the distortion was removed. Many layers of clean up were done to get rid of some Spanish Moss hanging down in front of the image from an overhanging tree. Nik’s Color Efex Pro 4 was opened and the Detail Extractor filter was selected (Detail Extractor 46%, Contrast 44%, and Saturation 6%) and Tonal Contrast filter was added (Highlights 1%, Midtones 36%, Shadows -33%, Saturation 59%, and Contrast Type High Pass). Now some of the beautiful color in the doors and brick started showing up. On a stamped layer (CTRL+ALT+SHIFT+E) was created and Topaz (see sidebar for website link) was opened and the Wonderland Preset was applied at 53% opacity. This was a great example of how Topaz Glow lights up an image. I love the final appearance of the home – hope it turned out this nice…..Digital Lady Syd
Digital Lady Syd Related Blogs:
How to Get the Soft Glow in Topaz Glow
An Artsy Sketch

Just playing around with an effect I learned from a tutorial by Lesa Snider called How to Convert a Photo to a Colored Sketch with Photoshop. It actually did a pretty nice job on this image. After converting the image to a sketch, I went to the Select -> Color Range and chose Highlights in the drop-down menu. Check Invert box and say OK-a layer mask is applied to the image selecting the background. Next I applied two textures I have created underneath the sketch with the top layer set to Hard Light and the Blend If This Layer black layer set to 101. Created a stamped layer (CTRL+ALT+SHIFT+E) and added a Curves Adjustment Layer for some contrast. Next several layers were created and just different areas were painted to emphasize them. Created another stamped layer and applied Topaz (see sidebar for website link) ReStyle (Peach Prairie preset with changes to Sat Primary 0.02, Third -0.05, and Fifth 0.25; and Primary -0.58, Third -0.20, and Fourth -0.36; Basic set to Color Blend Mode , Tone White Level -0.37; and Details Structure -1.00 and Sharpness -1.00 to get a more painterly look on the colors). Added a copy of the image before ReStyle was added and set it to Luminosity at 42% layer opacity to tone down the colors a little. Sort of a crazy looking image, but was still a lot of fun to play with all the colors……Digital Lady Syd
Just a Little Hibiscus

Image of my pink Painted Lady Hibiscus on my porch – they are such beautiful blooms! Thought I better practice painting a little in Photoshop as I had not done anything recently so here it is. In Lightroom and Dave Delnea’s Backlight 002 vertical preset was applied, and the middles of the flower was sharpened. The image was brought into Photoshop and Topaz (see sidebar for website link) Clarity using John Barclay’s Basic settings (Micro Contrast 0.36, Low Contrast 0.20, Medium Contrast -0.11, and High Contrast -0.23 – then my settings of Red Sat 0.22; and Lum Red -0.17 and Green 0.72). Next Topaz Black & White Effects plug-in was applied using a plug-in I call SJ Church (Conversion Basic Exposure Contrast 0.06 and Brightness 0.05; Quad Tone Color 1 Region Color (R7/G0/B7) and slider 9.95, Color 2 Region Color (R59/G51/B53) and slider 69.66), Color 3 Region Color (R158/G143/B146) and slider 150.6, and Color 4 Region Color (R255/G253/B216) and slider 255.0: and Transparency 0.58 – in the Mask, painted detail on stem and pistal using Brush Opacity 0.25/Hardness 0/Edge Aware 0.50 brush. Using same brush set to a small size 73, selected Burn and painted in the pistil shadow and some detail in the flower top. Used Color adjustment and painted in a little on flower tips. Dodges the left side of pistil and stem.) On a layer above, Jai Johnson’s beautiful free Spring Blush Canvas texture was added and a layer mask was added. Used my SJ Pastel 11 brush (I used Pastel 11 in SDW Pastel Brushes-this comes in as a huge 2130 px brush! I made it a 70 px brush – added Shape Dynamics and Texture to make a nice painting brush) set to 29% or less brush opacity, the flower was gently painted back in the layer mask. Text was added and a Levels Adjustment Layer was used to add back some contrast. That was it!…..Digital Lady Syd
On Being Nine
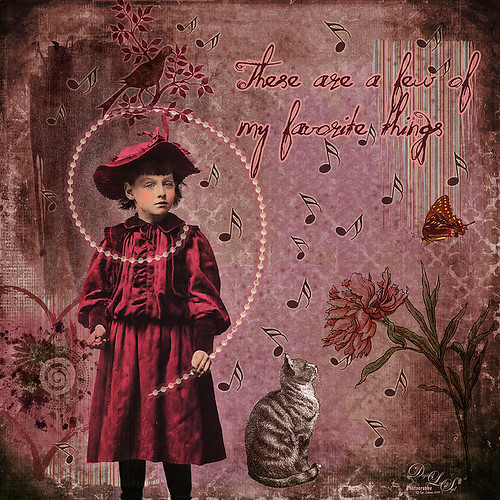
Great way to entertain myself on a very overcast wintry day. I have to honest and say I was watching on Creative Live a very good class called Advanced Digital Scrapbooking: Design Layouts in Photoshop by Traci Reed. I am not a scrapbooker, but I love to watch what they are teaching since it is a very good way to express yourself and your art. She was showing how to use templates and I remembered I had downloaded one a while back – that is how this little girl found a life of her own!
This image was started by adding the little girl that from Mary Bailey Vintage called Amelia. Next Anna Aspnes Inspired Edge Template 3-3 was added under the little girl – this acts as placeholders for the various items added in this image. 2 Lil’ Owls (see sidebar for website link) texture Vintique 42 was placed as the bottom layer and her Vintage Papers 20 was set on top using the Layer Style Blend If This Layer black tab split and set to 151/178 so some of the texture below showed through. I was unable to find download links for any of these scrapbook-like items. Paper was clipped to the different blocks in the template and clip art added to get all the elements into the image. The font is one I bought called Quilted Butterfly. The musical notes are from a brush I downloaded and set the size jitter and angle jitter to get the different directions. All in all it took several hours to finish this image, but it was so much fun to do something totally different……Digital Lady Syd
Using Topaz Glow to Add Color

Thought I would do a quick before and after on an image that Topaz (see sidebar for website link) Glow was applied to. Below is the original as I first processed it as an HDR image with a very wide angle lines.
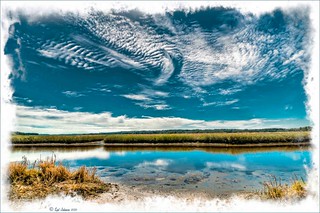
I like both renditions – they are just very different. You can see what mainly the color sliders can do to an image in Glow. Essentially that is all I did with this image. I did do a little painting on a New Layer on top just to make it look like I wanted it to look – used my Chalk 60 brush (with Angle set to 19%). (Here are the Glow settings if you would like them – TG-SJ Secondary Webbing preset are Primary Glow: Glow Type Light, Glow Strength 0.00, Effect Sharpness 0.00, Detail Strength 0.87, Detail Size 0.20, Brightness 0.03, Contrast 0.47, and Saturation 0.96; Secondary Glow: Glow Type Light, Glow Strength 0.56, Effect Sharpness 0.46, Electrify 0.00, Simplify Details 0.02, Brightness -0.13, Contrast 0.24, Line Rotation Rotation 0.00, and Glow Spread 0.26; Color: Yellow Saturation 0.20 and Yellow Lightness 0.34; and Finishing Touches: Effect Coverage 1.00, Coverage Transition 1.00, and the rest 0.00. Note you need to change this to Soft Light before the settings make any sense. Then here are the settings used to change it to the above: Added Orange Sat 0.78; Green Sat 0.40 and Lightness -0.41; and Blue Hue 0.18, Sat -0.27, and Lightness 0.26; and changed Yellow Sat 1.00 and Lightness 0.88. In Photoshop the layer was set to Overlay blend mode.) I find this transformation rather amazing!…..Digital Lady Syd
M&M’s Getting Their Last Breath of Air
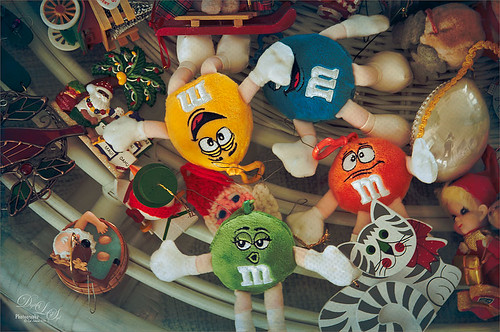
Sunday it was time to take down the Christmas ornaments. These adorable M&M ornaments my sister got me a few years ago are some of my favorites. In Lightroom 2 Lil’ Owls (see sidebar for website link) Fresh Color 7 preset was applied and then a couple adjustment brushes were used, one with Clarity and Sharpness increased and painted in the faces, and one with a little yellow color to draw the eye more towards the yellow M&M. In Photoshop Topaz (see sidebar for website link) Detail 3 with my Little Med Large Details preset applied (Detail Overall Medium Details 0.38 and Large Details 0.16 and Tone Contrast 0.30 and Shadows -0.01). Back in Photoshop a black layer mask (CTRL+I in regular layer mask) was added and just faces were sharpened again. A stamped layer was created (CTRL+ALT+SHIFT+E) and Topaz Adjust’s French Countryside preset (my favorite Adjust preset) was applied. This time a regular layer mask was added back in Photoshop and the bodies were slightly painted back with a 30% opacity black brush. The layer was set to Linear Burn blend mode at 40% layer opacity. I just wanted a touch of the Adjust in the image to soften the background area. Next R Gough’s Watercolour on Canvas Overlay was added. This overlay was in the a wonderful free holiday pack from Design Cut. A blue Solid Color Fill Adjustment Layer was clipped (ALT+click between layers to clip) to add a pretty bluish vignette. The last step was a Curves Adjustment Layer. That was it. This was a lot of fun to do a very traditional treatment to the photo!…..Digital Lady Syd


