
HDR Tree
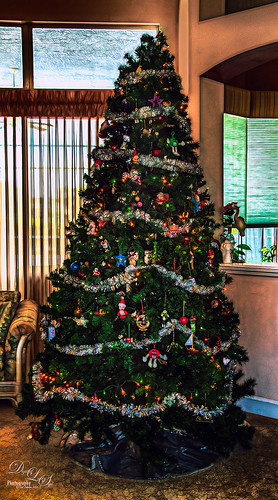
One last Christmas post this year. Someone said to take some HDR bracketed shots of your Christmas Tree and it will look really good – so that is what I tried here. As usual I get carried away with my favorite filters and started adding in some things, but I did process the three bracketed images in Nik HDR Efex Pro 2 using its Dark preset. Then in Lightroom Seims PW4 (see sidebar for website link) Super HDR and his Tint Warming 81A presets were applied before opening in Photoshop. Duplicated the Background layer and opened it up Topaz (see sidebar for website link) Glow – applied my SJ GrapIII Beach preset (settings listed at bottom) – this plug-in really added to the overall tone and color of the image, then set the blend mode to Color Dodge in Photoshop and the Fill to 74%. (Note: With Color Dodge blend mode, adjusting the Fill slider keeps the effect more pronounced than adjusting Opacity slider, which creates a more dull look). Did some clean up and applied Viveza 2 to add a slight vignette feel to the corners (could have used the Radial Filter in ACR). Next Topaz ReStyle was opened and the Dark Ecru preset was applied (these changes were done: ReStyle Opacity 73% and Texture Strength 0.44; Basic Color -0.31; Tone Black Level 0.11, Midtones -0.25, and White Level 0.08; Detail Structure -0.37 and Sharpness 0.56.). A Curves Adjustment Layer was used to add back a little contrast as the last step. It was a lot of fun to do an HDR – have not done this in a while…..Digital Lady Syd
(My SJ GrapIII Beach Topaz Glow settings: Primary Glow: Glow Type Dark, Glow Strength 0.17, Effect Sharpness 0.09, Electrify 0.23, Simplify Details 0.25, Edge Color 0.20, Detail Strength 18, Detail Size 0.24, Brightness 0.23, Contrast 0.17, Sat 0.01, Line Rotation 0.09, and Glow Spread 0.20; Secondary Glow: Glow Type Light, Glow Strength 0, Effect Sharpness 0.47, Electrify 0.17, Simplify Details 0, Brightness 0.36, and Contrast 0.62; Color Red Sat 1.00; Orange Sat 0.27; Yellow Sat 0.20 and Lightness 0.09; Aqua Sat 0.78 and Lightness -0.26; and Blue Sat 0.49; Finishing Touches: Effect Coverage 0, Smudge 0.00, Sharpness 0.25, Sharp Radius 0 and Vignette Size 0. For this image these changes were made to this preset: Changed Secondary Glow to Dark. Changed Red Sat to 0, Orange Sat to 0.79, Aqua Sat 0; and Green Hue 0.32, Sat 0.45, and Lightness -0.27.)
Merry Christmas from Digital Lady Syd
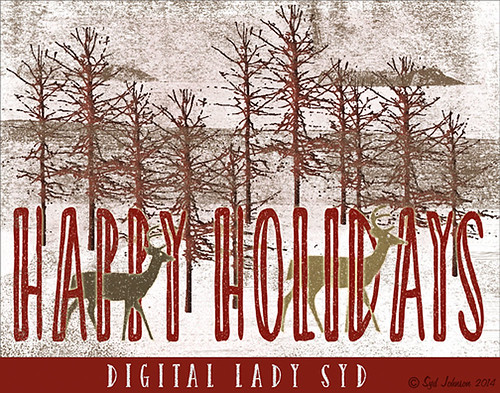
Happy Holidays to all my blog buddies! I so enjoy the people I have made friends with on the Internet and through blogging. I hope everyone is having a great time and is totally enjoying this time of year.
Just a few for those who wonder – how did I make this card? Well, this all started in Photoshop where I began with the cool Ink 3 png file that is in the Christmas Poster Freebies from Design Cuts (by Vintage Design Company). It was free transformed and flipped. A Solid Color Fill Layer using a brownish-beige color was clipped (ALT+click between the layers to clip) to the Ink 3 layer. The text was added. Then this file was taken into Corel Painter where the wonderful Karen Bonaker‘s Christmas brushes were used. The deer were added and the trees were added on separate layers. Then the file was brought back into Photoshop where a layer mask on the text layer was used to make the deer look like they are walking through the text. An Inner Shadow Layer Style was added to the tree layer (Distance 17, Choke 0, Size 17). On the deer layer a Stroke set to 5 pixels, inside, normal blend mode, and a light beige color was added. The Text used an Outer Glow set to the default yellow, but Size 17. The last step was my free Snow1-Overlay set to 43% layer opacity. Basically that was it. I so enjoy making cards!…..Digital Lady Syd
More Holiday Cheer!
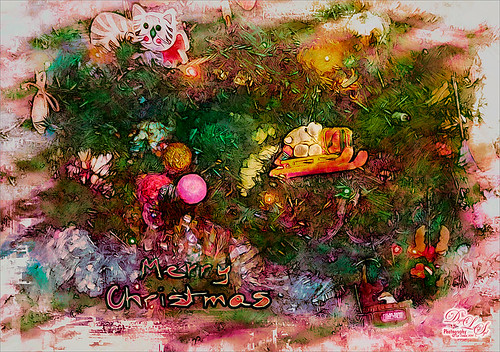
Just another Merry Christmas Card – hope all are enjoying the season. I was just adding different filters to layers to see what happens and this is what I got! Hum….. Anyway, this is what I did. Topaz (see sidebar for website link) Clarity was used to sharpen up the original tree ornament image. On a duplicate layer above, Topaz Glow’s Fur & Feather I preset was applied. Next Topaz Impression’s Abstract I preset was applied and I adjusted a couple sliders. In Photoshop the layer was set to Soft Light. Then the layer was duplicated and set to Normal blend mode at 77% layer opacity. A layer mask was added and some of the ornaments was painted back. I painted the text in Painter and placed it in as a layer with an Inner Glow layer style. On a stamped layer (CTRL+ALT+SHIFT+E) was created and taken into Smart Photo Editor. (Photo-art at a click 050; Changed Master fade to left just a little; Hue -0.298; and 2nd Hue 0.369. When brought into PS, it turned the color scheme very different but workable. Used Selective Color Adjustment Layers to get the color tweaked to where I wanted it.) The last step involved adding Nik’s Viveza 2 and adding focus on the ornaments. Just a lot of fun……Digital Lady Syd
On the Beach
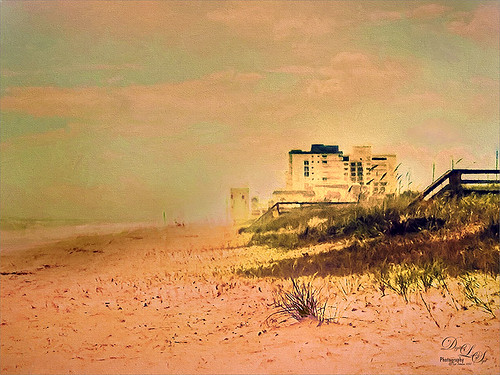
This is a nice little beach near my home called Ormond by-the-Sea. Thought I would try applying some of my new filters to this image. On a duplicate background layer in Photoshop, the Topaz (see sidebar for website link) Glow preset called Graphic III preset was applied. (Here are the adjusted settings I used: Secondary Glow: Glow Type Light, Glow Strength 0.23, Effect Sharpness 0.47, Electrify 0.17, Simplify Details 0, Brightness 0.36, Contrast 0.62, and the other two 0; Color: Red Sat 1.00, Orange Sat 0.27, Yellow Sat 0.20 and Lightness 0.09, Aqua Sat 0.78 and Lightness -0.26, and Blue Sat 0.49. Set to Multiply at 100% strength). This brought out the structure of the building very nicely. The background layer was duplicated again and placed on top. This time I used a preset I had created based on their Wonderland preset. (Here are the settings if you want to try them: Primary Glow: Glow Type Dark, Glow Strength 0.36, Effect Sharpness 0.29, Electrify 0.23, Simplify Details 0.21, Edge Color 0.13, Detail Strength 0, Brightness 0.37, Contrast 0.45, Sat 0.20, Line Rotation and Glow Spread 0; Secondary Glow: Glow Type Light, Glow Strength 0, Effect Sharpness 0.25, Electrify 0.11, Simplify Details 0, Brightness 0.77, and Contrast 0.60; Color Overall Hue -0.96, Sat 0.28, and Lightness 0; Red Sat 0.35; Orange Hue -0.46, Sat -0.34, and Lightness 0.79; Yellow Hue -0.34, Sat 0.41, Lightness 0.58; Green Hue -1.00; and Blue Sat 1.00; Finishing Touches: Effect Coverage 0, Smudge 0.05, Sharpness 0.30, Sharp Radius 0 and Vignette Size 0.) A layer mask was added and the sky and a little of the building was painted away so the first Glow preset settings appear above and the new ones below. Did a little clean up at this point using the Spot Healing Brush. A stamped layer was created on top (CTRL+ALT+SHIFT+E) and Topaz Impressions’s Dega Dancer I preset was applied as is. This really warmed up the image. Last, Nik Viveza 2 was used to add a little more focus on the large building in the distance. I believe this image is a pretty good representation of how it felt to be on the beach on a sunny early Fall day……Digital Lady Syd
Season’s Greetings!
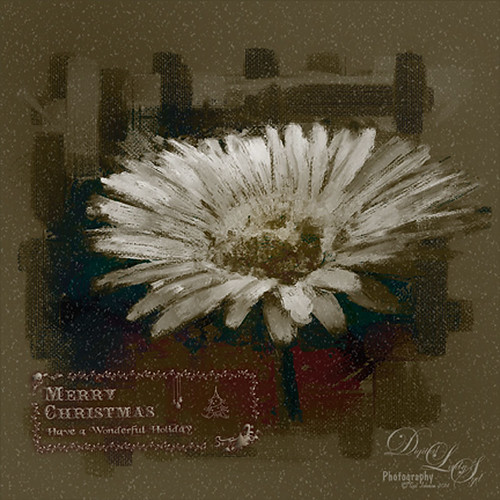
Really enjoying creating holiday items this year. This flower was painted in Corel Painter. Then brought into Photoshop where Painted Textures Winter Storm texture was added and set to Saturation blend mode. I am not sure I have ever used this one before, but by setting the Blend If Underlying Layer split black tab to 48/114 (ALT+click on tab and drag), some of the color came back – the blues and oranges mainly. A Selective Color Adjustment Layer was added. Next Nik Viveza 2 was used to pop the center where my focal point and reduce the background which pulls the eye a lot. Some clean up was done and my free Snow1-Overlay was applied and set to 14% layer opacity. Next my Merry Christmas PNG Overlay-01 (in same download link as above) was added. A Pattern Fill Adjustment Layer was clipped to the PNG layer (ALT+click between the layers to clip) and set to a beige colored pattern. Then in the layer style of the PNG layer, Bevel & Emboss effect was checked; an Inner Shadow was set to Blend Mode Normal and a deep gold color, and an Outer Glow set to Blend Mode Normal, Opacity 63%, black color, Spread 4 and Size 21 was set. I had to fiddle around with these settings to get a look I liked. But that was it. Have a Happy Holiday Season!…..Digital Lady Syd
Simply Glowing!
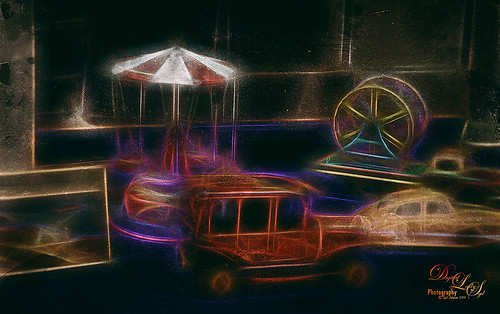
This an image of some vintage toys taken at a local antique show. The new Topaz (see sidebar for website link) Glow plug-in was applied to get this rather classic application of the plug-in. In Lightroom Seim’s (see sidebar for website link) Crosslight Warm preset was applied before bringing the photo into Photoshop. The layer was duplicated and Photoshop’s Shake Reduction filter was applied. This layer was duplicated and this time Topaz Glow’s filter was opened and Fractals II preset was used. Next Nik’s Analog Efex Pro 2 was applied and my SJ Wet Plate preset was selected. (Settings for this plug-in included: Basic Adjustments with 6 individual control points placed on each item to set the Detail Extraction, Brightness, Contrast and Saturation for each – this creates the darker background in the image; Photo Plate Strength 82% set to Corroded using the middle plate; Lens Vignette Amount -22, Middle between Circle and Rectangle, and Size 83%; Film Type Subtle 1st row/4th down set toward Faded, Strength 89%, Grain per pixel 500, and Soft/Hard in the middle; and Levels & Curves slight S-curve in Luminosity channel.) This is the really interesting final look that happened by combining these plug-ins. I do like the new Glow filter and am still learning how to use it to get some new effects. Just love trying new filters out – totally fun!…..Digital Lady Syd
Just Playing!
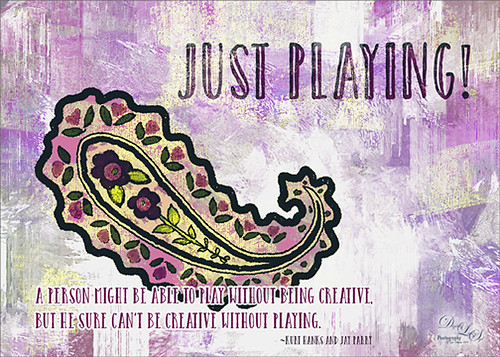
Just having some fun here. Did a wonderful tutorial by the great brush guru Obsidian Dawn called Multiple Colors (and Removing Transparency) with Photoshop Brushes Tutorial that explained how to colorize the brushes that she offers for free, I might add. I just sort of took the tutorial to a different level and ended up with this colorful final image. She included some very interesting info on selecting and adding the paint to the brushes so I would recommend checking it out if you like to use different types of brushes. I used Brush 19 in her Paisley Sketches Brush set. Since this required using several layers for the colors, they were put in a Group. Two textures, both by one of my very favorite texture sites, Painted Textures were used to finish up. Under the group the May Garden texture was applied and in the layer style, the Blend If This Layer black tab was split (ALT+click and drag on tab) and set to 189/196 and the split white tab set to 198/216. This gave the layer a lighter feel. A Hue/Saturation Adjustment Layer was added to give the texture more purple and pink colors. Added the Winter Storm texture set to Lighter Color blend mode and once again the layer style was opened and the Blend If Underlying Layer black tab was split and set to 84/139. Three Text layers were applied using the Catalina fonts that were bought in a Design Cuts package I bought recently. Love this font! The layer style for the longer lines of text once again used the Blend If Underlying Layers black tab split and set to 37/85. Also an Outer Glow was applied by setting the Opacity to Blend Mode Normal, Opacity 100%, White color swatch, Spread 67% and Size 10 px. This way the letters stood out but you could still see the design a little bit behind the lettering. For the larger top lettering, the layer style was opened and Blend If Underlying Layer white tab split and set to 242/255 and an Inner Shadow set to Normal Blend Mode using a sampled color from the green in the paisley brush, Opacity 100%, Distance 21 px., and Size 18 px. Just experimented to get the right look. But you can see some of the beautiful texture coming through the lettering by using the Blend If sliders. The last step was to add a Curves Adjustment Layer to pop the contrast and color. This was so much fun!…..Digital Lady Syd
Digital Lady Syd Related Blogs:
How to Use Those Handy Blend-If Sliders!
How to Get Blend If Slider Settings to Apply to a Layer
Painting in a Vector Pattern
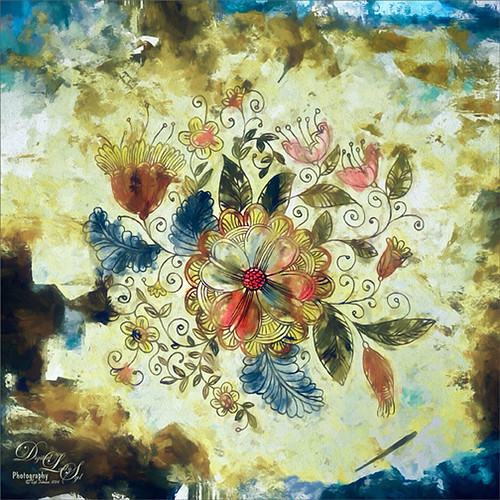
This is an image I was just having fun doing. Started with a layer that I placed a vector floral image on – Graphichive Floral vector flowers Swirls and Flowers 2 (there are some beautiful vectors on this site so check it out!). It was on a sheet with several other clip arts – had to open up the jpg, use the Rectangular Marquee Tool to select it and place on its own layer. Then select the background by going to Select -> Color Range – check Invert so that just the lines are selected and you now have transparent clip art that you can paint each flower and leaf the way you want. In this case I created a square file and copied the clip art layer over to this file. Used Free Transform (CTRL+T) and hold SHIFT key to adjust the size proportionately.
So to paint this, I used 6 different Pattern Fill Adjustment Layers – selected ones I liked, filled the Adjustment Layer masks with black (CTRL+I) inside the mask, and painted in white where I wanted that patterns to show up. If I did not like the color the pattern was, I just clipped a Solid Color Adjustment Layer set to Color Blend Mode to the Pattern Fill Adjustment Layer to change it. (ALT+Click between the layers to clip) I put all of the layers into a group by highlighting them and clicking on Create a New Group icon at the bottom of the Layers Panel. For a review of how to do this, see my Fun Photoshop Blog called How to Colorize an Old Photo. Next I placed a texture between the white background layer and the group – in this case it was Painted Textures Pilgrims’ Journey set to Pin Light blend mode. On top a Curves Adjustment Layer as added for contrast. Then because I could, Topaz (see sidebar for website link) Impression was applied using my SJ WC look on bldgs. (Settings used: started with Watercolor II preset and these were the final settings: Stroke Type 04, Brush Size 0.91, Paint Volume 0.42, Paint Opacity 0.87, Stroke Width 0.33, Stroke Length 0.89, Spill 0.23, Smudge 26, Coverage 1.00, Color Overall Hue 0.15, Saturation -0.20 and Lightness 0.06; Red Sat 0.47 and 0.14; Orange Sat 0.60 and Lightness -0.42; Yellow Sat -0.33 and Lightness 0.13; Green Sat 0.20 and Lightness -0.32; and Blue Sat 0.36; Lighting Brightness -0.04, Contrast 0.39, Vignette 0, and Light Direction X0.33 and Y0.06; and Texture Strength 0.78, Size 0.30, Canvas IV, Background Type solid white, and Background color used #d38967 – all other settings not listed at 0.) Next Topaz ReStyle using another one of my presets called SJ BW with greens – not sure how I got this one so I cannot give you the settings, but obviously I used some B&W setting in ReStyle. Last step involved Nik Viveza 2 to draw the eye to focal point, the main flower, in the image. It sounds like a lot of work, but it really was just experimenting and playing in Photoshop……Digital Lady Syd
Fall in Florida

This is a quick Android (yep – not an iPhone person) image taken from a tee box at one of our local golf courses. (For people who know – I-95 is hidden right behind the treeline.) Could not resist the slight feel of Fall that is almost over – not quite like Virginia when the trees are in their glory, but not bad on a wonderful sunny day! I have been so busy that I have not had time to look at the new OnOne Suite 9 (see sidebar for website link) and in particular my favorite module, Perfect Effects 9. This image was first processed in Lightroom using Seim’s (see sidebar for website link) Power Workflow 4 presets Magic Harsh Sun Fixer (definitely one of my top ten presets) and Controlled Contrast and Dave Delnea Backlit Vertical Left preset (I love his presets). The image looked pretty fabulous already! Then I added in OnOne’s Perfect Effects 9 plug-in and got this beautiful final result. Here are the settings used to get this final image: 1. Applied the Light Leaks & Lens Flares category Leaky Sun filter. 2. Changed the Lens Flare Layer opacity to 22%. Changed the Texturizer settings to: Opacity 76%, Saturation -49, and Brightness 16. 3. Added Filter Adjustment Brush and selected Glow Brush – painted in black mask white in the areas I wanted softened – that is the red and gold trees, midground areas and very foreground area. 4. Added from Filters section Borders the Russell border – set opacity to 45%. I have to say that OnOne has done it again – this is a pretty nice effect!…..Digital Lady Syd


