
Windsor Castle
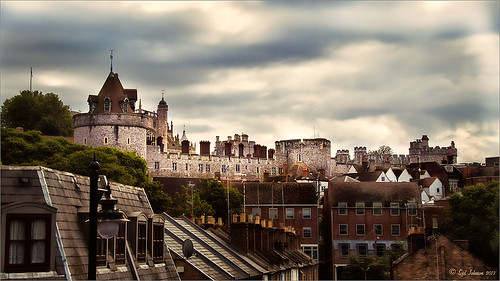
Here is another example of an image that used a Curves Adjustment Layer to adjust the color of the stone in this image of Windsor Castle in England. It turned too brown due to a filter treatment applied to the total image – Topaz (see sidebar for website link) Adjust 5’s French Countryside preset was applied to the image once it was brought into Photoshop – this preset is one of my very favorites but it definitely has a very brown tone to it. Nik Viveza 2 was applied next to selectively sharpen parts of the image. A regular Curves Adjustment Layer was added to increase the contrast in the image. Next another Curves Adjustment Layer was added and this time the Blue Channel Curve was adjusted to get rid of some of the yellow tones in the stone. The Layer Mask was filled with black and just the castle stonework was painted back in with a low opacity soft white brush. That is it! I love the final result – it really gives a different perspective on how large this castle really is!…..Digital Lady Syd
Digital Lady Syd’s Related Blogs:
Using Curves Adjustment Layers to Get Rid of Shadows and Highlights
I Didn’t Know That! Curves Adjustment Layers
Textured Pink Orchids

Just loved the way these beautiful orchids look with this luscious texture applied to them. These orchids were growing at the Hawaii Tropical Botanical Garden on the Big Island in Hawaii. Just did my basic image adjustments in Lightroom – used the Adjustment Brush to add some Clarity and Sharpening to the foreground flowers, and another one to smooth out the highlights and soften the background which was pretty harsh. Once in Photoshop, the background image was duplicated (CTRL+J). Next the texture Winter Wheat from Painted Textures Cyber Monday set was added between the two layers. A layer mask was added to the top orchid layer and the background was painted out with a soft black brush to cover up most of the background color. A Curves Adjustment Layer was added using a slight S-curve to add a little contrast to the image. The last step involved a black vignette set to 59% opacity so it barely is noticeable. Very simple processing and I loved the results. Melissa Gallo’s textures are so pretty!…..Digital Lady Syd
Digital Lady Syd Related Blogs:
Painterly Red Berries
Red Flowers in the Snow
Beautiful Christmas Flowers
A Vintage Landscape Look on a Scottish Monument

I loved the way this image turned out – never expected it to be this pretty considering it was an image I snapped while standing on the street in front of our hotel. It is Nelson Monument (in center) and Acropolis (aka National Monument of Scotland on left corner) on Calton Hill – I did not get to visit this site but wish I had. This was not difficult to process once I got going. After cleaning up a rather boring image, Topaz (see sidebar for website link) Simplify 4 was opened and a preset I call the John Barclay BuzSim Setting preset was used, (The settings are: Simplify: Colorspace RGB, Simplify Size 0.19, Details Boost 1.00, and Details Size 0.20; Adjust: Brightness 0.01, Contrast 1.08, Saturation 1.03, Saturation Boost 1.15, Structure 1.00, and Structure Boost 1.00; and Edges: Edge Type – Color Edge Normal, Edge Strength 0.00, Simplify Edge 0.30, Reduce Weak 10.00, Reduce Small 0.20 and Flatten Edge 0.00.) I listened to one of John’s excellent videos on Topaz Labs and created this preset which has a very subtle result. Next I added 2 lil Owls (see sidebar for website link) Workshop 6 – Texture 1 which has the beautiful turquoise and light yellow sky color – the layer was set to Overlay Blend Mode. The beautiful text was supplied by my favorite Shadowhouse Creations – his Text Brush 5. I actually clipped a bright green Color Fill Adjustment Layer to the text (to clip just ALT+click between the two layers and the color fill adjustment layer will only affect the layer below) – then the text layer was set to 55% opacity. Another 2 Lil’ Owls Texture – texture 4 was used as an overlay frame (follow the steps in my blog How To Make Frames or Borders – scroll down to the section called “To save the frame you created as an overlay to use again”). A light yellow Color Fill Adjustment Layer was clipped to the texture file. A Curves Adjustment Layer where the red, green and blue channels were adjusted to get this slight vintage feel. The last thing done was to add a Color Fill Adjustment Layer to the whole image using a soft cream color (#c6c3bd) and then Nelson Monument was painted out in the layer mask so the eye is drawn to that area of the image. Had a lot of fun as usual – never get tired of this!…..Digital Lady Syd
Winter Violets

Just liked the way my purple-blue violets turned out so I decided to post them. When I took this image, I held an old Cokin Gradual Blue Filter 122 B1 in front of my macro lens. In Lightroom David duChemin’s Iceland Split Greens preset (from his newest book The Print and the Process: Taking Compelling Photographs from Vision to Expression) was applied and then the Basic Panel sliders were tweaked. Topaz Detail 3’s (for website link see sidebar) Overall Detail Light I preset was applied. Next a Levels Adjustment Layer was applied and the mid point was moved to the left (2.57) to really lighten the image. The layer mask was filled with black (CTRL+I) and just some of the purple edges were painted back so the purple was not so bright. Next 2 Lil Owls (see sidebar for website link) Scripted Brush 34 at 2500 pixels was painted in upper right area – a layer mask was applied and any brush color was painted off the flowers. The layer was set to 68% opacity. A green Color Fill Adjustment Layer was clipped (ALT+click between layers) to change brush strokes to green. Kim Klassen’s Unleashed (a beautiful texture that was free by signing up for her newsletter) that I converted to a PNG texture was applied and a light purple Color Fill Adjustment Layer was clipped to the layer. The texture was set to 62% opacity. Another Levels Adjustment Layer was placed on top and the black Output Levels tab was set to 38 to soften and lighten the whole image. In the layer mask, the two main flowers were lightly painted out to sharpen just a bit. That was it. I really enjoyed just doing a fun image…..Digital Lady Syd
The London Eye Looking Up

I was just playing around in Lightroom today and found this old image of The London Eye that was a very different type shot. Decided to process it first using NAPP‘s Lightroom preset Summer Day. It created a very yellow image, totally different from what I ended up with, but I thought I would try it. Once opened in Photoshop, Topaz (see sidebar for website link) Detail 3, my “go-to” filter where I actually tried the “I Feel Lucky” button. The image above is basically what I ended up with. (These are the settings if you are interested: Detail: Overall details set to Small Details -.094 Small Details Boost 0.84, Medium Details 0.87, Medium Details Boost 0.53, Large Details -0.92, and Large Details Boost 0.95; Tone: Exposure 0.81, Contrast -0.53, Highlights 0.70, Shadows 0.81, Whites -0.81, Blacks 0.82, Cyan-Red 0.63, Magenta-Green 0.51, Yellow-Blue -.86, and Add Grain 0; Color: Temperature -0.70, Tint 0.75, Saturation -0.84, and Saturation Boost 0.57; and Effect Mask: Overall Opacity 0.37.) The last step was to add a Curves Adjustment Layer and putting a little less blue in the Blue Channel. This really looks like how I remember the sky that evening. The London Eye was one of my very favorite things I did on my trip to England……Digital Lady Syd
Digital Lady Syd Related Blogs:
“Perfect” Perfect Layers!
Beautiful Feathers!
Painterly Red Berries

These little red berries were growing in my neighbors yard – I really did not think they would look that great but I took a photo anyway. By adding the soft painterly texture, they turned into something quite beautiful. In Lightroom the basic panel sliders were manipulated and an adjustment brush was set to increased clarity and sharpening to paint around the edges of the front berries. The image was then opened in Photoshop where Topaz (see sidebar for website link) Detail 3 was opened and the Desaturated Blush I preset was applied. Painted Textures Creamsicle texture was set to Linear Burn at 100% opacity. A Levels Adjustment Layer was added and the Output level was changed to 54 to add a slight light haze to the image. The berries in front were painted out in the adjustment layer mask so they would appear slightly sharper. That is it! I love this texture – gives a real painterly look!…..Digital Lady Syd
Digital Lady Syd’s Related Blogs:
Beautiful Christmas Flowers
The Kiddie Tractor Revived!

Riding my toy tractor may be the first recollection I have. Since I grew up practically in the middle of a corn field (although my parents were not farmers), my first ride-on toy was a tractor exactly like this one. It was my favorite toy and I put miles on it! I did not have a tricycle, just a tractor. I had to get a picture when I went to the 39th Annual Turkey Run in Daytona Beach, Florida, last fall. Looks like we are missing a pedal here.
Used my basic Camera Raw steps (see How to Use Adobe Camera Raw (ACR) or Lightroom 4 Quickly) in Lightroom 4. Next Topaz (see sidebar for website link) Detail 3 was applied using Overall Detail Medium II preset first, and then the Soft and Dreamy II preset was applied. The tractor was painted back in a layer mask so just the background was softened. On a duplicated layer Topaz Adjust 5’s Low Key II preset with Transparency slider set to .28 was applied to the layer. A Hue/Saturation Adjustment Layer was used to desaturate the greens and yellows. 2 Lil’ Owls (see sidebar for website link) Workbook Bonus Texture 16 was added at 85% opacity. A High Pass Sharpening effect set to 8 pixels was applied and a final Curves Adjustment Layer for added contrast and give a nice orange color to the tractor was added. Lots of fun to work on something from your childhood……Digital Lady Syd
More Border Fun!
 Creating the Border: Completed this border using a tutorial I learned from PhotoshopLayers.com called Photographic Edges in Photoshop. It is basically a very simple process and uses the Photoshop Sprayed Strokes Brush Stroke Filter to create the border. I changed the settings and maxed out the Stroke Length to 20, the Spray Radius to 25, and Stroke Direction to Horizontal to get a more pronounced edge. Then the frame was saved down as png file. This was done using my the little known Script called Save Layers to File. (See my blog How To Make Frames or Borders on how to do this.) To use this new border easily on other pictures, just drag it into your document. Use a Solid Color Adjustment Layer to change the color of the frame. In this case, I changed it to a light pink, then used a Layer Style to add a soft gradient, a white texture, and Outer Glow. Using a Layer Style on borders can create a very subtle but nice effect.
Creating the Image: These Alestroemeria flowers were actually captured at the local grocery store with my little point-and-shoot Kodak camera. Not much processing was required. I followed the Lightroom processing steps from my blog How to Use Adobe Camera Raw (ACR) or Lightroom 4 Quickly. In Photoshop I applied OnOne Perfect Effects (see sidebar for website link) stacking Tonal Contrast, Rice Paper Light Texture, and Hollywood Glow at 50% opacity. A Curves Adjustment Layer was added to add back just a little overall contrast. A composite was created on top (CTRL+ALT+SHIFT+E) and duplicated. The top layer was set to Multiply Blend Mode and on a layer mask using a large soft black brush at 100% opacity, one dot was placed on where I wanted people to look first. Next the border .png was placed on top with a Solid Color Adjustment Layer set to light pink. Finally a Layer Style was added to the border using a light pink to pink Gradient Overlay (Blend Mode Normal, Opacity 48%, Linear Style, Angle 81 degrees, and Scale of 150%), Pattern Overlay (Blend Mode Normal, Opacity 66%, Pattern set to Normal Blend Mode, Opacity 66%, Pattern from Photoshop’s Watercolor Patterns – bockingford_rough at Scale 55%), and an Outer Glow set to its default settings.
Try creating this border – it really easy and fun to make!…..Digital Lady Syd


