
Beautiful Feathers!

These beautiful feathers were from the 24th Annual Native American Festival held in Ormond Beach, Florida. Totally enjoyed looking at the many exhibits and vendor tents, and the shows were very entertaining. This image is of a display of feather hair bungies that was in a vendor tent. Very little treatment was done to the image. The biggest change in Lightroom was changing the aspect ratio to a square crop. A few Basic sliders were adjusted before opening Photoshop. First the image was taken into Topaz (see sidebar for website link) photoFXlab where the layer was duplicated and in the Effects tab, Black and White Albumen – Chocolate was applied (this is actually a preset in the Black and White Effects plug-in). Next in the Adjustment Tab, Saturation was set to 2, Exposure to -0.05, Contrast to -5, and Dynamics 25. The top layer was set to 52% opacity and a Color Blend Mode. Once back in Photoshop, Topaz Detail 3 was opened and the Overall Medium Detail preset applied. A black layer mask was added and with a soft white low opacity brush, only areas I wanted really sharpened were painted back in. Then a little clean up to smooth the background was done. I really like the soft looking feathers in this image. What a fun place to take pictures – and not much processing needed afterwards!…..Digital Lady Syd
Some French Tulips!

Love this image of my beautiful red tulips I got from the grocery a few weeks ago. I was experimenting with different settings and this one turned out perfect in my mind! It was shot with my 60 mm Nikon Macro Lens set at F/2.8, 1/3000, and ISO 400. Very little was done in Lightroom other then a little Basic slider adjustments following the workflow in my blog How to Use Adobe Camera Raw (ACR) or Lightroom 4 Quickly. I added a pretty texture (1) from 2 Lil’ Owls Studio textures (a free one from the site – see sidebar for website link) that I had first opened in Nik Color Efex Pro 4 and applied BiColor Filters using 40% opacity and Darken Center Filter to the texture. It gives more of a colorful look than the original texture. The beautiful French text is from French Kiss Glorious Grunge Letter 2 (a free download) – a brown colored Color Fill Adjustment Layer was clipped to the text (to clip just hold down ALT+click between the two layers in the Layers Panel, and the Adjustment Layer will attach to just the text). The text layer was set to 66% opacity. To keep the text from covering the flower, a Layer Mask was added to the text layer – with a black brush at 100% opacity, the text was removed from the flower itself. Next French Kiss Artiste Gateaux was added, set to Overlay blend mode and 28% Opacity. This makes the image look like a canvas – love this texture! The last step was a Curves Adjustment Layer added to the whole image to add some contrast. Sometimes it is just fun to play with an image you just like!…..Digital Lady Syd
Digital Lady Syd Related Blogs:
Check out my Textures category in the sidebar for more Tidbits Blogs
Check out my Fun Photoshop Blog (link at top of page) and click Textures category in the sidebar
Hyacinths Deep in Reflection

Recently I posted a blog using this image called Take the Time to Experiment! where a Mirror Effect filter from The Plugin Galaxy was used. This time the Flood Filter from Flaming Pear was applied. I love this filter. It is the only one that gives a really realistic look to a water reflection. Before applying the filter, the canvas had to be increased to add the reflection under the image. (Here are the Flood filter settings used so you can see all the sliders that can be manipulated: Horizon 60, Offset 0, Perspective 68, Altitude 6, Waviness 17, Complexity 17, Brilliance 28, Blur 15, Size 0, Height 23, Undulation 46, and Glue Normal.) See my Fun Photoshop Blog The Flood Look for tips on how to apply this filter. Nik Color Efex Pro 4‘s Midnight, Polaroid Transfer, and Detail Extractor filters were applied to just the hyacinths to add back some color to the flowers, especially in the reflection. In Photoshop the layer was then set to 69% opacity. That was it. Really fun effect!…..Digital Lady Syd
Musical Daisies

My musical flower image basically started out by my experimenting with some inexpensive French Kiss Brushes I recently bought. The background is from Shadowhouse Creations – Old Paper Texture 4. My flower image was added and a layer mask applied so that only a few daisies were showing. Once done, the layer mask was applied to the image (right click on layer mask and choose Apply Mask). A Color Balance Adjustment Layer was added and sliders in the Midtones (0, +13, -18), Highlights (), +11, -12), and Shadows (-31, +4, _32) were set to change the flower color somewhat. (I am listing the settings just to give you a feel for how these can be adjusted.) All the following brush layers were added underneath the image but above the texture layer – that way the brush strokes look like they are part of the texture and do not cover the image. It is also now easier to adjust the layer opacity and color. French Kiss Watercolor Spots 1_14 PNG brush file was applied on a New Layer and a bright pink Color Fill Adjustment Layer was clipped to it (ALT+click between the two layers to clip). Next a layer with one French Kiss Spatter4_14 brush PNG file stroke was applied and a purplish Color Fill Adjustment Layer was clipped to it. Another new layer and French Kiss Spatter 2_04 was applied with a deeper purple and set to 51% opacity. I seem to like adjusting a PNG file over the actual painted stroke – it seems easier to me but I am not sure it makes that much difference whether you actually stroke the image or use an overlay PNG stroke. French Kiss Vintage French Music in a set called French Kiss Vintage French Brushes 2 was added on top at 82% opacity, and a brown Color Fill Adjustment Layer was clipped to the layer. The music was painted off the flowers by using a layer mask. (Not sure why I placed it above the image – it would have been easier below.) The last step was a Curves Adjustment Layer to lighten up the image overall. This actually was not as hard as it sounds. Mainly just a lot of paint being spattered! What fun!…..Digital Lady Syd
Where Am I?

This is the beautiful Scott Monument in Edinburgh, Scotland. There is an excellent tutorial called Processing with Textures by Colleen of Chasing Dreams Photography that shows you how to create a vintage feel that looks somewhat like this. After doing basic processing in Lightroom, the image was brought into Photoshop where Lenabem-Anna Texture – 208 was added and set to Overlay blend mode at 17%. She has such beautiful textures that can be downloaded from FlickR – see her Use Information before downloading. This texture was chosen to lighten the dark image in the center. The texture was removed by painting a sampled color from the texture over the building areas using a low opacity brush. Next her beautiful vintage sky Texture – 230 was applied and set to Darken at 100% – a layer mask was used to remove texture from the parts of the image where the texture should not be covering. A vintage action was run on the background layer to add more of the effect and the layer was set to 49% opacity. On top Flypaper Elysium Copy Taster Texture was added but a Hue/Saturation Adjustment Layer was added with Saturation set to -100 so no color but just the scratches were seen. The texture was set Overlay blend mode at 45% opacity. French Kiss free Glorious Grunge Edging Overlay was added and a Solid Color Adjustment Layer using a cream color for the edging. A dark vignette was applied at 54%. To get a better feel for all these steps, check out the video. This image was a lot of fun to do and I really like the vintage look!…..Digital Lady Syd
Dingbats on Textures – Who Knew?

This beautiful cat statue was located outside the door to the breakfast buffet at the Hilton Waikoloa Village on the Big Island in Hawaii. After initial processing in Lightroom, the image was brought into Photoshop where French Kiss Bohemian Texture, a free download, was added behind the cat image. A black layer mask was added to the cat layer and the cat image was painted out with a white brush – it was refined by going into the Properties panel with the mask selected and clicking on the Mask Edge button to smooth out the selection. French Kiss Grunge No1 Chateau (a free download of PNG brush overlays) was placed on a layer above the texture but under the cat, and a brown Solid Color Fill Adjustment Layer was clipped to the layer (go to Layers -> New Layer -> Solid Color Fill and check Use Previous Layer to Create Clipping Group). The overlay was set to 69% opacity. Just above this layer another French Kiss overlay – Bohemian Template Overlay was applied (in set with Bohemian Texture download) with another Solid Color Fill Adjustment layer added using a soft cream color. The overlay texture was set to 48% opacity. Next above the cat image, French Kiss Artiste Impasto Texture (not free) was set to 32% to get a textured look on the cat – my own free gray Cat Painting Texture would probably work just as well. Now what was really neat is how I got the interesting animal and markings effect – they are from Tangaroa Dingbats font. By adding a layer style (double click on the layer) and selecting the Inner Glow with the default settings, and Pattern Overlay using my free Digital Lady Syd’s Smudge Texture as a pattern set to 258% scale, you get the soft orange-brown look. (To create a pattern from a texture, just open it up in Photoshop and go to Edit -> Define Pattern and it will appear at the bottom of your patterns list.) A separate text layer had to be created for each of the three objects selected and each text layer was set to approximately 30%. The Sharpen Tool was used on New Layer to sharpen the eyes just a little and that was it. I think it turned out pretty nice and it was a lot of fun to create. Try out using dingbats in your images to add a little different look to a texture…..Digital Lady Syd
Adding Texture to a Landscape

Usually I use my own images to alter, but I found this beautiful texture image of old buildings in Porto, Portugal, from Mayang’s Free Textures (scroll down a ways in link to see original) and it seemed like a good candidate to see what I could do with some more textures to enhance it some. Click their link to see the original image and lots of others that can be used for personal use.
This image was first processed using Topaz (see sidebar for website link) photoFXlab. First duplicated the layer. On top layer the Black & White Effects plug-in was opened and Hand Tinted Chiffon was selected with Transparency set to 1.00 and Vignette Strength to .45. After applying the plug-in, back in photoFXlab this layer was set to Linear Light at 100%. A +From Stamp layer was created and these Adjustment tab sliders set: Tint -8, Saturation 17, and Dynamics -28. Next exited to Photoshop where some clean up was done and French Kiss Artiste Collection Fantasie texture was applied. Two Hue/Saturation Adjustments Layers were added with black filled layer masks – the red-orange color needed to be adjusted and the greens above the buildings were off. These areas were painted back in the masks to create the correct tone in the image. An Ash texture (no long available – but Shadowhouse Creations has a very similar texture called ArtGrunge 5 which would give a very similar effect) and it was set to Hard Light blend mode at 45%. A hazy feel was added to the image by adding a Levels Adjustment Layer and just moving the Output Level black tab to 80. A Curves Adjustment Layer was added next to just slightly add contrast. This image had a very low resolution on it so I created a composite layer on top (CTRL+ALT+SHIFT+E) and went to Image -> Image Size and checked the Resample Image box and set the resolution to 240, leaving the size alone. The last step was adding my Mid Size Double Edge Frame layer style – sampled colors in the image for frame colors. I was really pleased with how painterly this image turned out. It is a little different from creating a flower type texture image, but you can really add some creative aspects with a little experimenting. And thank you Mayang.com for supplying such a interesting image to work with!….Digital Lady Syd
Digital Lady Syd’s Rule No. 9: Get the Shot!

I took this beautiful little rose at Lowe’s with my inexpensive Kodak C1450 14-mp point-and-shoot camera and it turned out very nice! These little cameras really do a great job for those unexpected shots! Since most people have decent cameras on their phones (mine is still a 2 megapixel so I carry this camera), there really is no reason not to get the shot. It just may not be quite as sharp or colorful as your good camera, but at least you get the shot, the memory, and something you can work with in Photoshop. That is what I did with this rose – it was a little soft except where it was focused, but the colors were still beautiful and overall, not that bad an image.
One of the issues I had with this image is that it is a JPG and there was a lot of Chromatic Aberration in the image – I tried to remove it in Lightroom, but it still looked rather bad so I treated it with a soft texture treatment to blend in the petals where the bleeding was bad. Some noiseware was also applied. Two gorgeous textures were stacked from French Kiss Textures – Artiste Fantasie at 80% opacity and Artiste LaDanse set to 68% opacity and her Spatter Brushes were used over the rose. Following Dave Cross’s path tutorial from his Photoshop CS5 Finishing Touches for Photographers class at Kelby Training (but it is also in his really good Photoshop Finishing Touches book), I created a fancy edge around the flower. Dave’s book was published a while back, but most of the tutorials work fine in CS6.
So get the shot, even if you do not have your best equipment with you – it may be a great image anyway!…..Digital Lady Syd
Fake Panoramic Effect
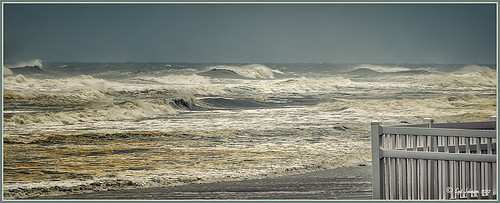 |
Taken the morning after Hurricane Sandy went past Ormond Beach in Florida, this image showed how strong the surf was and how gray the sky appeared even though the ferocious hurricane was not a direct hit. We were so fortunate that the storm did not hit Florida directly.
What I really like about the shot is how sharp the texture in the waves and beach surf is. To get this effect, the image was first processed in Lightroom where just basic slider corrections were made and a custom crop was created. I usually do not do this, but this image seemed to scream panorama to me as the sky was so plain and the main subject is the large expanse of water. Since everything was moving, a several shot panorama was out of the question, so it had to be faked. Click on image to see Lightroom version – it is very flat, not at all how I remember it. In Nik Color Efex Pro 4, a Cross Processing filter using Method C04 at 27% strength, Detail Extractor filter set to Normal (Detail Extractor at 64%, Contrast at 31%, and Saturation at16%) with 6 Control Points to restrict the filter effect to the sky area, and a Lens Vignette filter (Amount -9, toward Rectangle,Size 57% and Brightness -16%). In Nik Viveza 2 the Center was brightened. The Spot Healing Brush was used on a clean up layer, and Contrast was boosted with a Curves Adjustment Layer. The default preset in Imagenomics Noiseware was applied. When noiseware is applied, the image detail will usually get softer – therefore, in a white layer mask, I painted with a soft black brush the waves back so you can see the water mist detail. The last step was to apply my free SJ Thin Double Edge Frame layer style sampling colors from the image. Now I get the result I remember!…..Digital Lady Syd
Happy New Years!

Happy New Years to everyone. I posted this image earlier today and thought I would give you the info on how to create it. The flowers are two of my red gerberas from my back porch that decided to burst forward on the New Years weekend. They are a little crazy looking as I keep moving them into the house when it gets cold and outside again when it warms up! Anyway, here are the steps in a nutshell! After initial processing and cropping in Lightroom, Topaz (see sidebar for website link) Detail 3’s Medium Detail II preset was applied. Next Isabelle Lafrance free Christmas Lights overlay was applied for the bokeh effect. I just used a soft black brush on a layer mask to bring the red gerberas back into the image. Next I applied my free SJ Snow 2 Slight Blur Overlay and added a Pattern Overlay. In another document I opened up my free Smudge Texture and changed the colors to reds, greens and yellows – saved it down as a new pattern (Edit -> Define as a Pattern). Then on the Snow Overlay layer, I created a layer style using the Pattern Overlay and selected my new pattern set to 33% scale – this gives the colored confetti look. I duplicated the layer and Free Transformed it (CTRL+T) – selected Flip Vertical so the colored snow on this layer lines up differently. The bottle is from Mel’s Happy New Years Brushes with a Bevel & Emboss layer style applied along with the fizz. The font is Orial with a Stroke, Inner Glow and Outer Glow layer style added. The last step was a Curves Adjustment Layer to add some contrast. Lots of fun to play with all these effects! Hope everyone has a chance to play in Photoshop and try out some of these fun techniques!…..Digital Lady Syd


