
Topaz Adjust Using Painting Venice Preset – Beautiful Effect!

I love how this image ended up with a beautiful soft artistic look – for the image above I used Topaz Adjust (see sidebar for website link) Painting Venice preset with no adjustments made. I have not used this preset before but really love the results. A very similar effect was obtained by using Topaz Simplify’s BuzSim preset (reduced the Simplify Size to 0.10 and increased the Saturation Boost to 1.56) – I could not see a big difference when I tried this. If you would like to compare the images, the Simplify image is in my Fun Photoshop Blog Using Topaz Simplify for That Artistic Feel! blog.The people were painted out just a bit to bring their body lines and kayaks in focus a little more. Using my blog Smoothing Out Those Waterfalls, the Motion Blur filter in Photoshop was set to an Angle of -82 and a Distance of 48. This image was taken at the Hilton Waikoloa Village on the Big Island in Hawaii. Beautiful place to visit……Digital Lady Syd
The Art Corner: Poetry and Music by Clodion

This Carrara marble artwork is found in the East Sculpture Hall of the National Gallery of Art in Washington, DC, and was sculpted in 1774-1778 in Paris by Clodion. Metal Chris, a great local DC concert photographer and founder of the DC Heavy Metal website, took all these these images for me recently as I missed it on my last trip to the National Gallery. What I love about this sculpture is that by viewing it from the different angles, which Chris did, you get a very different expression and feel of the art. Poetry definitely takes on a very different look depending on the view.


The Gallery’s site says “Clodion prepared a terracotta model for Poetry and Music, which is in the National Gallery and frequently on view in the ground-floor sculpture galleries. It provides a rare chance to compare an artist’s model with the final version in stone. In this case, Clodion modified the figure of poetry, “correcting” it to adhere to traditional representations: the terracotta figure had rested his head in his hand, but here he holds a writing stylus.” I will try to find this on my next trip to the Gallery – I think it would be fun to see. This is one of four sculptures that were meant to bring to life the abstract concepts of the arts and sciences. I did a previous blog called The Art Corner: Painting and Sculpture by Tassaert if you are interested in more information on both sculpture pieces. The last two pieces, Geometry and Architecture by Jean-Jacques Caffieri created in 1776 and Astronomy and Geography by Felix Lecomte created in 1778 are located at the National Trust, Waddesdon Manor, Buckinghamshire, England.
The first image was processed using Russell Brown’s Paper Texture Panel (see Russell Brown’s Paper Texture Panel Updated! blog to download) and Flypaper Textures Creme Anglais Taster set to Overlay Blend Mode at 93% Opacity and Touchstone Taster set to Overlay Blend Mode at 100% Opacity. Layer masks were added to clean up the faces and shadows a little and a large shadow on the wall was removed as it was very distracting. What really made this image so beautiful was OnOne PhotoFrame (see sidebar for website link) Maivre Background set to Overlay Blend Mode at 80% Opacity while still in the plug-in. It was actually just like adding another layer of texture. Once back in Photoshop, a layer mask was added to softly clear the face area of the texture. The left image of Poetry was converted to a black and white using Nik’s Silver Efex Pro 2 starting with the High Contrast preset. A little localized sharpening was done to the his face using the LAB sharpening method (see my Fun Photoshop blog Unsharp Mask Filter in LAB Mode) and some noise was removed from his body using Imagenomics Noiseware that I am trying out. The right image was hardly touched (only slight noise removal due to the dark lighting effect) – just a beautiful image and very much how the sculpture looks at the Gallery.
If you get a chance to go to this wonderful Art Gallery in DC, you will should try to see one of these beautiful sculptures…..Digital Lady Syd
Nik CEP4’s Film Efex Faded for an Illustrative Look

Had fun working on this little Hawaiian ‘Elepaio bird that was living with a bunch of his buddies at the Palace Tower in the Hilton Waikoloa Village. For very small birds they really make a racket, especially around sunrise and sunset – very busy, busy, busy birds! To create this sketch-like effect, he was processed in Nik Color Efex Pro 4 stacking just two filters – the Detail Extractor and Film Efex Faded set to Film Type 11 and an overall opacity of 71%. A Curves Adjustment Layer was added to add contrast and OnOne PhotoFrame (see sidebar for website link) Dave Cross 02 to finish the image. Very simple but I really loved the illustrative look of the bird. These new Film Efex filters in Color Efex Pro 4 give some great results but you have to play around with them to achieve it sometimes. Here is a link that shows what the Film Efex Faded filter will do from their website – Nik is currently presenting a filter each week and showing how it can be used. Really good stuff here!…..Digital Lady Syd
Digital Lady Syd’s Related Blogs:
Nik Color Efex Pro 4 Just Does It Right!
The New Film Efex-Vintage Filter From NIK CEP 4
Little Green Frog’s Makeover Using Nik’s Color Efex Pro 4!

This little guy was hiding between a couple Queen Emma Lily leaves during a rather heavy rainstorm. Had to get his picture! He is a Green Treefrog and is one of the reasons I don’t get a good night’s sleep this time of year, but his coloring is beautiful!
I tried several different effects before settling on a recipe of Nik’s Color Efex Pro 4 filters. These filters were stacked as follows: Detail Extractor set to an Overall Opacity of 50%; Midnight using Neutral Color Set, the Blur slider reduced to 8%, and Overall Opacity of the filter set to 80%; Vignette Lens centered on frog and Overall Opacity set to 53%; and Image Borders – just a plain Type 13. This is a reminder that you don’t have to use the filter effect at 100% – just open up the Control Points panel at bottom of each filter panel and an Opacity slider appears that can be adjusted for the amount you want. Back in Photoshop, I used the LAB Sharpening technique to sharpen up just his body a little (see my blog Unsharp Mask Filter in LAB Mode). A Curves Adjustment Layer was added to increase contrast just a little and that was it. He has no idea how handsome he is!…..Digital Lady Syd
Digital Lady Syd Related Blogs:
NIK Color Efex Pro 4 – Digital Lady Syd’s Review!
Pseudo HDR Using NIK Color Efex Pro 4
White Daisies! Using Color Efex Pro Midnight Filter
Nik Color Efex Pro 4 Just Does It Right!
Some Beach Fun!

Thought I would put up an image I created a couple years ago of Ormond Beach, Florida, where Granada Boulevard runs into the Atlantic Ocean – it is a beautiful stretch of beach if you are in the area. The old Hotel Ormond, a large 300-bed hotel that was built in 1887, was located near this beach. This was one of my first attempts at adding a texture to an image – not sure what texture this is, but it definitely is a watercolor texture that goes from a yellow tone on top to blues on the bottom – the layer was set to a Color Dodge Blend Mode at 30% opacity.
The image below is also of the same stretch of beach but from 1903 – there were beautiful houses instead of high-rises overlooking the ocean. In this winter image, the sails helped move the bikes on the hard sand beach coasting at up to speeds of 20-25 mph. The image is from Shorpy Historical Photo Archive – a great site to follow on a daily basis if you love American history like me as they post a new image every day from the past. To see this image in high resolution on their site, just click on it – and click here for a similar lower resolution shot of the same bikes racing a car. This beach is where the first official automobile race was held in 1903 and the town of Ormond Beach is still known as the “Birthplace of Speed.”

I hope to shoot more local images in the near future – it is fun to live in an area that has some great local historical interest. In the meantime, try out some textures to add a little interest and fun to your own images……Digital Lady Syd
Digital Lady Syd’s Related Blogs:
Where Am I?
Getting That Vintage Look!
Russell Brown’s Paper Texture Panel Updated!
Purple Lily Pads!

Here is one of my first attempts at creating an image using a color palette I liked and not the one in the image. I just finished John Paul Caponigro‘s tutorial on Photoshop Color Strategies at Kelby Training where he teaches you how to change hues naturally to give a very believable feel to an image. He is one of my very favorite Photoshop gurus and he does beautiful fine art photography. This image actually contains: three Hue/Sat Adjustment Layers each addressing a different area of the image, a Color Balance Adjustment Layer, a Gaussian Blur filter applied to the image and selectively painted out, a Curves Adjustment Layer, a Replace Color layer, a Topaz Simplify 3 plug-in using the BuzSim preset set to a low Simplify Size, and a Wow-Frame 10 layer style. I was really pleased how the purple colors and cool tones could replace the greens and yellows and give such a wonder effect!…..Digital Lady Syd
Where Am I?

This is an image of San Francisco taken at night in February in a brisk and cold breeze. I just listened to another interesting webinar by Nichole Paschale from Topaz (see sidebar for website link) called Night Photography Enhanced with Adjust, Black and White Effects and Star Effects. I am always surprised how much I learn from these short videos – there were several good tips in this one, even though I know these programs pretty well. My image was not that great, but I needed a nighttime image to try some of the techniques on. Now I rather like the effect. Of course it uses one of my favorite plug-ins, Black and White Effects, so I am not surprised I like the results. The preset was set to my Old Vintage Effect (see Quad Tones in Topaz Black and White Effects Plug-in to create), one I use on a lot of my images. Next the Star Effects plug-in was used to enhance the streetlight using Sun Flare 1 preset. A Flypaper Texture Lemoncello Taster texture layer was added using the Multiply blend mode at 35% opacity. It still did not have the feel I wanted, so I added a Black and White Adjustment layer and mainly lowered the yellow and added some reds and greens and blues. The opacity was set to 26%. A layer style was added to frame the image. I can honestly say this is exactly how the street looked to me as I was walking to dinner on that cold dark night. If you have not tried out some of Topaz’s videos, give them a listen. Lots of cool things to try in them!…..Digital Lady Syd
Topaz Adjust’s French Countryside Preset – Beautiful!
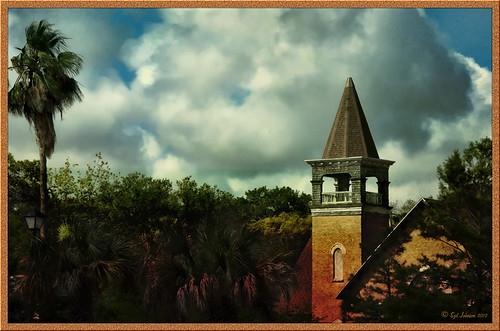 |
Thought I would do another Before and After where I show what one of my favorite presets in Topaz Adjust 5 (see sidebar for website link) looks like when applied. This image was taken in full light and I really took the image as a test shot before visiting some of the wonderful historic sites in St. Augustine, Florida. I really love steeples and cupolas on buildings. I had a hard time deciding what to do with it – it was a hand-held three HDR image. I processed it in Photoshop’s Merge to HDR Pro, only checking the Remove ghosts box before exiting to Photoshop (hover over image to see the tone-mapped image). Some image clean up was done, and two curves adjustment layers, one for contrast and one for color tone, were added since the image was not processed in Lightroom or Camera Raw. After much experimentation, I finally settled on using Topaz Adjust 5 and the French Countryside preset. It seems to soften the image just enough, yet retains some detail in the image – the trick is to adjust the Detail tab’s Threshold slider to bring back some of the details. Then I added Caleb Kimbrough Summer 4 Texture – one of my favorite textures to add the red and green tones into the image for that warm feel. (Also check out his site for many other wonderful textures.) The image took on a totally different feel. Try this preset if you have Adjust…..Digital Lady Syd
Digital Lady Syd Related Blogs:
Why I Love Topaz Adjust!
Topaz Adjust 5 Is Here! First Look!
Making An Ordinary Image Your Own


