
Soft Bokeh Texture for a Flower Image

This image of pink orchids in Hawaii had a background layer showing the flowers against a clear blue sky – perfect for adding textures. I really love the bokeh texture used in this image. As many of you know who follow me, I am a big fan of Shadowhouse Creations textures. This image stacked three of his beautiful textures to get this wonderful soft look: Oil Painting 5 set to Color Blend Mode at 100% opacity – a white layer mask was added and the flowers and part of the stems were painted in black lightly to bring back a little bit of the green and pink color; Gorgeous Tones Texture 3 (third one down) set to Screen Blend Mode at 32% opacity; and Bokeh Texture 4 set to Darken Blend Mode at 28% opacity. If you like the bokeh effect, this texture is one of the best…..Digital Lady Syd
Digital Lady Syd Related Blogs:
Russell Brown’s Paper Texture Panel Updated!
Soft-Look Flowers Using Textures
Tips for Flower Textures
Cafe Alcazar and Vintage Topaz Adjust

Here is an image of the Cafe Alcazar that is located in the old swimming pool area of the current Lightner Museum (old Hotel Alcazar) in St. Augustine, Florida – one of the best places to grab lunch if you are in the city. I did very little to this image but apply a Topaz Adjust preset called Daylight to Tungsten II which gave the browns the rich tones, sharpened using my LAB sharpening method and added a Curves Adjustment Layer to increase contrast. Topaz Labs did a nice video on their Film and Vintage Effects with Adjust, B&W Effects and Lens Effects that does a good job of explaining how to get this look. I really love the feel of this image – gives a little of that vintage effect the historic location instills……Digital Lady Syd
Digital Lady Syd Related Blogs:
Where Am I? (Cafe Alcazar)
Unsharp Mask Filter In LAB Mode
I Didn’t Know That! Curves Adjustment Layers
Quad Tones in Topaz Black and White Effects Plug-in
Lidden Urn from Carl Thieme

The above image is of a beautiful porcelain Lidden Urn by Carl Thieme of Potschappel, Saxony in Germany from the late 19th century. It is on display at the Lightner Museum in St. Augustine, Florida. I have to be honest and say I did not have a good appreciation for this type of art, but after researching a little on the internet, I am fascinated by the history. If you have an interest, here is a link on the interesting history of the area called Antique Lamps-Dresden, A History Lost, and links to Live Auctioneer showing two similar pieces: piece one and piece two. I am actually very glad to have learned something different in the art world! Actually, I guess that is what a museum is all about – introducing people to new things!
To process this image, I did not do that much to it. ShadowHouse Creations has issued a new free painterly pack of textures and I had to try them out! I put them in a folder and used them with Russell Brown’s Paper Texture Panel (see my blog Russell Brown’s Paper Texture Panel Updated! to download). This effect was created by stacking Painterly-6 (Overlay Blend Mode at 60%) and Painterly-1 (set to Overlay Blend Mode at 100%). I painted out the texture from the painting on the lower part of the urn using a white layer mask and soft black brush at a low opacity so it shows up very clearly. OnOne PhotoFrame (see sidebar for website link) acid burn 12 was added using a color sampled from the image.
Try shooting images in museums, you might get something really interesting. And be sure to shoot any information about the piece too!…..Digital Lady Syd
Digital Lady Syd’s Related Blogs: (All related Lightner Museum links)
The Art Corner: Little Girl Knitting – A Mystery Sculpture!
Black and White Photo or Not? Give It a Try on That Difficult Image
Where Am I?
Digital Lady Syd’s Rule No. 6: Try Something New!

I have not done a Digital Lady Syd’s Rule recently so here is one – Try something new! This is my first attempt at creating a Monet impressionistic type painting. I used a photo from my trip to the Big Island and really cropped it down since I am still learning all the strokes and blending needed for a larger image. I followed a couple tutorials by Fay Sirkis that are now available on the NAPP website (see Painting With Your Camera and A Stroke of Genius-Photoshop Art Studio with Fay Sirkis under the Webinar link). If you want to try to paint like the famous painters of past generations, Fay Sirkis is the one who teaches it best. Can’t say enough good things about Fay – she is a great teacher, fun to listen to, and very knowledgeable about all the techniques of many famous artists. The nice thing about Fay is she provides you with all the Photoshop brushes, mainly Mixer brushes, to create the painter’s style you want to try. Therefore, when trying to do a Monet painting, you have Monet Impressionist brushes for blending, adding highlights, underpainting, etc., at your disposal, and she teaches you how she made them and how to use them. This article from Professional Photographer is a good example of her teaching method – Fay Sirkis: Painting Magic, Adobe Photoshop CS5. She also teaches classes at Photoshop World and on Kelby Training, and is one of the Corel Painter Masters.
I may not be Monet but this image was definitely a lot of fun to do – I have never tried anything like this, and it has given me a new appreciation for the type of art that Monet and the Impressionists created. I hope to try some other Master’s styles and brushes from Fay soon. So do like me and try something new!…..Digital Lady Syd
For my other Rules, click on sidebar entry called Digital Lady Syd’s Photoshop Rules.
Hibiscus Flowers – I Love to Photograph Them!

These beautiful Red Chinese Hibiscus blooms appeared on Mothers Day last week so I had to take their picture! Used my favorite artistic plug-in – Topaz Black and White Effects (see sidebar for website link) – and applied a preset I had created earlier called Water Landscape Sunny (Adaptive Exposure section – Adaptive Exposure 0.18, Region as 26.10, Detail 1.11, and Detail Boost 1.09; Quad Tones which creates the interesting effect used Color 1 Region set to R1G1B12 and 9.60, Color 2 Region set to R63G78B85 and 95.97, Color 3 Region set to R216G211B129 at 141.2, and Color 4 Region set to R255G254B237 and 255.0; Edge Exposure set to Edge Size 0.19, Edge Exposure -0.43, and Edge Transition 0.27 for all sides; and Transparency set to 1.00.) While in the plug-in, the Detail brush was used to sharpen the center of the flowers and to go around the petal edges where they overlap each other. Next ShadowHouse Creations Marshmellow Skies texture set to Overlay at 100% opacity was added to give the soft green-turquoise feel to the background – a white layer mask and a soft black brush was used to take the texture effect off the flowers. A Curves Adjustment Layer was added and OnOne PhotoFrame (see sidebar for website link) grunge 04 set to 75% opacity was also added. Not hard and once again a really beautiful effect. I love Black and White Effects! I could do this all day! As you can see by the number of related blogs below, this is definitely one of my favorite plug-ins – check them out for several other examples on how to use it!…..Digital Lady Syd
Digital Lady Syd Related Blogs:
Black and White Effects on Outside Art
Cleaning Up a Messed Up Photo
Topaz Black and White Effects Quad Tones Are Great!
Sunny Preset for Topaz Black and White Effects
My Office Friend Ted
Loving Both Filters!
The Art Corner: Painting and Sculpture by Tassaert
Quad Tones in Topaz Black and White Effects Plug-in
Get Rid of Those Power Lines Fast – with Paths and Spot Healing Tool!
Topaz B&W Effects vs. Nik’s Silver Efex Pro
Just Another Topaz Black and White Effect Example
Topaz B&W Effects Plug-In-A Real Winner!
White Daisies! Using Color Efex Pro Midnight Filter
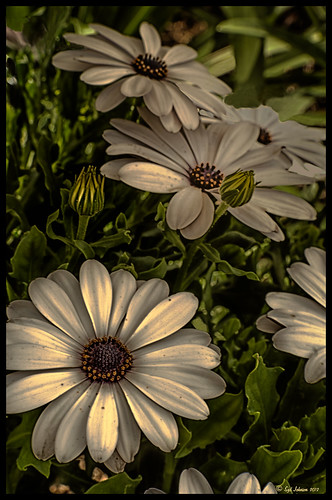
These beautiful daisies are growing in my front yard – first time I had seen this variety with the navy and orange centers. (Hover over image to see the image as it came from Lightroom.) Got a chance to try out the new Color Section in the Lens Correction Panel in Lightroom 4’s update (Adobe Camera Raw 7.1 for Photoshop) and it worked great! See New Color Fringe Correction Controls for information on this new tool. Next used Nik Color Efex Pro 4 with Detail Extractor, Midnight and Image Borders filters stacked. The Midnight Filter set to Sepia Color Set really gave this image the lovely soft feel. Added a few control points in Nik Viveza 2 to bring out the structure of the flower centers and buds. Added a Curves Adjustment Layer and painted out a few of the distracting light points. That was it……Digital Lady Syd
Digital Lady Syd Related Blogs:
NIK Color Efex Pro 4 – Digital Lady Syd’s Review!
Nik’s Viveza 2 Plug-In – A Hidden Gem!
Nik Color Efex Pro 4 Just Does It Right!
Black and White Effects on Outside Art

I call this image “Who’s Looking at You?” I almost fell down taking this image and everybody at the Flagler College (old Ponce de Leon Hotel in St. Augustine, Florida) thought it was funny as the tour guide just said one of her rules was no one was allowed to fall down! Oh my! Anyway, I was totally struck by the beautiful face on this figure which is part of the Ladies Side Courtyard Entrance. I do not know who actually created the figure but it appears to be similar to the Lion Statues outside the entranceway (see my Tidbits Blog Loving Both Filters!) Used Topaz Black and White Effects on image selecting the Cyanatype Collection -> Cerulean Dynamic preset to get the color effect started. Also used a Gradient Fill Adjustment Layer using a Gorgeous Gradient Royal set to Linear Style, 90 degrees, and Reverse with layer set to Overlay blend mode and 62% opacity – painted out the face a little using a white layer mask and low opacity black brush. Sharpened the face and that was it. I loved the final result!…..Digital Lady Syd
I Didn’t Know That! Converting Lightroom Preset to Adobe Camera Raw Preset
 |
I occasionally come across a need to take a Lightroom preset and use it as a preset in Adobe Camera Raw. This is not as complicated as it seems. Below are the steps required to accomplish this task.
1. Apply the preset in Lightroom and make sure you know which panels and sliders you used. (If preset not already created, to save preset in Lightroom, on left side of Presets line, click (+) for “Create New Preset.” Name preset.)
2. Right click on image in Lightroom and select Edit in -> Open as Smart Object in Photoshop. The image is opened in Photoshop with the Smart Object icon on bottom right of thumbnail in Layers Panel.
3. Double click on thumbnail and it opens up into Adobe Camera Raw. Go to Presets panel (9th icon over on righthand side under the histogram) and the click folder icon at the bottom of the panel to open the New Preset dialog. Name and click the items you want included in the preset, then click OK. Your new preset shows up in the Presets panel.
You can now use your Lightroom preset anytime you want in Adobe Camera Raw also. I usually start my personal preset names off with an SJ so I know they are mine. It is easy to get presets from many different sources as time goes on so it helps to know which are yours.
The image above is of a miniature mum in my yard. Hover over the image to see how the image looked with just a Lightroom preset I created called Dark Vignette – it makes the background very dark behind the flower. For information on how to create this preset and how the image was finished, see bottom of blog for details.
Hope this helped you get a little more organized…..Digital Lady Syd
To create this preset, changes were made to: the Tone Curve set to Highlights -24, Lights +41, Darks -56, and Shadows -54; HSL – Luminance sliders set to Red -41, Orange -9, Purple -2, Magenta -50 and all others 0, and Saturation sliders set to Red -2, Purple +32, Magenta +59 and all others set to 0; Effects Post-Crop Vignetting Style set to Highlight Priority with Amount -61, Midpoint 33 Feather 0 and others set to 0. To finish, image was sharpened and OnOne PhotoFrames (see sidebar for website link) acid burn controlled 15 was added and reduced in size in the plug in, and then grunge 12 was added on top – in Photoshop petals were painted over frame edge using a layer mask on first acid burn frame.
Digital Lady Syd Related Blogs:
Colorful Blown Out Look Lightroom and Adobe Camera Raw Preset
Settings for Vivid Drawing Look ACR/Lightroom Preset and NIK Color Efex Pro 4 Pseudo HDR Recipe
Orchids with Russell Brown’s Paper Textures Panel

This was so easy and turned out so pretty. Need to darken the background of your image to get this effect. The the Flypaper Texture Creme Anglaise was added to give the painted look (in group of textures provided with Russell Brown’s Paper Texture Panel – see blog links below to download). A Hue/Saturation Adjustment Layer was added to darken the texture a bit more with Master set to Hue -146, Saturation -59, and Lightness -14. The flowers were painted out in the layer mask so they would not be affected by the color change, but it still did not have enough purple tone. Therefore a Color Fill Adjustment Layer was added with the color set to a deep blue (R101G33B227) set to 37% opacity. The flowers were once again painted out on the adjustment layer mask. The last step was OnOne PhotoFrame airbrush_06 (see sidebar for website link) and the color was sampled from the image to finish up. Very quick and easy effect…..Digital Lady Syd
Digital Lady Syd Related Blog:
Russell Brown’s Paper Texture Panel – A Real Winner!
Russell Brown’s Paper Texture Panel Updated!
Russell Brown Texture Panel Landscape Image
Whale Watching with Nik’s Color Efex Pro 4 & Viveza 2

One of the many photos of a great whale watching trip on the Big Island in Hawaii. (See Hawaii Ocean Sports for information on whale watching boat trip.) This image used one of the workflows I like to use for quick processing of my images. The RAW file was adjusted in Lightroom where the Highlights, Shadows, Whites and Blacks sliders were moved. Next the Exposure and Contrast sliders were adjusted, and finally it was straightened and cropped. The image was brought into Photoshop and opened in Nik’s Color Efex Pro where five filters were added in this stack order: B&W Conversion (Dynamic Contrast), Photo Stylizer (Cool Silver – Style 1), Low Key, Darken/Lighten Center, and Detail Extractor applied just to background area with Control Points. Not sure how I came up with this combination, but I really liked the final result. Nik’s Viveza 2 was used to sharpen up the whale and water blowing up behind him. OnOne PhotoFrame acid controlled 12 (see sidebar for website link) was added using a matching color from image. That was it!
The combination of Color Efex Pro and Viveza is a pretty powerful combination. I do not process any image now without at least going into Viveza – it is a fabulous finishing plug-in…..Digital Lady Syd
Digital Lady Syd Related Blogs:
Nik’s Viveza 2 Plug-In – A Hidden Gem!
Detail Pop Using Nik Color Efex Pro and Viveza
Using NIK’s Color Efex Pro 4 and Viveza Together
Nik Color Efex Pro 4 Just Does It Right!

Loved the beautiful old puppets on display in one of the walkways at the Hilton Waikoloa Village on the Big Island in Hawaii. It seemed like a perfect time to once again add the Nik Color Efex Pro 4’s new Film Efex – Vintage filter. The Colorize Filter, Midnight Filter, and Image Border were then stacked on top. Finally a little Nik Viveza 2 to sharpen the elephant a bit and that was it! Love the results!…..Digital Lady Syd
Digital Lady Syd Related Blogs:
The New Film Efex-Vintage Filter From NIK CEP 4
Beautiful Daisies with Film Efex: Vintage in Nik Color Efex Pro 4
Unsharp Mask Filter In LAB Mode
(Here are my settings for the filters: Film Efex-Vintage – Saturation 10%, Warmth 79, Vignette 63, Brightness -2, Grains per pixel 500, Film Strength 80%, and Film Type 13; Colorize – Method 6, Color R143G209B219, Strength 5%; Midnight – Color Set Neutral, Blur 0, Contrast 30, Brightness 60, Color 57, Shadows 20, and Overall 78%; and Image Border – Type 3, Size 60%, and Spread 98%.)


