
Free Timeline Cover Template for Seven of Your Images

It has come to my attention that Facebook is changing everyone over to using the Timeline feature for their profile page. Therefore I have created this free template you can use in the top portion of your profile page to show off your favorite images. The openings are set for a 4″ X 6″ size image. The resolution of the template is 72 ppi so you do not have to use a very high resolution of your image since they will be seen on low resolution monitors or phone/Ipad devices. This template can also be used as a blog header.

Steps to Add Photos for Photoshop/Elements Users: Download template here (scroll to bottom of page for download button) and open in Photoshop. Highlight each layer that says “PLACE IMAGE # HERE” and go to File -> Place. Navigate to your image and Place. You can now adjust the image to the opening since the image comes in as a Smart Object. If you Rasterize the layer (right click to choose Rasterize in Photoshop or Simplify in Elements) the layer to make file smaller, you can still adjust position of image later using a Free Transform (CTRL+T). Hold SHIFT key to constrain size of image. When finished, save your Photoshop Template file as a PSD file so you can update with different photos easily. Then do a File -> Save As and save the file as a jpg to be uploaded to Facebook using the steps below. It is easy to change the look of the template.
- The template is set to White but if you want the Facebook Blue color, just click the turned off top Facebook Blue layer eyeball and it will match Facebook.
- If you want to change the template color, pattern and stroke type, just double-click on the White Template layer to open up the Layer Style Blending Options for this layer. (For Elements Users, go to Layer -> Layer Style where you can adjust the Stroke and the Inner Glow – there is no Pattern Overlay style.) For the flower template example, Pattern Overlay was selected and Color Paper Pattern Blue Crepe from Photoshop’s canned patterns was chosen. (To load new patterns, click on the down arrow by the default pattern, and then open up the fly-out menu to load new pattern groups.)
- To just change the template color, go to Inner Glow Blending Option and change Blend Mode to Normal. Select the color you want and adjust the Size slider to fill the template – voila! New color!
- Select Stroke in Layer Styles to change the size and color of the stroke surrounding each image. The first example used Black set to Inside at a size of 2 pixels and White was used on the Facebook Blue example.
- To add a regular texture to the template, highlight the Template Layer and Place the texture (just like the images). Adjust to fit and then clip the texture layer to the Template Layer by going to Layer -> Create Clipping Mask so the openings for the images appear.
Steps to Load Cover to Profile Page: Go to Profile Page and hover cursor over the top area to the right of your image. The words “Change Cover” appear. Click on the words and select “Upload a Photo…” and navigate to the template image just created. The template will appear as the cover on the top without your image. Click Save Changes and your image will appear.
I hope you like using this template. Enjoy!…Digital Lady Syd
Russell Brown Texture Panel Landscape Image

I call this photo Hawaiian Horses Chatting – they look deep in conversation. Hum?? Anyway, this weekend I did a Fun Photoshop Blog called “Russell Brown’s Paper Texture Panel – A Real Winner!” (I seem to like real winners!) This is another one of his great free Photoshop panels that creates texturized images very quickly and allows you to experiment easily to get an interesting effect. Check out my other blog for the download links and details on how this panel works. I will say that Flypaper Textures has given you several beautiful textures to play with in the panel until Russell gets an update to include other textures. This image used three Flypaper textures stacked: Texture Aquarius set to Soft Light Blend Mode at 84% layer opacity, Texture Creme Anglaise set to Multiply Blend Mode at 100%, and Texture Colosseum Sienna set to Vivid Light Blend Mode at 46%. I had been having a hard time getting a look I liked for this image until I tried the texture panel – it really surprised me how beautiful the effect ended up. Give this panel a try if you have Photoshop CS5 or CS6 and you love textures like I do. Definitely worth the effort!…..Digital Lady Syd
Topaz Simplify and Topaz Detail Together

Recently I watched a video, this time for Topaz plug-ins (see sidebar for Topaz website and more blog links below), and learned a couple new things I thought I would share. If you have read my blogs before you know that I am a big fan of Topaz products – they may not be the most sophisticated, but they do some very cool effects the other major companies can’t achieve. Scott Stulberg did a lengthy video called “Memorable Travel and Stock Photography” where he covers Topaz Adjust, Detail and Simplify. I tried to incorporate a few of these tips in this image of sun-lighted grass growing on the road to Waipi’o Valley on the Big Island in Hawaii. Gosh it is hard to take a bad picture in Hawaii!
To begin with, Topaz Simplify was used. Scott suggested this plug-in is great to use on a shot that is a bit soft from a gentle breeze or a not-so-great lens – this effect can save an image and turn it into something very nice. There are two color space choices – RGB (more vivid colors) or YCbCr color space (more muted colors). This image used the YCbCr color space. Scott mainly uses the BuzSim preset – the trick is to move the Simplify Size slider to the left from the default setting (0.33) and you will see the detail return but the color stays saturated. On this image the Simplify Size slider was set to 0.05, Details Boost slider set to 0.79 (default is 1.00), and Details Size set to 0.13 (default is 0.20). It is a very similar result to using Vibrance in Photoshop but Simplify has much better color saturation. In the Adjust section, the Saturation was toned down a bit to 0.96 (default 1.31) and Saturation Boost set to 1.00 (default 1.15). He is basically lowering or turning off all the artistic settings and leaving the saturation turned on. One small problem I seem to have with Topaz products is that sometimes I have trouble retrieving the settings when using a Smart Object layer, which is supposed to retrieve the plug-in settings used on the image. Therefore, create a preset and name it something that will remind you of the image if you liked the result.
Next Topaz Detail was used. Scott feels that this plug-in makes it appear you were using a better lens than you really were. Basically you want to move the Medium Detail slider, then the Small Detail and Large Detail sliders until you get a sharper feeling image. He does very little sharpening to his photos but uses Detail to do the sharpening – it is like using the Clarity slider in a realistic way. That is how the plug-in was used for this image.
The final touch I added was a Hue/Saturation slider boosting the yellow saturation up quite a bit. Then I filled the layer mask with black (CTRL+Backspace) and painted with a very low opacity soft brush in to give just a soft yellow tone. OnOne’s Dave Cross 14 frame (see sidebar for website link) was added using a color sampled from the shot.
Sometimes it feels like I harp on all these these plug-ins, but they really are fun to use and they can take your images to a new level…..Digital Lady Syd
Digital Lady Syd Related Posts:
Simplifier and Simplify Filters
Topaz Plug-Ins – Same Image Trying Each! – this blog has many of my Topaz blog links at the bottom if you would like more information on any Topaz products
Beautiful Daisies with Film Efex: Vintage in Nik Color Efex Pro 4
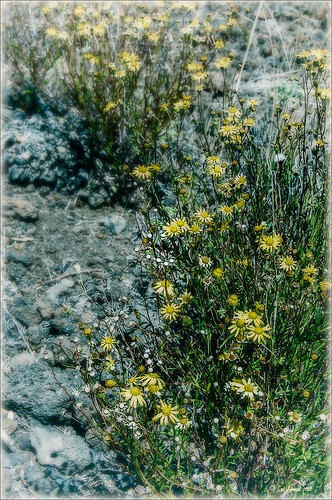 |
These beautiful sunshine daisies were growing wild at the 9000+ ft. on the Mauna Koa volcano on the Big Island in Hawaii. The ground was very arid and it was super-breezy at this spot. This is just another example of using Nik’s Silver Efex Pro 2 and Color Efex Pro 4 together to get a very nice look. The original had a very cluttered appearance (hover over image for original), but by using Film Efex: Vintage and Vignette: Blur filters stacked, this much more appealing image is created capturing what the flowers looked like to me. Totally loved the color combination that resulted.
If you do not own these two Nik plug-ins, I would encourage you to download a trial. Together they create a wonderful result. For more information on the steps required to get this look, see my Fun Photoshop Blog “Use NIK Color Efex Pro 4 and Silver Efex Pro 2 Together to Create Fabulous Landscapes!” Also see my Tidbits blog “The New Film Efex-Vintage Filter From NIK CEP4.” Have fun experimenting – I know I am!…..Digital Lady Syd
Magnificent Macros with Nik Plug-Ins

The Jazze Rose Frost Alstroemeria flower is one of the prettiest perennials that you will find. This one resides in my front yard now. The same workflow with Nik products that really make your landscapes pop was applied to this macro. Silver Efex Pro 2 (same High Structure-Harsh preset with Color Filter set to Green), Color Efex Pro 4 (Darken/Lighter Center and Graduated Neutral Density filters stacked), and Viveza 2 to bring out details in the stamen structure were applied. That was it! Check out my Fun Photoshop blog “Use NIK Color Efex Pro 4 and Silver Efex Pro 2 Together to Create Fabulous Landscapes!” for more information.
Give this a try next time you want a different look for your macros!…..Digital Lady Syd
Topaz Black and White Effects Quad Tones Are Great!

Just another day in paradise! This is beach front at the Waikoloa Beach Marriott Resort and Spa on the Big Island in Hawaii. I was having trouble finding some way to make the image really pop and look like it looked to me when I was there. I ended up going into Topaz’s Black and White Effects (see sidebar for website link) thinking it might look good as a black and white image. In Topaz plug-ins, you have to reset your settings or the last one used shows up on the image. Well the last effect I had used was my Old Vintage Effect Preset and it gave this image exactly what it needed. To create this preset, see my blog “Quad Tones in Topaz Black and White Effects Plug-in” to get the basic information to create the quad tone colors required for this warm sunny feel. I did increase the Adaptive Exposure slider from 0.18 to 0.41 to get more of an HDR look, checked Process Details Independently because of a little haloing around the tree trunks, and selected a light Vignette for this image instead of a Border. In Photoshop I had to remove a little noise. No sharpening or curve adjustments were needed. OnOne (see sidebar for website link) PhotoFrame Taufer Texture 12 was added. I really like this combination of colors and have used it many times. Try the settings if you want to get that warm feel…..Digital Lady Syd
Digital Lady Syd Related Blogs:
Sunny Preset for Topaz Black and White Effects
The Art Corner: Painting and Sculpture by Tassaert
Topaz Plug-Ins – Same Image Trying Each!
Topaz B&W Effects Plug-In – A Real Winner!
Aerial Shot Using a Point-And-Shoot Camera! Not Bad!

Thought I would show you what results you can get even when shooting with an inexpensive point-and-shoot camera. I got several wonderful images from the air, but this one of the Rockies was my favorite. (For a nice read on aerial photography, see Julieanne Kost’s book “Window Seat – The Art of Digital Photography & Creative Thinking.”) My little Canon PowerShot A1000 died last month so I had to quickly purchase another small camera. I wanted one that runs on batteries so I do not have to charge it all the time (since I do not use it that much) and I wanted something fairly cheap. I got a Kodak EasyShare 14 mp camera with a 5X zoom for $49 and it gets better pictures than my Canon did! This an example of what it can do. There was more noise in the JPEG image, but that is to be expected with a cheaper lens, and it definitely needed processing in Lightroom and Photoshop. In Photoshop, Adobe Camera Raw sliders were applied including the Noise Reduction sliders; then Nik’s plug-ins Color Efex Pro 4 (stacked filters Vignette: Lens, Detail Extractor, and Skylight Filters) and Viveza 2 (to even out the saturation in the corners) were used. This has been a great surprise to me. Definitely not as good as my Nikon DSLR, but not bad for a inexpensive point-and-shoot camera.
I guess this goes to show that even if you do not have the best camera, it sure beats missing the shot altogether, and you can get a really nice image!…..Digital Lady Syd
Soft-Look Flowers Using Textures

These beautiful dahlia flowers are now planted in a flower bed in my front yard. To get this effect, it was a pretty simple process. I sharpened the center and darkened the green stems first. Next ShadowHouse Creations Subtle Tones ST-8 texture was set to Color Blend Mode. With a layer mask I painted out the texture over the flowers very lightly using a soft 13% opacity brush and building up the effect until it looked the way I liked it. Next ShadowHouse Creations 3 Assorted Texture Set T 2 texture was set to Hard Light Blend Mode to add a very feminine look – also a layer mask was used to clear the lacy texture from on top of the flowers. A Hue/Saturation Adjustment Layer was added on top to select the correct texture color by adjusting the Hue slider. The last step added OnOnePhotoFrames toner scratch 21 (see sidebar for website) with a very light purple-pink color. That was it. I loved the final result. I hope you will try using some of the beautiful textures from ShadowHouse Creations website where there is a huge selection of textures that can be downloaded for free. Major thanks for what he does to help us budget-minded Photoshoppers!…..Digital Lady Syd
The flowers were photographed on a table with a science fair 3-sided white board behind them and natural light from a window – shot with a Nikkor 60 mm Macro Lens set to F/3.2, 1/15 sec at ISO 400 with an attached Bower 0.5 x High Resolution Digital Lens with Macro lens, which gives the large depth-of-field effect.
Scanning a Bloom for a Different Look

This is a blossom from my new Ballerina Blue Fuchsia plant. I got an idea from reading The Photoshop Darkroom by Harold Davis and Phyllis Davis to scan my flower into the computer using a black box. I actually used a black sunglasses case to cover the plant while I scanned it with my Epson Perfection 3200. I used VueScan Scanner Software (my scanner is so old that Epson would not support it in Windows 7, but this relatively inexpensive software will) set to 3200 dpi, print quality, output tiff as a camera raw file, opens in Adobe Camera Raw in Photoshop CS5. The black background needed a little cloning clean up first, then the flower had a few bad spots on the leaves to clean up, Nik Viveza 2 was used to even out the purple color evenly, and finally the Sharpen Tool was used on a few of the flower veins. That was it. I was surprised how easy and different the flower looks scanned in. If you have a scanner, give it a try for a change…..Digital Lady Syd
Lunchtime atop a Skyscraper – What a Story!
Recently the Daytona News Journal ran an article on Charlie Ebbets (no link since the article is now archived and there is a charge to read it now), the photographer who took the very famous photo called “Lunchtime atop a Skyscraper” which was taken on the 69th floor during construction of the old RCA Building in 1932. His wife, Joyce Ebbets, still lives in the Ormond Beach area. It was not discovered until 2003 that Ebbets had photographed this image. Apparently a movie is being considered based around this image that will follow some of the people on the beam and how the depression had hit New York City back in 1930’s. His daughter has a wonderful website on his life at Ebbets Photo-Graphics with slideshows and images from throughout his life. When he died in 1978, he had more than 300 published photographs.
To see several of the photos he took during the construction of this part of Rockefeller Center, see the short U-Tube video called “In the Heights – Tribute to Charles Ebbets.” There are some other great photos from Mr. Ebbets collection and a quote from La Fototeca: History of Photography on the Mr. Ebbets life: “Ebbets was born in 1905 Gadsden, Alabama. He bought his first camera at the age of eight by charging it to his mother’s account at a local drugstore. By the 1930s Ebbets was a well known photographer and had work published in the major newspapers across the nation including the New York Times. In 1932, he was appointed photographic director for the Rockefeller Center, which was under construction in New York. In September of that year, he would take the photo which would later define his work, Lunchtime atop a Skyscraper. In 1933 Ebbets moved back to Florida where he was to live and work for the rest of his life. In 1935, Ebbets became the first official Associated Press photographer in the state. During this era, he also founded the Miami Press Photographers Association and was its first President.”
One of my personal favorite images is called “Tee Time” since I love golf. I had never heard of this image before and that is amazing with all the golf paraphernalia everywhere…..Digital Lady Syd
Keeping Focus Where You Want It Using Focal Point 2 and Color Fill Adjustment Layer
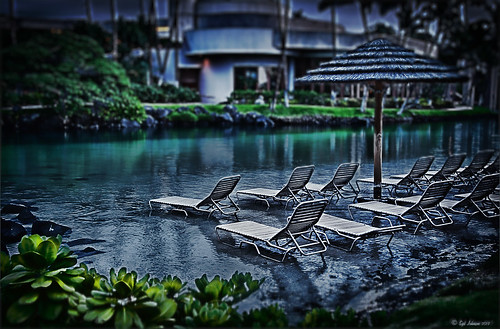 |
The above was shot in the early evening in the Lagoon Area at the Hilton Waikoloa Village – very near the Dolphin Learning Center. This is an HDR image processed in Nik’s HDR Efex Pro using three images. In my last blog OnOne’s Focal Point 2 (see sidebar for OnOne’s website link) was shown on a beautiful flower shot (see “Let’s Focus on OnOne’s Focus Point 2 – Nice Little Plug-in!“).
This time I wanted to show how pretty it works on a landscape. The Focus Bug was used to keep the lounge chairs in focus and the Focus Brush was used to keep the thatched umbrella in focus. Also a very nice dark vignette was added from inside the plug-in.
Here is a little tip on how to keep your highlights under control. In this case to keep the water highlights from becoming too dominant in the evening image, a Color Fill Adjustment Layer in any color was added, the layer masked filled with black (click on layer mask thumbnail and press backspace to fill with black), and then by double clicking on the adjustment layer color swatch, a dark blue color from the image water area was sampled so the fill color matches it. In the black layer mask, paint back with a very soft low opacity brush (between 10 and 30%) the areas you want darkened, in this case mainly the water areas around the lounge chairs – this is just a very subtle adjustment.
The last step involved adding a Curves Adjustment Layer to give a little darker feel to the image. That was it. To see the tonemapped image before the plug-in and color fill layers were added, hover over the image.
Give Focal Point 2 a try if you get chance (if you buy fine art photographer Vincent Versace’s book, “Welcome to Oz 2.0: A Cinematic Approach to Digital Still Photography with Photoshop,” the Focal Point 2 plug-in is a free download from the book which has good reviews. Also try using a Color Fill Adjustment Layer to reduce out-of-control highlights. It is a very simple technique that works very effectively!….Digital Lady Syd
Let’s Focus on OnOne’s Focus Point 2 – Nice Little Plug-in!

These beautiful pink and white orchids were captured at the Hawaii Tropical Botanical Garden on the Big Island in Hawaii – they had a huge assortment of orchids in their Orchid Island exhibit, many varieties I had never seen before! If you look closely, you will see a tiny white spider web connecting the blossoms.
On this image I used OnOne’s Focal Point 2 – a really wonderful plug-in that is part of the OnOne Perfect Photo Suite 6.0 (see sidebar for website link). I had not used it before but after listening to OnOne’s short video called “Selectively Draw the Viewer’s Eyes Where You Want It To Go” (scroll down to 1/9/12), it proved to be very easy to apply and quite effective. It uses the Focus Bug technology like its other products, and the effect can be painted in or out with the Focus Brush. A soft blurred vignette can easily be added also. ShadowHouse Creations Pseudo Film Scratches Texture Heavily Scratched 2 was added with the layer set to Divide which gave the bright splotches of color throughout the image. The Sharpen Tool was used to selectively sharpen the forward edges of the flowers, and a composite layer (CTRL+SHIFT+ALT+E) was created on top to add a Layer Style. In this case, an oldie but goodie layer style from a book I bought years ago called “Adobe Photoshop 7 One-Click Wow!” by Jack Davis and Linnea Dayton was added using Wow Frame 09. The cool thing about this little book is that is shows what all the styles look like when applied. These styles are also included on the accompanying DVD to my favorite Photoshop Book “Photoshop CS3/CS4 WOW! Book” by Linnea Dayton and Christen Gillespie, where the original book is basically reproduced in the Appendices. Give Focal Point a try if you like this type of effect – very easy to use and gives very dramatic portrait or landscape effects also…..Digital Lady Syd
OnOne’s Perfect Effect Landscape Tips

This week I used one of OnOne’s quick video tips for their Perfect Photo Suite 6 (see sidebar for website link) called “Bring Out the Most Detail Out of Your Landscape” (need to go to the 12/21/11 video to find) where they give you some great settings for a starting point to adjusting your landscape images in Perfect Effect and Focal Point. These beautiful trees were growing on the Big Island in Hawaii. Only Perfect Effects was applied to this image and the Red color range in the Color Enhancer effect to bring out the pink in the flowers. I got a little over the top with the frame, but I liked the effect so I used it – it is PhotoFrame Taufer Texture 07 in darkish green at 61% opacity. If you have Perfect Photo Suite 6, or just Perfect Effects, check out this video and the numerous others that are listed. I have been learning lots by going through them – much better than reading the manuals. Thanks OnOne!…..Digital Lady Syd
Digital Lady Syd Related Blogs:
Another OnOne Perfect Effects Pix-Got To Love It!
Digital Lady Syd’s Review of OnOne Perfect Effects
Pseudo HDR in OnOne Perfect Effects


