
Painting People
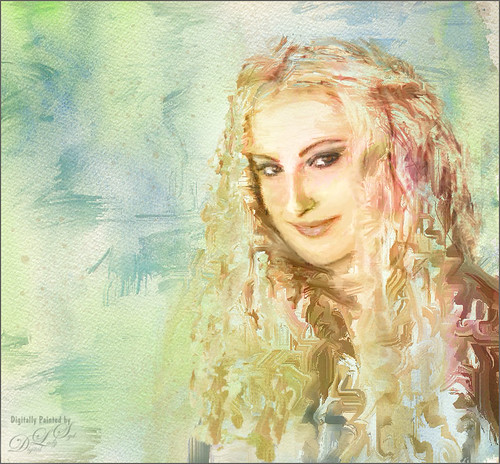
This image is my first Painter image of a person – my very pretty daughter-in-law – that I have tried to make it look realistic without looking too much like a photo. Not sure I completely succeeded, but it is fun to paint people for a change. In Painter Topaz (see sidebar for website link) Restyle’s Pale Salmon Pink preset was applied. Back in Photoshop, I did some clean up layers. Two textures were applied: Painted Textures June Party set to Hue blend mode at 80% layer opacity to give the hair that sort of “with-it” look that is popular right now, and French Kiss (see sidebar for website link) Morning Dew set to Multiply at 62% layer opacity to add to the background that was painted in Painter. Finally a Nik Viveza 2 layer was created to emphasize the face a little more….Digital Lady Syd
Romantic Venice
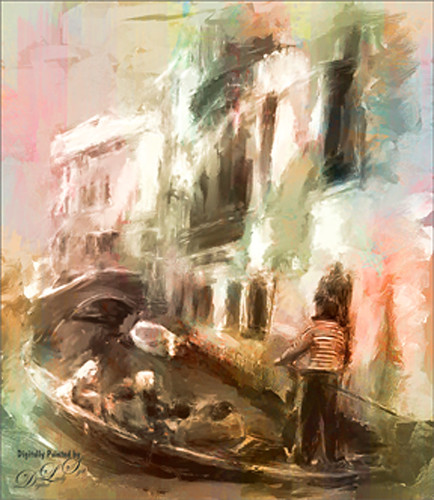
This is another image from Free Images that I downloaded and painted in Corel Painter. After painting some in Painter, the Modern Scheme was applied from the Underpainting Panel that really popped the colors. Painted Textures May Garden texture was added to the image and set to Color blend mode at 93% layer opacity. The Equalize plug-in was also added before taking the image into Photoshop. There Nik Viveza 2 was opened and the standing man was highlighted slightly. That is all that was done. I love the final soft painterly look of the image……Digital Lady Syd
Venetian Dreaming…..
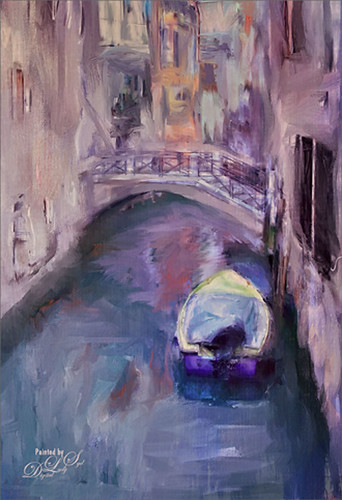
Just another Corel Painter image created following Melissa Gallo’s terrific Painter for Photographers instructions. Not exactly like Melissa’s beautiful images, but I think I am starting to get a style. Since I have not been to Venice in a long time, a free image from Free Images (used to be Stock.Xchng and image is linked) was selected to paint. The original colors were totally different to what is shown, but that is half the fun of painting! While in Painter I actually used Topaz (see sidebar for website link) ReStyle’s Cool and Clear preset with a few changes to get a different color scheme before painting the image. I will say that there were 13 iterative saves before I got to this final image. I am finding the Iterative saves are actually handy to have since I needed to go back to one due to some painting mistakes. The Painter image was saved as a psd file and taken into Photoshop where another Topaz ReStyle preset – my favorite Cream and Plum (you can really see the tones in this image) – was used along with Nik Viveza 2 to emphasize the boat a little more to finish up. Anyway, totally fun but it did take a little time to get it right.
Check out my Fun Photoshop blog this weekend for the same image but done totally with Topaz plug-ins in Photoshop…..Digital Lady Syd
Houses in Marsh Harbour
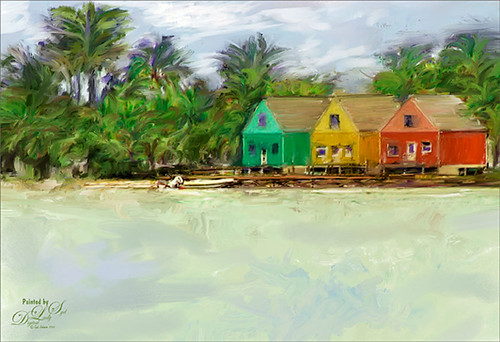
Just a quick post on this painting. The original photo was taken while actually leaving the channel at the small town of Marsh Harbour in The Bahamas. Still working on learning to use Corel Painter – Melissa Gallo’s Painter for Photographers Workshop is really helping me understand how to use this program. Lots to learn yet – this is really so much fun! I did do the final crop in Photoshop and used Viveza 2 to emphasize the focal point. Also a Curves Adjustment Layer and signature layers was added. Still not comfortable staying in Painter for this……Digital Lady Syd
Some Painter Magic!
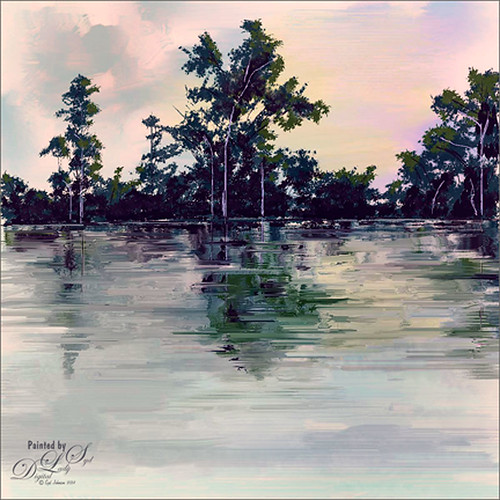
I will be honest and say this is a totally “Bob Ross” Joy of Painting type of image I created in Corel Painter 2015. This was done by following the painting instruction of Corel Master Melissa Gallo’s videos in her Painter for Photographers Workshop. Am really enjoying her artistic teachings and brushes. Also in Photoshop used Nik Viveza 2 to enhance parts of this image to get the color saturation I liked. That was it! Fun! Fun! Fun!……Digital Lady Syd
Some Mums for Fall
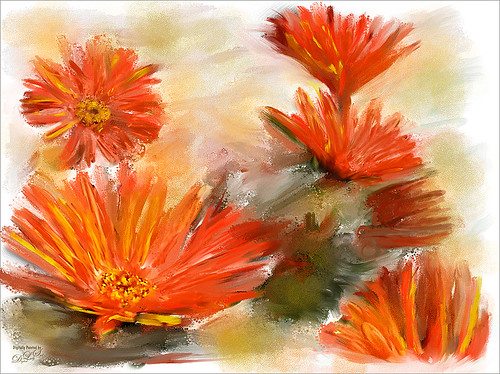
Just some mums taken at Orlando Airport recently and painted in the new Corel Painter 2015 update. This image was cloned in Painter using painted following the video Painter Cloning tools with professional photographer and digital painter Melissa Gallo. All the brushes she used in this short video along with one from Fay Sirkis called Background Edge Bubbles were used to paint it. Then in Photoshop Nik’s Viveza 2 was used to push the eye toward the lower left flower. A Levels Adjustment Layer was added and that was it. This was totally fun and pretty quick! Oh yes, Melissa just released her new Painter for Photographers Workshop – hope to show everyone some new paintings soon!…..Digital Lady Syd
Painting Scotland!
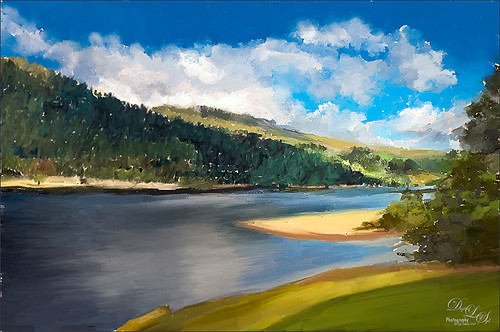
This image was painted from a shot I took while in Scotland several years ago – just can’t get enough of this beautiful country! This is where I am at with my painting journey. The basic image was painted in Corel Painter with some brushes I created after reading an older book by David Cole called Complete Digital Painting Techniques. Even though it uses an older software edition, I was able to follow his workflow for creating an oil painting and to create the brushes he was using in his example. I still had to supplement with a couple oil brushes from Fay Sirtis, a Corel Master who makes wonderful Painter and Photoshop brushes. After completing what I could in Painter, the image was brought into Photoshop and a Solid Fill Layer was added under the painted layer to add just a little different color in the areas that were not covered with paint, just to give a little interest. Come clean up was done to smooth out some rough edges, and a couple Radial Filters were applied using the Camera Raw filter. That was it and is where I am with my Painter journey, and oh yes, it was lots of fun to do!…..Digital Lady Syd
Some Crazy Painting!
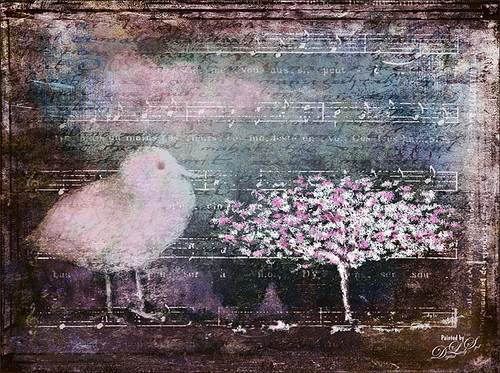
Just having some fun with this image. A while back I did a blog on creative work called How to Create an Image from Nothing. This image was created in a very similar. This image totally combined painting in both Photoshop and Painter. I am finding I like some of the brushes in Painter better than those in Photoshop, but I am better at blending my images in Photoshop. Therefore I keep bringing in things created in Painter into Photoshop and put it all together. Not sure I will ever be able to reconcile the two programs, but at least I am getting my own technique. This image background was French Kiss Studio 3 White Wash – my favorite white texture. Two of 2 Lil’ Owls Studios (see sidebar for website link) Textures were used, the border is from ViVa Penmanship Mask 3, and the music from Kim Klassen Music and Script brushes from her Test Kitchen. Topaz (see sidebar for website link) ReStyle was used to create the beautiful final colors in the image. My free SJ Clouds 1 and 8 are also in this image. The chicken is a Painter brush by Karen Sperling called birdies. Rather crazy effect but lots of fun to do!…..Digital Lady Syd
Happy New Year!

Happy New Year! Hope you all have some New Year’s Resolutions for next year, or at least one like me. I do not do well with this sort of thing so I try to keep myself focused on maybe just one or two goals for each year. This year my major digital goal is to learn Corel Painter better and try to understand the program so I can pop in and out of it like I do Photoshop. Above is just a little image I created in Corel Painter and Photoshop wishing you the best of times for the coming year. It was a lot of fun to create. The path, trees, and much of the snow were all painted in Painter using several of Karen Bonaker’s various snow brushes and David Gel’s Snow Time 2009 brushes (both of them have all kinds of fabulous free brushes). Then I popped into Photoshop and created layers for each of the following image elements. The cabin, foreground trees, deer and moose were all from my favorite Shadowhouse Creations Rural Objects and Tree Brush Set 2 – I use them all the time! Kim Klassen‘s Let Go texture was set to Darker Color to get a more textured and nicer color of green for the background color. Also my free SJ Snow 2 Overlay slight blur was added at 86% layer opacity. The font is Tramyad. Once again, I hope you all have a great New Year!…..Digital Lady Syd
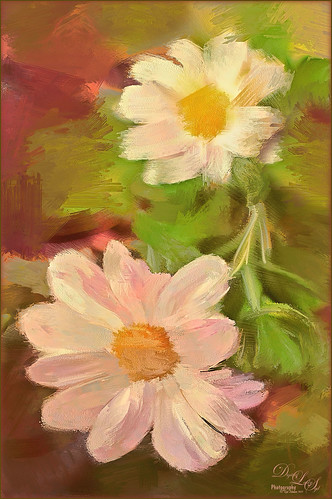
Christmas Flowers!
Recently I set a goal to learn how to use Corel Painter. These Christmas flowers were a perfect choice for me to practice some of my newly developing skills. I love the colors that the brushes created although I am not sure exactly which brushes I used, but several blending brushes were used. I have learned to keep a custom panel of my favorite brushes set up so I do not have to keep searching for them. (Not unlike setting up your own panels in Photoshop.) After I finished painting it, I wanted to show a few outlines for emphasizing certain area. The original image into Topaz (see sidebar for website link) Simplify and a sketch with black lines on a white background was created. Back in Photoshop, the white was removed using Color Range, and then the layer was moved into the Painter image. A layer mask was added and lines I did not like were removed and the layer was set to 51% opacity. A dark brown Solid Color Fill Adjustment Layer was clipped (ALT+click between the layers) to the lines layer. A Hue/Sat Adjustment Layer was added to make the flowers the perfect color of red. Some localized contrast was added by selecting a Curves Adjustment Layer and filling the layer mask with black. Just the areas where I wanted contrast was painted back, which was mainly the red flowers. I love the way Painter and Photoshop work together! Hope everyone is having a wonderful Holiday Season!…..Digital Lady Syd
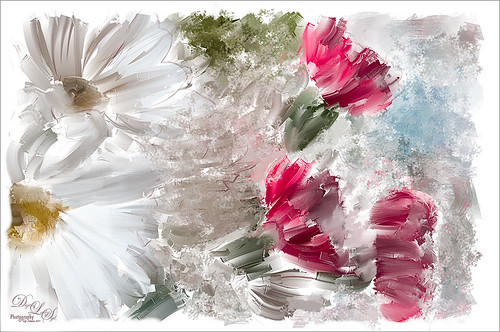
Some Floral Holiday Cheer!

Happy Holidays to everyone! Had to post my beautiful gerberas that look so Christmasy (is that a word?). This was so easy to do. Started with my flowers in Lightroom – just the basic slider changes were done. In Photoshop the first step was to add Isabelle Lafrance‘s Fairytale Winter 2 overlay (apparently this overlay is no longer available which is a shame since it is so pretty) – she makes some of the best overlays available. A layer mask was added and the flowers were gently painted back. A stamped layer (CTRL+ALT+SHIFT+E) was created on top and desaturated (CTRL+SHIFT+U). To sharpen the image the layer was changed to Overlay blend mode and the Filter -> Other -> High Pass was opened using a setting of 7, just until I started seeing a little crispness without haloing. Now the Aaron Nace trick is to add a black layer mask and just paint back where the sharpening should be applied – just the parts of the flowers closest to the viewer. On a new layer Kim Klassen’s free Mini Sampler Holiday Brush holiday 10 was applied – I love everything Kim creates – textures, brushes, videos. I added my own text layer using the Bambino font. Then I remember I had been playing around in Corel Painter and created this little fur tree that looks like it was blowing in the wind on a white canvas. Therefore I added to my image and set it to Linear Burn blend mode at 61% – loved the final look. I am still loving Painter! Hope you have a wonderful Holiday Season!…..Digital Lady Syd
Digital Lady Syd Related Blogs:
Trying Out Some Aaron Nace Techniques
Just Painting!
This is one of my first recent major efforts using Corel Painter – I am still trying to understand this program. Basically I painted this image using a brush I created after listening to Melissa Gallo‘s video on the Corel Painter website – her video is Reason #2 – Cloning Feature. Since Melissa is absolutely one of my favorite texture people, I was totally absorbed with what she did. This image of my miniature mums is pretty basic, but I thought it turned out nice. I created the Luscious Oil Paint brush she used and find I am it a lot on other images. Then I took the image back into Photoshop where I added Topaz (see sidebar for website link) ReStyle to really get a pop in the colors. (Here are the settings if you are interested: Sandy Butterflies preset. ReStyle Opacity 55%; Color Style Hue Fifth 0.13; Sat Primary 0.50, Secondary -0.37, Third 0.38, and Fourth 0.78; and Lum Primary 1.00, Secondary 0.30, Third -0.25, and Fifth -0.30; Texture Strength -0.66; Basic Opacity 55%; Color Temperature 0.19, Tint 0.17, and Sat 0.02; Tone Black Level 0.53, Midtones 0.14, and White Level -0.16; and Details Structure 0.25 and Sharpness 0.36.) A little clean up and a Layers Adjustment Layer was done and that was it. Painter really is a lot of fun!…..Digital Lady Syd
Digital Lady Syd Related Blogs:
Topaz ReStyle with Corel Painter and Nik Analog Efex Pro


