
Darling Dahlia
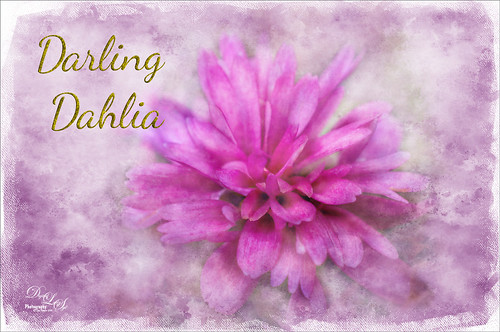
Image of a little dahlia that just poked up its head in my winter spring bed a month ago. It was only about 2 inches wide but just lovely! First sharpened the image using Photoshop’s Shake Reduction filter. Then sharpened again by duplicating the layer, setting it to Hard Mix blend mode, adding a Gaussian Blur set to Radius 3, and setting the Layer Fill slider to 5%. Next took Belle Fleur called Rose Garden texture into Alien Skin’s Snap Art 4 and set it to Watercolor Abstract preset (Brush Size 81, Photorealism 58, Coverage 57, Stroke Length 62, Color Variation 43, and Default Brush Style. It was set to Soft Light blend mode. Added another texture, one of mine named SJ The Phyllis Sky (created with Grut’s Charcoal Shin Ding Brush – painted a texture background in three colors – blue, turquoise and brown – gave a lovely texture and cloud feel that was saved to use again). A Hue/Saturation Adjustment layer was clipped to the texture so it became purplish in color (Hue 292, Saturation 19, and Lightness -8). A layer mask was added to paint out a lot of the flower to bring through the warm color of the flower from the texture underneath. On a layer above some painting clean up was done on some of the petals. Added a New Layer filled it with 50% gray using the Edit -> Fill. Set it to Soft Light blend mode and used a black and white brush to paint back areas for lightening or darkening the image. Added a Curves Adjustment Layer to add back some contrast – painted in the layer mask to lighten the effect in the center of the flower. Added a Text Layer using the Dancing Script OT font – in layer style turned on the Bevel & Emboss default settings and a Stroke effect using the Structure Size of 18, and Fill Type Pattern – Graphic 09 at 47% Scale. A Canvas Vignette was added on top to give a painterly look. This flower was so pretty…..Digital Lady Syd
Blowing a Kiss
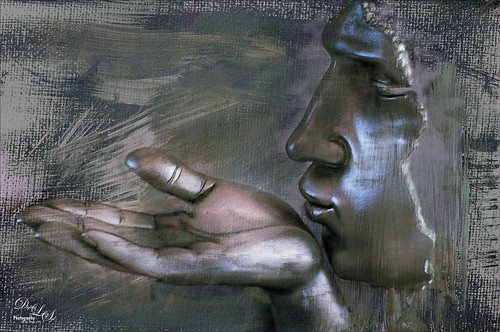
On my Fun Photoshop blog (see my Using a 50 mm Lens as a Macro Lens – Really? blog) recently I had two image taken as macro’s on the face of the above sculptor. Thought I would do another macro image, this time using my regular lens and not a flipped 50 mm lens, and get a little creative with the RAW file. This image was just basically post-processed in Lightroom using mainly the Basic Panel. Then in Photoshop Melissa Gallo’s Taupe Canvas (no longer available) was placed on the bottom, then a black layer mask was placed on the LR image on top. Just painted back in what I wanted to see using a couple different brushes at different brush opacities. Created a Darken Layer to outlines the focal point lines and a New Layer for a white Spotlight Effect on the face and hand. A Black and White Adjustment Layer set to Luminosity blend mode to adjust the colors. Then Blake Rudis’s action called 5 Tone Heat Map was used to add some more subtle color to the image – set to 88% layer opacity. I sort of like the feel of the image…..Digital Lady Syd
Smokestacks in New York City

The above image is from the Library of Congress and is an image taken of the Business District in Manhattan, New York City, cc1900. Shorpy.com showed it as a blog image and has posted some really interesting info about what buildings were in this original image. What intrigued me is the smoke from all the smokestacks and all the American Flags (I counted at least 160), most flying on top of the buildings. A lot of clean up was done first and the image had to be converted to RBG from Grayscale and reasonable size needed to be set. On a cleaned up stamped image (CTRL+ALT+SHIFT+E), Topaz Studio was opened and one of my uploaded Community presets (SJ Building Sharp) was applied. I did go through and tweak the four adjustments (Basic, Precision Contrast, Precision Detail, and Dehaze) in this preset, but it is pretty much the same settings. The last step in Topaz was to reduce the total effect in the sky – used a Mask Transparency of 0.33 with a brush and then added a Feather of 0.23 in the More Mask Options section. In Photoshop a Color Lookup FoggyNight preset added at 11% layer opacity and Linear Burn blend mode. Two textures from Flypaper were added: Alice set to Overlay blend mode and 100% layer opacity and Villa Adriana set to 36% layer opacity and Overlay blend mode. Last step was to open Nik Viveza 2 and add a little lightness on the buildings facing the sun and in the corners for a subtle vignette effect. Really fun picture to work with……..Digital Lady Syd
Feeling Happy
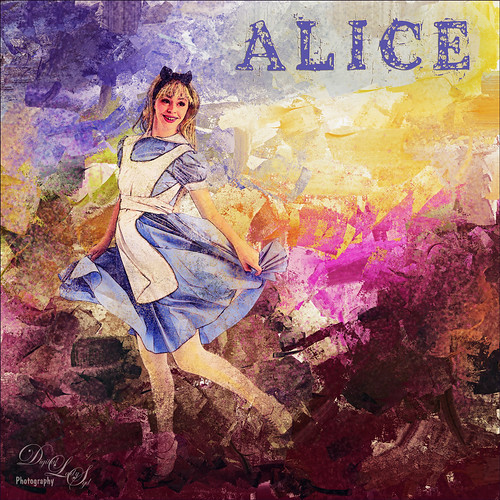
This is a composite image that I created using stock images and a texture I had created in Corel Painter. The beautiful Alice is from Faestock on DeviantArt. The first step was to create a New Document set to 8 inches X 8 inches at 300 dpi. Next the stock image of Alice was added and the girl was selected and removed from the white background. On this cut out image, an effect used by Corey Barker at Creative Live during the 2017 Photoshop Week was applied. I cannot seem to find another source for this effect but Corey has used similar effects in Photoshop User Magazine and a Kelby One blog. Anyway, the basic effect gave Alice a rather gungy look using different brushes in layer masks. The Alice layers were put in a group. Then the texture was added underneath the group. Selective Color Adjustment Layers and a Curves Adjustment Layer were used to blend this all together. Nik Viveza 2 was added to draw focus to her face. The font is the Old Printing Press Free Version. It is fun to make just a care-free image that makes you smile!…..Digital Lady Syd
The Red Lion in the Tower
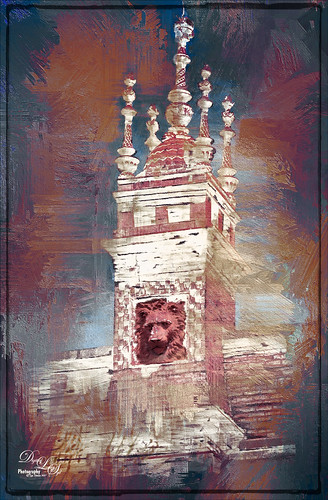
Took this image recently in St. Augustine of the back of the Alcazar Hotel (Lightner Museum) showing one of the beautiful red clay lions. Henry Flagler had these lions placed over both this hotel and the Ponce de Leon Hotel (now Flagler College) exteriors. To begin in PS, a free action by Chris Spooner called Engraved Effect Medium was used on the whole image. Lots of clean up with a mask. Then Topaz (see sidebar for website link) Impressions2 using a Van Gogh preset was applied and the effect was painted off back in PS on the lions face. Melissa Gallo’s Painted Textures Mist on the Lake (no longer available)) was applied twice – one set to Normal and one to Linear Burn at 55% layer opacity. A Hue Saturation Adjustment Layer was used to adjust the color. Then a stamped layer was created (CTRL+ALT+SHIFT+E) was placed on top and taken into Topaz ReStyle using the Cream and Plum preset (one of my favorites) was applied to the image and set to Hue blend mode at 76% layer opacity. On another stamped layer Nik Viveza2 was applied to adjust the contrast just right. Last step added just a simple line border. That was it. I love these beautiful clay lions – they are so striking!…..Digital Lady Syd
Just a Pretty Flower
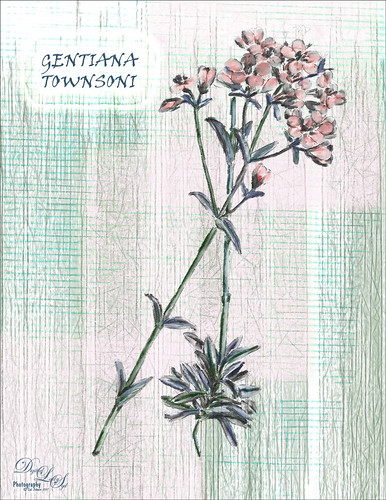
This pretty flower is from an old album called Illustrations of the New Zealand Flora (Plate 139) published in 1914. It was just a black and white line drawing and I added the color and texture. The image was removed from a page on the downloaded PDF file using the steps in my How to Create Vintage Text for Images Fun Photoshop Blog -just go towards the end for steps to pull images. I am afraid I took a little color liberty here as the volume says the flowers are actually white, but I liked the pink color. The flowers pink color was created by using a Curves Adjustment Layer’s individual Red channel with the layer mask filled with black (CTRL+I in the mask) – just painted in the pink on the petals – layer was set to Color blend mode. On a separate blank layer under the outline, painted in the green textures using Grut’s I Qwillo (I love this brush for drawing and painting!) and a Mixer blender to paint in the leaves and stem. Below that but above a white background layer a texture was painted – just experimented with a couple of my brushes and took just the texture layer into Topaz Studio. The Radiance filter was applied so the fine lines showed up – I thought it matched the line drawing effect of the flower. The font is Viner Hand ITC and an Outer Glow layer style with a Contour change was used to make the text stand out. The original outline was set to 15% layer opacity at the top of the layer stack. That was it. Lots of fun. I really enjoy looking at the old volumes of animals and plants. ….. Digital Lady Syd
Fog Rolling In
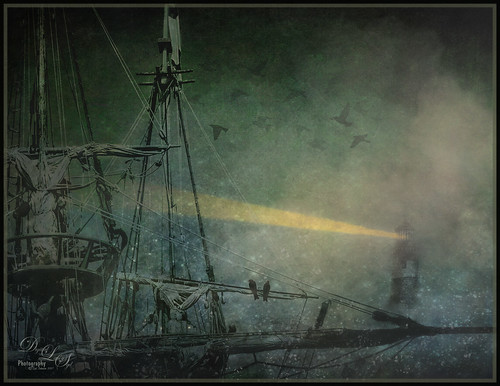
This image was created using several elements and textures – just a lot of fun to do! I have been sailing when the fog comes rolling in and I wanted that eerie feeling when it happens. The original boat element is one I took in London several years ago – it is an actual replica of the Golden Hinde – Sir Francis Drake’s galleon he sailed in 1578. In Lightroom the ship image had been converted to black and white before opening in PS. Next a New Document was created in PS and this image was loaded into it. The ship image was cropped and moved to the left side. Next Distressed Textures’s The Artist’s Palette Moody Earthtone texture was placed underneath at 25% opacity, and a Hue/Saturation Adjustment Layer was set above to make the texture less saturated and more of a blue-green tone. A Levels Adjustment Layer was clipped to the ship image (ALT+click between the layers). The lighthouse was added using some old clip-art from the Old Fashioned Nautical Illustrations book (#371). On a New Layer Obsidian Dawn’s Light Beam set Lighthouse Beam 1 was applied at 51% opacity. On another New Layer Lavender Designs Birds Nest Brush was applied – the two birds sitting on the sails. Jai Johnson’s Flybirds png2 was placed on another New Layer at 27% opacity – a layer mask was added and some of the birds were painted out. Then in the Properties Panel, the Density was set to 61% and Feather to 2.3 so the look like they are disappearing in the fog. Four Adjustment Layers were added: Hue/Sat for the yellow in the beam, Color Lookup Pastel 8 Hues set to 25% opacity, Levels to add contrast back, and another Color Lookup at 69% opacity using Blake Rudis’s preset Vintage Baby Blue. On another New Layer set to 26% opacity I used my old Cloud Text & Smoke Brush to add in more fog and haze. Using the Adobe Paper Texture Pro already supplied textures, 3 were stacked: Brush Rose set to Overlay at 67% opacity, Caspian set to Overlay 89%, and Touchtone set to Difference at 25% opacity. A Curves Adjustment Layer set to Luminosity blend mode and 61% opacity and was added to put contrast back into the image. Felt something was missing so I added 2 Lil’ Owls (see sidebar for website link) texture Cosmos 14 set to Multiply blend mode and 67% layer opacity – her star textures are some of my favorites! On a New Layer some of the spots from the texture below were painted out using my SJ Pastel 3 brush (see my How to Create My Favorite Brush blog). Topaz (see sidebar for website link) Lens Effects Fog filter was applied and set to the bottom right corner – in PS it was set to 66% layer opacity. Add a Red Channel Luminosity Curve. Then Nik Viveza 2 was opened and the final focal point was adjusted. I decided that I just did not like the way the fog looked, so with two brushes, Cloud Billoway and Cloud Heft from Gruts FX Cloud Set were both increased to a very large size and dabbed down to get the fog effect – then the layers were set to a very low layer opacity to give the dreamy fog effect. Clipping Hue/Saturation Adjustment Layers to each allowed for some color variation. In the last step I added one of my frame layer styles setting colors from the image. This turned out to be quite a project!…..Digital Lady Syd
Here comes the Sun!
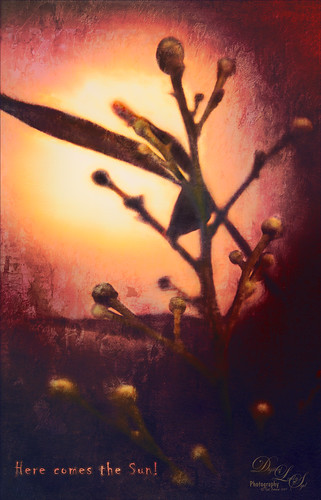
This is an image of some berries taken in my yard recently using my Lensbaby Composer, which give the soft effect. Mainly just a lot of work in Photoshop. This image actually uses three of one of my favorite texture people, French Kiss Textures (see sidebar for website links), to get this pretty effect: Atlelier Musing, Centre Ville, and Bohemian. Her textures are always beautiful and painterly. Lots of my standard adjustment layers were needed to get this effect along with a final adjustment in Nik Viveza 2. Also many layers of clean up and painting. Lots of fun but it took forever! Still, it is reminiscent of the Beatles song…..Digital Lady Syd
An Engraved Leaf
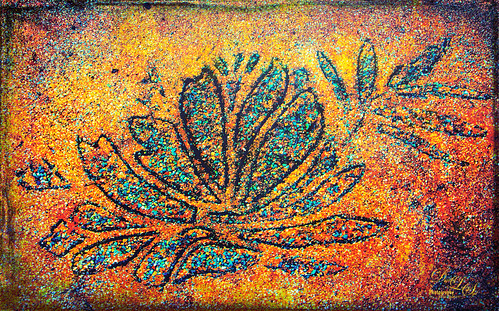
This image was taken at the Ormond Memorial Art Museum and Gardens of a pattern drawn into the sidewalk. The texture in the image was so nice, I decided to add a little pizzaz to it. First Topaz (see sidebar for website link) ReStyle preset Loulou and Mandy was applied. This gave it the bright orange and turquoise colors. Three adjustment layers were stacked: Color Lookup using Fuji F125 Kodak 2395, Levels, and Photo Filter using Cyan at 52% density. On a stamped layer (CTRL+ALT+SHIFT+E) Topaz Texture Effects2 was applied using a Dingy Cream preset. On another stamped layer, Nik Viveza 2 was applied to adjust corners. A Vibrance and Saturation Adjustment Layer was used. Then I decided to create a brush from the texture of a section selected using the Marquee Tool, turned to black and white, then painted out some more areas, and went to Edit -> Define Brush Preset. Now used the brush to paint in some added texture over the feather and flower and in blank parts of the image to add more texture. I really like the brush I created and hope to use it some more!…..Digital Lady Syd
An Urgent Plea
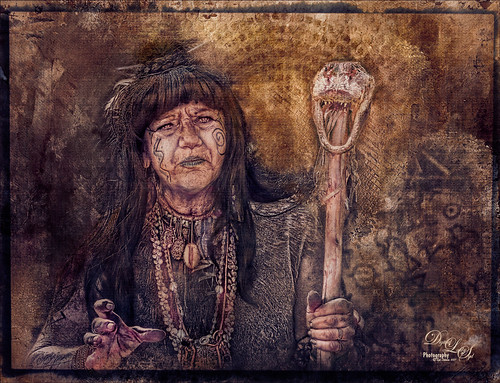
This is a lovely Native American woman I met at the recent Ormond Beach Native American Festival. She was actually doing a little presentation to the students from the local elementary schools on Native American traditions. I wish I could remember which was her tribe, but I would bet she is or was a teacher – very entertaining for the kids, and us adult kids too. Her expression reminded me of the past plight of the American tribes, and liked the fact that she represented how a female member would be attired. I can honestly say this image took me forever to finalize – just could not pull the whole look together. Finally the right textures fell into place and ended up just using my basic Photoshop workflow. Lucis Pro added the detail as an almost hyper-effect mode. Topaz (see sidebar for website link) ReStyle was used to get an interesting color palette and Topaz Texture Effects 2’s Fudge Brownie preset gave the vintage feel to the image. Then several clean up layers and of course, Nik Viveza 2 to draw attention to the face and the Alligator stick (hum). Needless to say, the kids loved that artifact. Just one image but three textures from 2 Lil Owls (see sidebar for website link) and one from Kim Klassen were used to get the final effect. Overall it turned out pretty much like I wanted…..Digital Lady Sy
Soaring into Summer
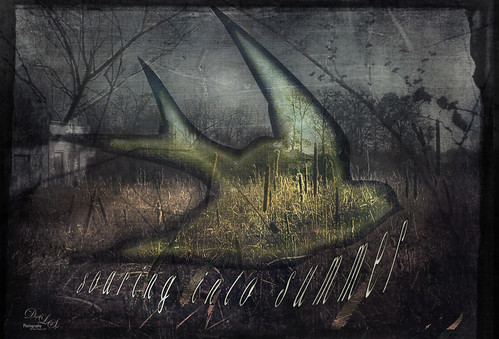
This image is a composite from a couple different photos and several textures. I have never tried any real grunge effect so this is quite a change for me. Basically lots of layering and adjustment layers to pull this together. The original image was taken across the street from my old home on Lake Wawasee (click to see the webcam) in Indiana and was a huge marsh of Pussy Willows at this time. Two 2 Lil Owls (see sidebar for website link) – Ancient 1 and Jewel Chalks 19. The font is Nomah Script and was warped to fit the bird. The bird is from Photoshop Creative magazine No. 12, and the foreground contains Midnightstouch Grasslands 3. Topaz (see sidebar for website link) ReStyle to get a better color adjustment. From Shorpy’s (my favorite vintage image site) an Abandoned Garage on Highway No. 2 in western North Dakota in October 1937. A layer mask was used to blend it in the background. A dark border was added and Nik Viveza 2 was used to adjust the final lighting effect. Lots of work on this one and I hope it conveys the effect I wanted of a bird soaring over the field and adding an element of warmth to the rather drab image……Digital Lady Syd
Building a Nest for the Future
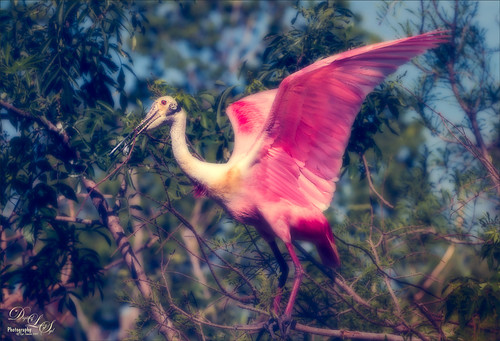
One of my favorite birds to photograph, partly because they are so funny. This Roseate Spoonbill had to work pretty hard to get the branch broken off the tree limb so his mate could add it to the nest at the St. Augustine Alligator Farm Rookery. The couples work very hard together getting it all just right. This guy was in such a busy background that I had to figure out a way to calm it down. Decided to go with a bit of a glamour look to soften the whole image down thanks to Sebastian Michael‘s action. (If you took his course, the link is in a recent e-mail.) I hope I get to find this guys nest and see the chicks that will be hatching soon. ….Digital Lady Syd
Tree on Fire
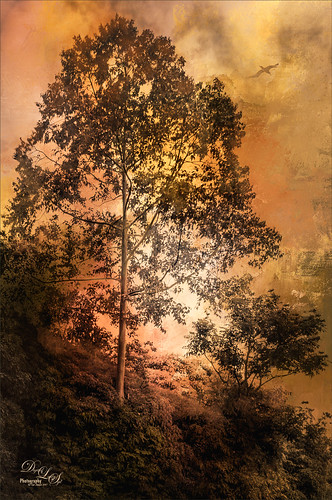
This image is from the beautiful drive on Maui called the Hana Highway. The tree was basically sitting alone on a hillside enjoying the wonderful weather, but somehow it turned into a rather dramatic image mainly due to the added texture. In Lightroom after watching a video by Serge Ramelli called Amazing Free Lightroom Presets!, his AA Drama Radial Circle Middle preset was selected. The Graduated Filter and Radial Filter settings were adjusted and moved. In Photoshop, the Background layer was duplicated and the PS Lighting Effects filter was used to add a little light in the top of the tree – was just trying it out. Think I like the Camera Raw Radial Filter better for this. Added the Flypaper Bird Brush Set-Albatross Fly Birds to the sky on a separate layer. Jai Johnson’s Daily Textures Explorations Texture 9 was used to create this rather glowing background effect. The layer was set to Multiply blend mode. A Red Channel Curves Adjustment Layer was added to modify the highlights. Nik Viveza 2 was opened and 7 control points were used to drive the eye toward the focal point and to give a slight vignetting effect. Also a little light could be scattered on the hill with this filter. A hoe-hum image has been turned into something rather spectacular!…..Digital Lady Syd
Ghostly Dandelion
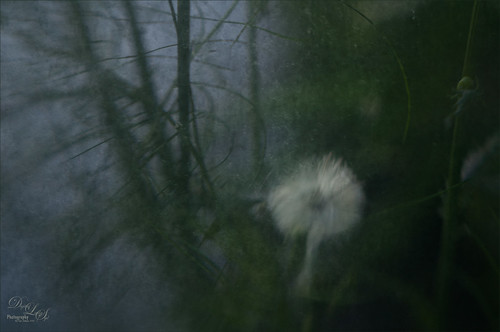
This is another in a series of Dandelion images I took of this humongous weed growing by my front door???? This time my old Lensbaby Composer was set it to F/4 with the +10 Macro Lens attached. In Photoshop all that was done was to add two free rust textures which can give an almost wintry feel to an image when the blend mode is changed. The first was called Texturez Rust Texture 3559 and set using Soft Light blend mode at 28% layer opacity – then a Hue Saturation Adjustment Layer was clipped to the texture (ALT+click between the layers to clip) and the Saturation slider was set to -100 to remove all the color of the texture, just leaving the pattern. A layer mask was added to the texture layer and just the Dandelion was painted out so it was no texture covered it. Next another texture called Hrt Rust Metal 7 was added on top and set to Hard Light at 31% layer opacity. Another Hue/Saturation Adjustment Layer was clipped to it and the Saturation slider was also set to -100. A Layer Mask was also set on this texture layer. The last step was to use the now free Nik Viveza 2 plug-in to further drive the focal point to the dandelion. The flower was brightened and structure increased while the corners of the image were slightly darkened to give a gentle vignette effect and drive the eye to the dandelion. That was it. I really like the moody feel to the image…..Digital Lady Syd
Little White Convertible
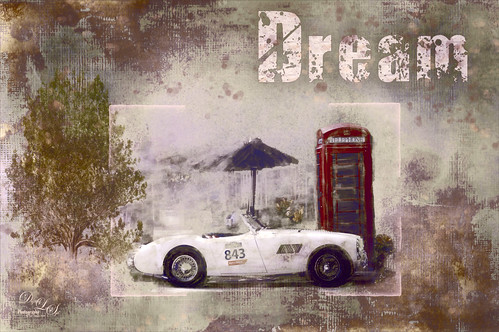
This is just a pretty little white car next to an old British Phone Booth in downtown Savannah, Georgia. Don’t know why I took the picture, but the car was so cool looking. This image really need to have a lot of background clutter removed, so one of my favorite texture people, 2 Lil’ Owls (see sidebar for website link) had a texture from their Mosiac Set called darcy. I also created an Oak Tree in Photoshop using the Filter -> Render -> Trees command. The Dream lettering is from Kim Klassen’s Dreamy Brush set. On layers above some paint splatters were added. The last step was to open a stamped layer (CTRL+ALT+SHIFT+E) and applied Topaz (see sidebar for website link) ReStyle, one of my favorite Photoshop plug-ins! Wish I owned that car!…..Digital Lady Syd
Hogwarts at Halloween
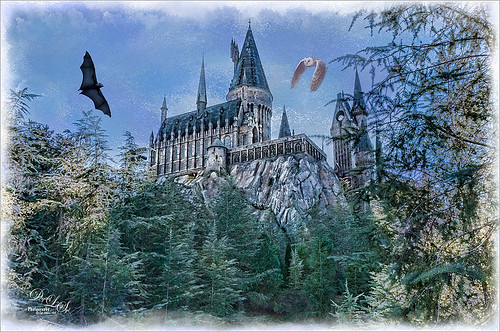
This image of Hogwarts School of Witchcraft and Wizardry at Universal Studios-Orlando was used to show how to get a bit of an illustrative look to an image using Topaz (see sidebar for website link) Adjust and Clarity and a Watercolor Texture for the sky. I actually just followed a really great tutorial by Leslie Nicole at French Kiss Textures (see sidebar for website link) that gave the exact steps and layers used. See her Before and After – Using a Watercolor Texture to see how it was done. (And check out her textures while visiting.) Both birds were by Midnights Touch – To the Bat Cave collection and Who Gives a Hoot collection to add a little holiday effect. I also added a watercolor border painted using my SJ WC Salt Brush set to 69 px to create. Lot of fun here and I really like the results!…..Digital Lady Syd
Some Texturing Fun!
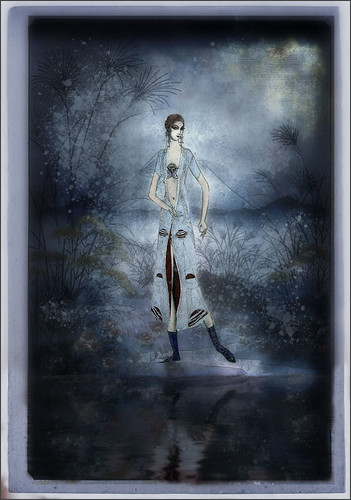
This image started out being what I thought would be just simple little layering image and instead turned into this rather complicated final image. I basically got the idea from reading one of my favorite blogs, First Night Design, where Sarah shared where she gets some of her images for doing her marvelous texturing – Ida Rubinstein as Istar by L. Bakst from 1924 and Kai Outsuki no hara from 1858. Basically cut out the lovely lady and put her in the oriental image. Used 2 Lil Owls (see sidebar for website link) Mosaic Sets Darcel Grunge texture twice – one set to Linear Light using the Blend If sliders to get the effect I wanted, and the second time set to Linear Burn at 67% layer opacity using Blend If sliders again. The elegant lady (extracted from her image using Topaz ReMask 5) was set on top. On a stamped layer Topaz Lens Effects (see sidebar for website link) Generous Diffusion preset was applied, and then Flaming Pear’s Flood plugin was applied to give the reflection. On a New Layer a speckle regular brush was used to create the painterly snow look on the image. That was the major work done on this image. I really liked the feel in the image……Digital Lady Syd
First Signs of Winter
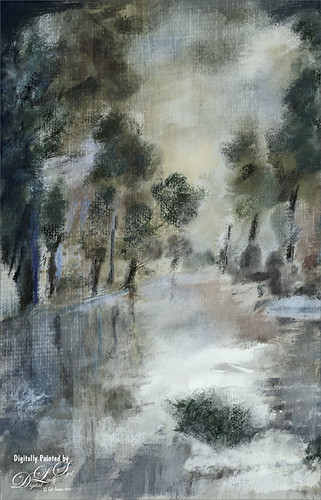
Totally enjoyed myself painting this little wintry scene. I think the recent hot weather in Florida has gotten to me! Used a very textured paper in Corel Painter 15 and mainly an Oil Brush and Blender that smeared some of the edges. In Photoshop used some of Grut’s brushes (these are a fabulous collection of brushes) to fill in where the trees did not look quite right. A texture was applied with no color (used a Hue/Saturation Adjustment Layer clipped to it and set Saturation slider to -100) to get even more texture. Last step was to add Topaz (see sidebar for website link) ReStyle Desaturated Warm III preset for the final color effect. It really is fun just to paint!…..Digital Lady Syd
Building a Home
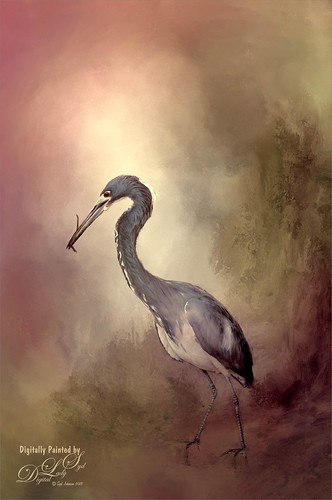
This beautiful Tri-Colored Heron was posing at the St. Augustine Alligator Farm Rookery, where he was actually building a nest as seen by the twig in his mouth. These birds are all over Florida and I probably see one at least once a day. This image used the same techniques from my recent blog called How to Get a Painterly Effect for Wildlife and Birds, especially as done with the Wood Stork image. This time two of my Painter textures were combined to get the sort of magical background effect. Topaz (see sidebar for website link) Adjust’s Summer preset was applied to a stamped (CTRL+ALT+SHIFT+E) version on top and on another stamped version Topaz Lens Effects Toy Camera Memories preset was applied. The Saturation was actually reduced a little in this section. It was pretty much the same workflow, just trying different textures and painting the bird on several layers. I really love my birds!…..Digital Lady Syd
Still Life Fun
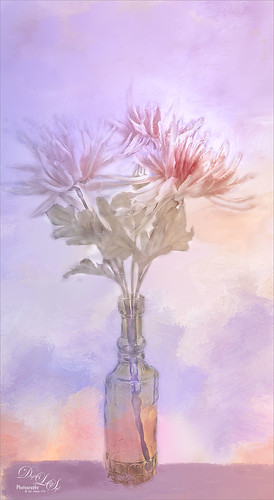
This is just a still life image I took a while ago of some flowers. Added one of my painted textures underneath, then with a black mask added to the flower layer, painted back in the flowers. The texture was copied twice and placed on top – one was set to Multiply blend mode at 54% and the other set to Color blend mode at 76%. A table and shadow were added using Grut Oil Rooster Suit brush. On a stamped layer (CTRL+ALT+SHIFT+E) Nik Viveza 2 was used to further bring out the color of the flowers. Several clean up layers were used and a few adjustment layers were added to create some contrast. I really love flowers….Digital Lady Syd
A Little Birdie Told Me So!
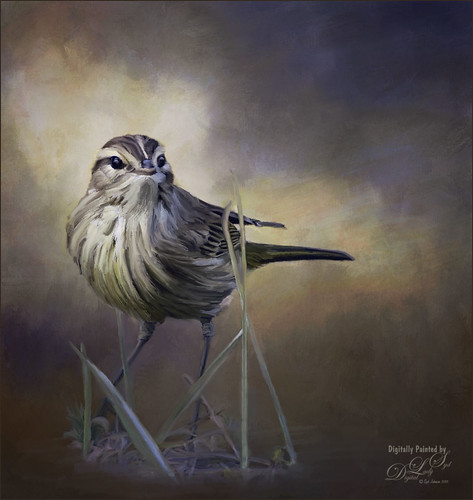
This was just a little bird I photographed near my home that was just walking around with a group of other little birds. He was placed under a couple painted textures, one I created in Painter and one by Jai Johnson called Clouds Over the Pasture. His eyes were brightened using the Exposure Adjustment Layer. Then on several different layers, the Mixer Brush was used to paint the bird. Finally on a stamped layer, Topaz (see sidebar for website link) ReStyle’s Smoke Gray Veil preset was used to give the different color effect. I love what this plug-in can do to an image! Next Nik Viveza 2 was used to direct the eye to the focal point. Another one of my textures was added on top and set to Overlay at 47% to add the really nice orange tones into the image. That was it – lot of fun here!…..Digital Lady syd
Jumping Whales
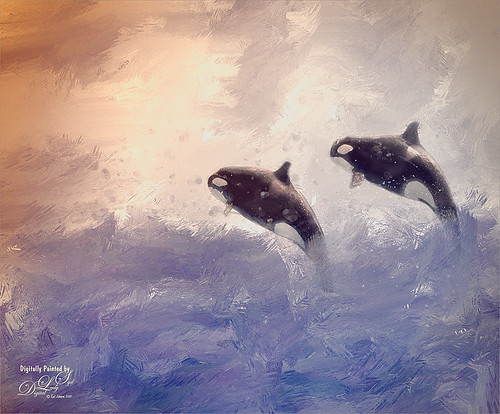
These Killer Whales were performing a few years ago at SeaWorld Orlando. I decided to place them in a water texture created in Corel Painter. I wanted them to look like they are in their natural environment. The biggest problem I had with this image was getting the lighting to look natural on the sharper whales. First the whales were painted through a black mask on top of my SJ Stormy Weather at Sea texture. Several adjustments layers were used to even out the tonal contrast and color. Then Topaz (see sidebar for website link) Lens Effects was used on a stamped layer (CTRL+ALT+SHIFT+E) and the Vignette Selective using the Golden Halo preset was used. Nik Viveza 2 was used the get rid of the color cast and turn the spots on the whale white. The texture was copied twice and placed on top of the layers – first set to Multiply blend mode at 49% layer opacity, and then set to Hard Light at 21% layer opacity. Some water splatter layers were created to get the water splashing effect using Aaron Blaise Water Splatter Brushes (all his brushes are fabulous!). On yet another stamped layer, Topaz Lens Effects was opened up again and the Toy Camera effect was chosen – used the preset Awesomeness for starters and tweaked it to get the correct sunlight effect. The last step was a Levels Adjustment Layer to even out the contrast. This was really a lot of fun to do!…..Digital Lady Syd
Horses Checking Me Out
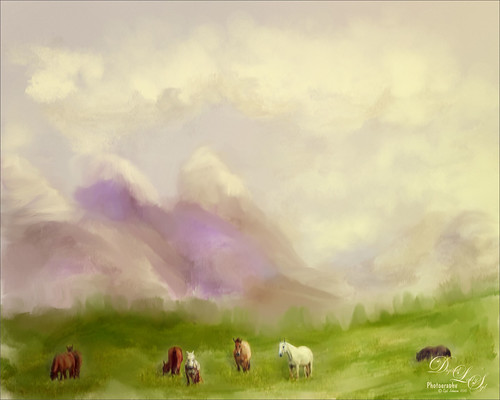
Created this image using a texture I painted in Corel Painter and a horse image from Belarus. This is basically just painting the horses into the texture by using a black layer mask on the horse image above. Then used Topaz (see sidebar for website link) Lens Effects Toy Camera filter Awesomeness I preset as a start, then applied the Reflector filter to lighten up the whole image. On a stamped layer Topaz Restyle was used and just the bottom colors were changed to darker tones. Then mainly just some clean up – love the the results……Digital Lady Syd
A Tricolored Heron That Fell in a Painting!
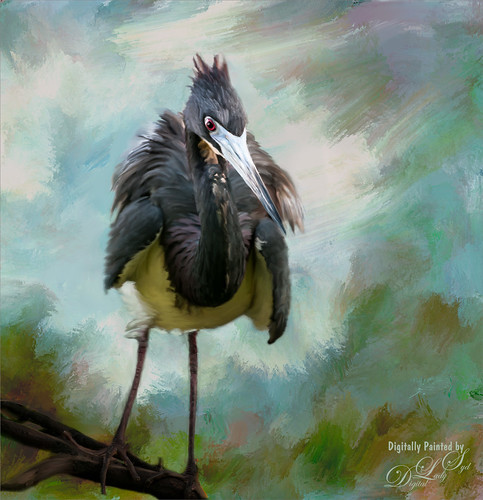
I seem to have an endless supply of these bird images from the St. Augustine Alligator Farm Rookery. It is such an incredible place to get bird images in the Spring. This is just another example of one of the magnificent birds hanging out looking for a mate. This time I actually used a layer mask to separate most of the bird from the tree limbs behind him. Since I was going to paint him, it did not have to be perfect. The bird was painted using Fay Sirkis’s (from KelbyOne) Precious Diamond Blender brush (her Mixer brushes are wonderful), then changing to it to add color when needed. This is my favorite brush for painting birds and has been used on most of my bird paintings. The texture is made up of two textures I created in Corel Painter 2015. Both textures used Quick Fix Color Brushes from Karen Sperling’s Artistry Quick Fix Video (#4 in this case) Series (check them out-and inexpensive way to learn Painter and she provides some of the best Painter brushes!), and the second also used a blender I created, and the other used Karen’s . They were placed underneath the bird and on a New Layer on top, the edges of the bird were blended into the texture. An Exposure Adjustment Layer (see my How To Do a Quick Eye Sharpening in Photoshop blog) was used to sharpen the eye. On a stamped layer on top, PS Camera Raw’s Radial Filter was used to add focus to the face and beak – painted out with the brush parts of body not to be emphasized. A Selective Color Adjustment Layer’s White Color was selected to make the white color behind the bird stand out just a little more – set Black slider to -37. That was it. I was pleased how the texture fits with the bird……Digital Lady Syd


